Learn how to draw Santa Claus with this simple step by step drawing tutorial. Learning how to draw can be exciting and this simple Santa drawing is perfect for the Christmas holiday. Learn how to draw a Santa hat and follow along to make this holly jolly Santa come to life on your paper.

RELATED: You might also want to make a Christmas tree drawing or keep drawing with one of these things to draw.
Once you have this simple Santa drawing mastered you can use him to make your own Christmas cards or homemade Christmas decorations. Download the drawing guide and get started.
Let’s start the Santa drawing
You can make this drawing your own by changing the position of the arms, adding a different beard or glasses, giving Santa his big bag of gifts to hold or adding a different fur trim to his coat and hat. (You could now change to a pen or colored pencils)
How to Draw Santa
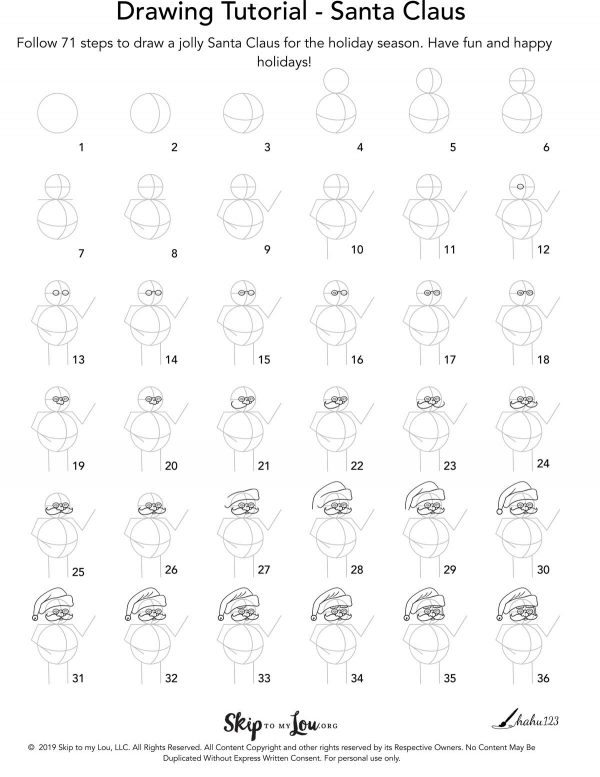
Steps 1-11 are guidelines to help you draw Santa easy. Draw these lines lightly with a pencil.
Step 1:draw a big circle (belly guide) – little tip: think of the circle as the face of a clock.
Step 2:draw a curved line vertically from the top to the bottom (from 12 to 6 o’clock).
Step 3:draw an inverted arch horizontally across the circle (from 9 to 3 o’clock).
Step 4:draw a second smaller circle on top of the first (head guide).
Step 5:draw a curved line vertically from the top to the bottom – from 12 to 6 o’clock (face guide).
Step 6:draw a straight horizontal line through the middle of circle 2 – from 9 to 3 o’clock (face guide).
Step 7:right underneath circle 2, draw a horizontal line for the shoulders – the same length as the width of circle 1.
Step 8:from the end of the shoulder guide, add a bent line for the first arm – e.g. downwards like Santa is holding his belly.
Step 9:at the other end of the shoulder guide, draw another bent line for the second arm – this time upwards to make Santa wave at us.
Step 10-11: at the bottom of circle 1 (at 7 and 5 o’clock), add straight vertical lines (leg guide).
Step 12: start with Santa’s glasses – along the horizontal and to the left of the vertical face guide, add an ellipse or circle.
Step 13: similar to step 12, add another ellipse or circle, just to the right of the guideline.
Step 14: connect the glasses with an arched line.
Step 15-18: add the eyes – inside the glasses, draw an arched line and add a small inverted arch underneath (each to the side where the nose will be).
Step 19: add the nose – draw an inverted 3-shaped line lying on its back – a small curve for the nostril.
Step 20: add a small curved line for the other nostril.
Step 21:add the mustache – draw a curved line from the bottom of the nose to the side of the face.
Step 22: add the top of the mustache – draw a flat s-shaped line from the side of the left nostril connecting it with the end of the line from step 21.
Step 23-24: add the mustache on the other side – draw the same shapes as in steps 21 and 22, just mirrored and slightly shorter as this side is a little bit turned away from us.
Step 25-26: add the mouth – draw two inverted arches for the lip.
Step 27: for the Santa hat drawing add the fur trim of Santa’s hat – maybe draw this step first with a pencil. Above his eyes (from 9 to 2 o’clock), add the fur, but do not complete the top left corner – this part will have the hat overlap. Draw a curved rectangular shape, rounded at the edges, or a cloud-like shape.
Step 28: add the top of the hat – draw a curved line going over to the left side of Santa’s head.
Step 29: draw the overlap and create the point of the hat- don’t connect the top – here we will add the bell.
Step 30: add the bell – draw a small circle at the point/ end of the hat.
Step 31: inside the circle (from step 30), draw a dot and a short line to indicate the bell.
Step 32: add some curved lines to indicate folds on the hat.
Step 33-34: add bushy eyebrows – right under the hat, draw little cloud-like eyebrows.
Step 35-36: from the hat to the mustache – draw a curved line parallel and another along the right side of Santa’s face (for his face and hair).
Step 37-38: For his hair on the left side, draw a flat s-shaped line (from hat rim to mustache) and another at the side of the head guide.
Step 39-43: add the beard – Santa is nothing without his long white beard, so draw a curly beard or a pointy one. Draw some curved c-shaped lines going from the hat to the middle of his chest (to the vertical belly guideline), from there, go up the other side with some curved and waved lines.
Step 44-46: under his lip, add three curved lines to indicate the fluffiness of Santa’s beard.
Step 47: add the first arm, to the left, draw a c-shaped line using the arm guide for positioning.
Step 48: add a curved line for the upper arm.
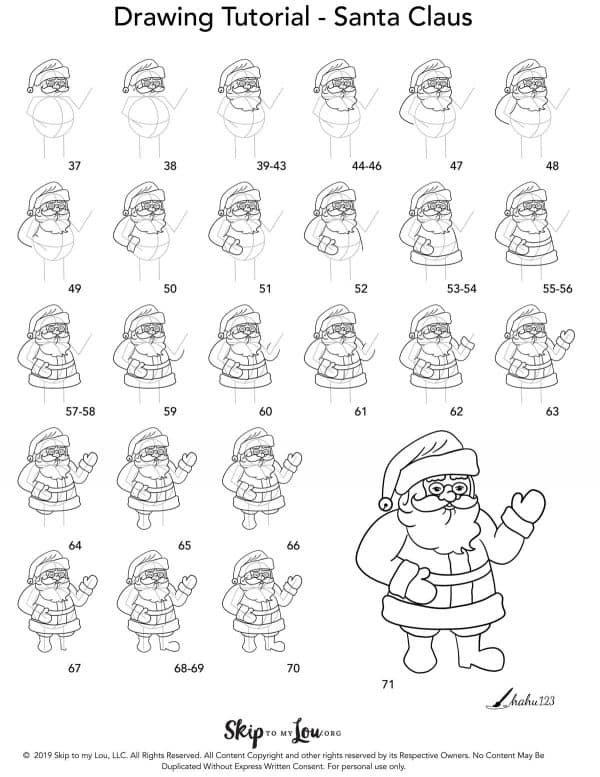
Step 49: add a short line for the other side of the lower arm.
Step 50: add the trim to the sleeve – draw a rectangular shape, rounded at the edges or a cloud-like shape.
Step 51: add the first hand/mitten – at the edge of the sleeve trim, draw a 3-shaped line with a very small top part and a bigger bottom.
Step 52: add the belly – draw along and then leave the right side of the belly guide. You can connect the line to the beard or leave a small space.
Step 53-54: add the coat trim – similar to the sleeve and hat trim, draw a long rectangular shape with rounded edges (or cloud-like) further down, but parallel to the horizontal belly guide. Connect the coat to the arm.
Step 55-56: add the belt – draw a curved line along the horizontal belly guide and another above and parallel to the first.
Step 57-58: add the fur trim along the middle of the coat – draw waved or cloud-like lines matching the rest of the trim.
Step 59: add the second arm – start by drawing a curved line for the elbow.
Step 60: add a short curved line for the lower arm.
Step 61: draw another curved line for the upper arm and shoulder.
Step 62: add the trim to the sleeve – draw a rectangular shape, rounded at the edges or a cloud-like shape.
Step 63: add the other hand/mitten – at the edge of the sleeve trim, draw a 3-shaped line with a very small top part and a bigger bottom part.
Step 64: add the first leg – underneath the coat trim, draw a curved line for the pants.
Step 65: add the first boot – along the leg guide, draw a bent line to each side (like a wide “greater than” and “less than” symbol) and connect them with a curved line.
Step 66: add the other leg – underneath the coat trim, and draw a curved line for the pants.
Step 67: add the other boot – start with the calf and heel and draw a long L-shaped line with a short line going back up at its end.
Steps 68-69: draw two curved lines for the sole and foot.
Step 70: draw a straight line for the shin – connecting the foot to the pants.
Step 71: To give details to the eye draw black dots for eyeballs or leave as is like he is laughing with eyes squinting. Erase the guidelines and add any details you like.
You are now all done with your drawing of a jolly Santa Claus ready to bring joy to all children and adults alike this holiday season. This tutorial merely serves as a basic example for an easy Santa drawing. The more you practice, the more you will be able to individualize the drawing. You can change Santa’s facial expression, his clothes, arm, and leg positions, add a bell to his hand or a big belt buckle on top of his jiggly belly. Omit or add any details you like.
my favorite drawing supplies
- Sketching Pencils
- Kneaded Rubber Eraser
- Sketch Pad
- Erasable Colored Pencils
- Fine markers
- Sketch and Drawing Art Pencil Set
- Artist drawing set (This is great for new and experienced artists. It’s also something I give as a gift.)
How to Draw Santa Video
More STEP BY STEP Tutorials
Now you know how to draw Santa and don’t forget, practice makes perfect so keep drawing with these ideas.
- How to Draw a Cat
- Dog Drawing
- How to draw a horse
- How to Draw a Unicorn
- Easy Rose Drawing
- Easy Flower Drawing
- Anime Face Drawing
- How to draw a turkey
Have fun drawing and happy holidays
I would love to keep you fully stocked with creative ideas, yummy recipes, fun crafts, and loads of free printables. Subscribe to Skip to my Lou to get new ideas delivered to your inbox. Follow me on Facebook, Pinterest, Twitter, and Instagram for all my latest updates.


Perfect to do with kids this year. Can’t wait to try it.
Such a great tutorial on how to draw Santa Claus! Thank you! 🙂
How fun! My kids and I had so much fun drawing this together. Thank you!