I’m so happy you are here! I love sharing easy ideas to brighten your day and help you be creative! Whenever you need a fun idea or creative activity please come visit me! I will keep you stocked with loads of crafty ideas and free printables.
How to Draw a Christmas Tree
Guidelines
(Step 1-4) Draw these lines lightly with a pencil.
Step 1: draw a straight vertical line.
Step 2: draw a tall/pointed triangle on top of the line (tree guide) – make it as big and wide as you like.
Step 3: starting at the bottom corners of the triangle and working upwards, draw inverted arches (branch guide) -generally, 3-5 or 6 should suffice.
Step 4: draw the star guidelines – start with a letter A without its middle line. Draw a horizontal line (about the same length as one side of the A) slightly above where the A’s middle line would be (the first third of the A). Now, connect the left bottom of the A with the right side of the horizontal line and the right bottom of the A with the left side of the horizontal line.
Let’s start drawing the Christmas Tree
You can make this drawing your own by adding different topper or ornaments, changing the position of the ornaments, or making a differently proportioned tree guide. (You could now change to a pen or colored pencil.)
Step 5: draw along the outer outline of the star.
Step 6: add the holder for the star – draw a simple triangle or a curved one.
Download here —-> Step by Step Easy Christmas Tree Drawing
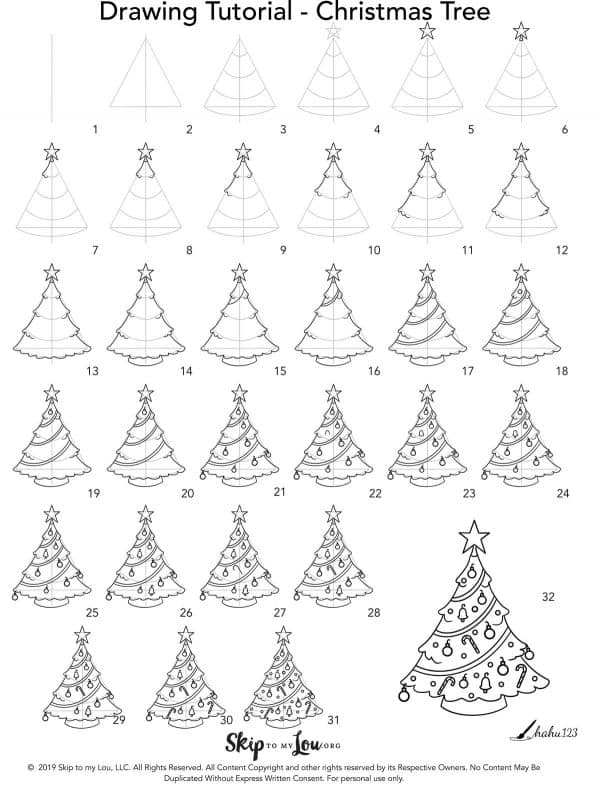
Step 7: add the first branches – roughly using the triangle tree and top branch guides, draw along the side and add a couple of bumps (or points/spikes) at the bottom to indicate the separate branches
.Step 8: similar to step 7, draw the top of the tree branches mirroring the one from step 7.
Step 9-12: repeat steps 7 and 8 for the remaining branches on both sides. Add more bumps or spikes as you reach the lower branches.
Step 13: add the bottom branches – similar to step 7, draw the branches, just this time, add more bumps (or points/spikes) along the bottom branch guide.
.Step 14: add the stand – at any desired width apart, draw two lines at a slight angle, and connect them with a curved line.
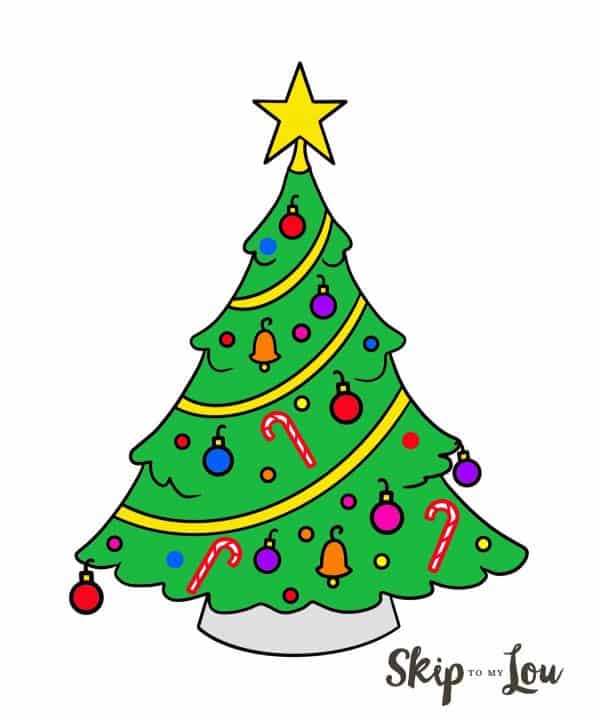
Step 15: time to decorate the tree – start with a ribbon/garland. Draw a curved line from the middle of the right top branches to the middle of the left branches below.
Step 16: draw a second curved line parallel to the one in step 15.
Step 17: wrap the ribbon/garland around the tree -repeat steps 15 and 16 for the branches below.
Step 18: add some baubles – start by drawing a circle.
Step 19: draw a small square on top of the circle (from step 18).
Step 20: draw a curved line/hook on top of the square(from step 19).
Step 21: repeat steps 18-20 and add many more baubles. Just leave some space for more ornaments.
Step 22: add a bell – draw an arch with long sides.
Step 23: similar to the stand (from step 14), draw the bottom of the bell.
Step 24: at the bottom of the bell, draw a small circle or semicircle for the clapper.
Step 25: on top of the bell, draw a curved line/hook.
Step 26: add as many bells you like, simply repeat steps 22-25
.Step 27: add a candy cane – draw the cane shape – a semicircle with a straight line extending from one side.
Step 28: draw the same shape – just smaller – inside the cane and connect the ends.
Step 29: add the stripes now or add the stripes with colored pencils/markers later.
Step 30: add as many candy canes as you like – just follow steps 27-29.
Step 31: add some lights – draw small circles in all the empty spaces. Little coloring tip: color a lighter shade of whatever the color of your lights will be around each light.
Step 32: erase the guidelines.
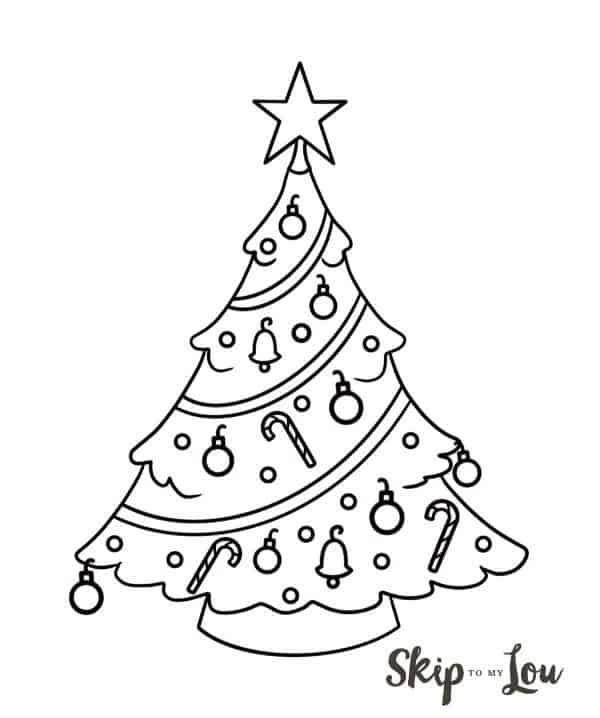
You are all done with your drawing of a fully decorated Christmas tree. Use colored pencils to color or decorate it – maybe with glitter or tissue paper! (affiliate link present)
This simple tree drawing tutorial merely serves as a basic example. The more you practice, the more you will be able to individualize the drawing. You can change the dimensions of the tree, draw more realistic branches, add little bows or gingerbread cookies, or draw gifts and goodies underneath the tree.
my favorite drawing supplies
- Sketching Pencils
- Kneaded Rubber Eraser
- Sketch Pad
- Erasable Colored Pencils
- Fine markers
- Sketch and Drawing Art Pencil Set
- Artist drawing set (This is great for new and experienced artists. It’s also something I give as a gift.)
Here is a video for even more help in drawing a tree step by step.
More Easy Drawings
Practice makes perfect! If you like this simple Christmas tree drawing, grab your pencils and give these drawings a try!
- How to draw a horse
- Easy Rose Drawing
- Dog Drawing
- Easy Flower Drawing
- How to Draw a Cat
- How to Draw a Unicorn
- Anime Face Drawing
- How to draw a turkey
I would love to keep you fully stocked with creative ideas, yummy recipes, fun crafts, and loads of free printables. Subscribe to Skip to my Lou to get new ideas delivered to your inbox. Follow me on Facebook, Pinterest, Twitter, and Instagram for all my latest updates.
LOVE IT!!!!!
cute
This is so cute! I love this easy step by step.
Great tips! I used this as a guide to draw on my chalk board.
Great tutorial. Very easy to follow. My kids and I had fun with it.
So fun!! My kids love drawing, so they will love this!!
Thank you SO much for this! My boys are always wanting me to do something like this and I don’t even know where to start. This came in so handy this morning. Thank you!
This also makes a nice pattern for relief woodcarving (chip carving.)