Want to learn how to draw a horse? Whether you’re a beginner or looking to improve your skills, this easy guide will walk you through each step of creating a beautiful horse drawing. From simple shapes to adding detail, you’ll be able to sketch your own realistic horse in no time. Let’s get started and bring your horse drawing to life!

Once you’ve completed your realistic horse drawing, why not try your hand at more fun things to draw? If you love coloring, check out these beautiful horse coloring pages. Plus, I have a great selection of coloring pages for teenagers with designs that everyone will enjoy!
This article contains affiliate links.
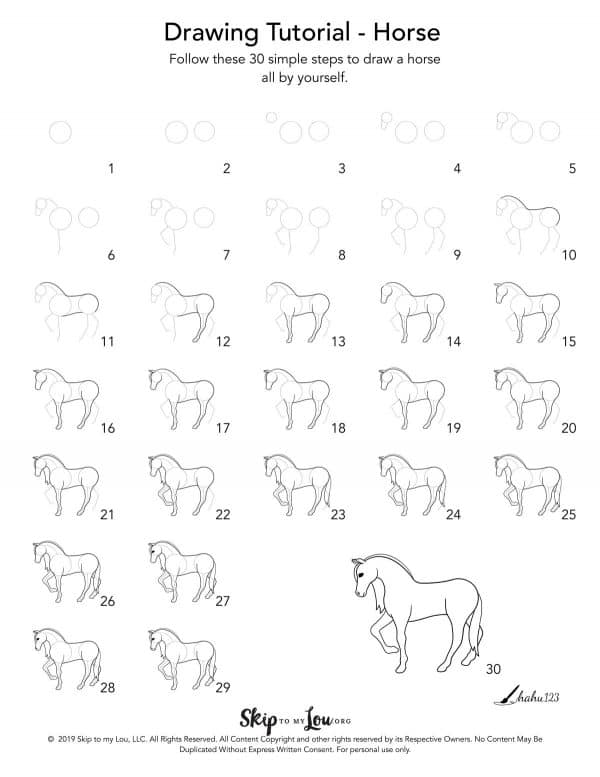
Easy Step By Step Horse Drawing Tutorial
Learn how to draw a horse easily with these steps. Begin with the Horse Body Guidelines (Steps 1-9)
Lightly sketch these lines with a pencil.
Step 1: Draw a circle (shoulder/chest guide) – little tip: think of the circle as the face of a clock.
Step 2: Draw a second slightly smaller circle to the right (back/behind guide).
Step 3: Draw a third much smaller circle to the left and above circle 1 (head guide).
Step 4: Add a long inverted/upside down trapeze shape at the bottom of circle 3 – at about 5:30 and 8 o’clock.
Step 5: Add a slightly curved line for the neck connecting circle 1 and 3 – start at 1 o’clock on circle 3 and end at about 11 o’clock on circle 1.
Step 6-7: Create the front leg guides – at the bottom of circle 1, draw each leg in three parts with two bends, bend the leg back at the knee and forward at the fetlock joint. We drew a standing and a bent leg (at 6 and 7:30 o’clock, respectively).
Step 8-9: Add the back leg guides – similar to the front legs, draw each guide in three parts with two bends, but here you will draw the bend for the hook forward as well as the bend for the fetlock joint. We drew two similar legs, one in front of the other (at 6 and 5 o’clock – circle 2).

Let’s start drawing. You can make this drawing your own by changing the position of the head, tail or legs, or the distance between the guides, or the facial features. (You could now change to a pen or colored pencil)
Step 10: Start with the neck and horse’s back – draw a curved/ arched line parallel to the neck guide (start slightly above circle 3 at nearly 12 o’clock, end at 1 o’clock on circle 1). Continue the line towards circle 2 to 11 o’clock, and draw along the circle till 5 o’clock.

Step 11: Add the belly – draw a curving line between circle 1 (at about 6 o’clock) and 2 (at about 7 o’clock).
Step 12: Draw the first hind leg – continuing the back line from step 10, draw around the leg guide. Add bumps at the hook, fetlock joint, and hoof. Keep drawing the line up into the body to indicate the thigh.

Step 13: Draw the first front leg – similar to step 12, draw around the leg guide. Add bumps at the knee, fetlock joint, and hoof. Continue the line into the body as well. This helps to show which leg is facing us.
Step 14: Draw a horse head and snout- similar to the legs, draw around the head guides and add bumps around the bottom of the trapeze to indicate the chin, mouth, and nostrils. (Make an outline around the guides, start at 2 o’clock on circle 3, around the trapeze, end at 11 o’clock).
Step 15-16: Add the first ear – in the space to the left of circle 3, draw a forward bent ear. Add details – draw a curved line inside the ear (from its point to where it meets the headline). This will show the inside of the horse’s ears.
Step 17: Add the forelocks – draw a curved line from the ear to the middle of the face (or as long as you like).
Step 18: With the forelocks in place, add the second ear – draw it behind the first in the same shape and style.
Step 19: Add the mane – draw a curved line along the neck. This will make it look like the mane is on the other side. For a long mane – see step 21.
Step 20: Continue the neck and add the horse’s chest – draw an arched line parallel to the neck guide connecting the circle 3 (at 3 – 4 o’clock) and circle 1 at 10 o’clock, continue along the circle to the leg.
Step 21: Add the mane – draw strands of hair or a few curved spikes.
Step 22: Add the second front leg – just as in step 13, draw around the leg guide, adding bumps at the knee, fetlock joint, and hoof. This time, do not draw inside the body.
Step 23: Add the tail – draw a long, waved tail.

Step 24-26: With the tail in place, add the second hind leg – behind the tail, draw around the leg guide, adding bumps at the knee hook, fetlock joints, and hoof.
Step 27: Add the eye – place the eye inside circle 3, at around 8 o’clock.
Step 28: Add the nostril – draw an inverted 6 or bean shape at the left bottom corner of the trapeze.

Step 29: Draw a simple line for the mouth. Step 30: erase the guidelines and add any finishing touches you like (e.g. lines for the hooves or horseshoes, texture for fur, strands for the mane and tail, saddle and reins, etc.) You are now all done with your first drawing of a majestic horse, ready to be colored or decorated!
This tutorial serves as a basic example. The more you practice, the more you will be able to individualize the drawing. You can change the facial expression, legs, mane, and tail, add markings, or add a mandala pattern for a fun coloring project. Omit or add any details you like. Have fun drawing.
How to Draw a Horse: Drawing Guide Step by Step
Use this printable download as your drawing guide. Follow the easy steps and you will be on your way to creating a hand-drawn horse by YOU!
Video Tutorial
Fun Facts About Famous Artists Who Drew Horses
Did you know some of the world’s most famous artists loved to draw horses? Here are a few fun facts:
- Leonardo da Vinci was not just a master painter; he also sketched horses! He created a famous outline of the horse for a statue he planned but never completed. This horse’s legs were drawn with incredible detail.
- Frederic Remington was known for his artwork depicting Native Americans and horses, capturing the wild spirit of the American West in his sculptures and paintings.
- Andrea Mantegna was another artist who used curvy lines and careful shadows to depict horses in his paintings, adding a sense of life and motion to his work.
- Albrecht Dürer, a German artist, is known for his studious approach to animal sketches, including horses. His perspective and attention to the cheek and muzzle of horses were groundbreaking in his time.
- Raphael, one of the great Italian Renaissance artists, also drew horses with great care, paying attention to angles and using rectangles and ovals to shape the horse’s body.
Now that you know a bit about artists who loved to draw horses and have the steps to create your own, grab your crayons or markers and start sketching! Whether you’re creating an artwork for your wall or just having fun, drawing horses is a fantastic way to improve your skills and learn about art history along the way!
My Favorite Drawing Supplies
- Sketching Pencils
- Kneaded Rubber Eraser
- Sketch Pad
- Erasable Colored Pencils
- Fine markers
- Sketch and Drawing Art Pencil Set
- Artist drawing set (This is great for new and experienced artists. It’s also something I give as a gift.)
More Things to Draw!
After you have made a horse sketch, keep drawing. Practice makes perfect! Grab your pencils and give these drawings a try!
- Easy Rose Drawing
- Dog Drawing – You will find drawing animals is so much fun!
- Easy Flower Drawing
- How to Draw a Cat
- How to Draw a Unicorn
- Anime Face Drawing
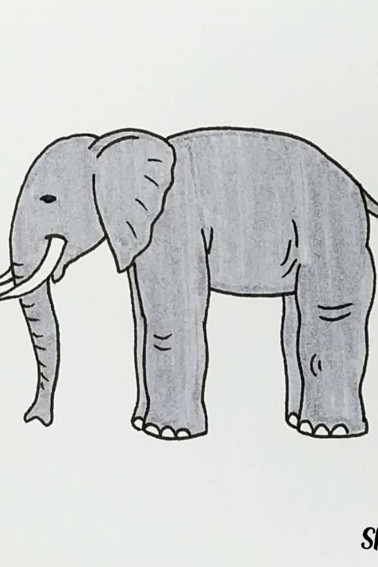
- Elephant Drawing
Coloring is another way to use those colored pencils. Color your stress away with Mandala Coloring Pages.
I would love to keep you fully stocked with creative ideas, yummy recipes, fun crafts, and loads of free printables. Subscribe to Skip to my Lou to get new ideas delivered to your inbox. Follow me on Facebook, Pinterest, Twitter, and Instagram for all my latest updates.


it was fun drawling animals And I love it is was pretty hard but that is what makes it so good😊
Looks good and you made it easy to judge proportions. Thank you.
Thanks, I am so glad you liked it! Please check out the other easy drawing tutorials.
This was a great tutorial!!