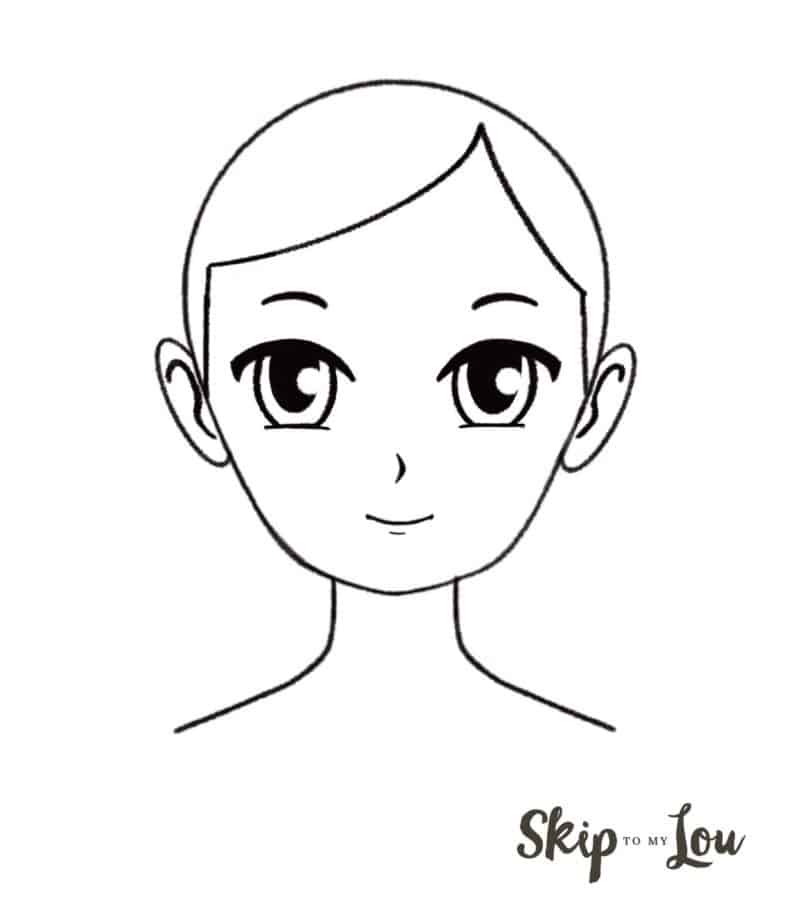
Learn how to draw an anime face from beginning to end—even if you have zero drawing experience. An anime, the Japanese cartoon video character has enlarged eyes and head and simple facial features with basic shapes.
Follow along below and download our free step by step guide for drawing manga and anime style faces! If you are looking for more things to draw, we have more easy drawing tutorials for kids and adults with step-by-step guides.
How do you draw anime faces step by step?
It’s easier than you think to create cute anime characters loaded with personality! In this step by step tutorial, our anime-style face has very simple proportions, which will help you recreate any face and individualize it to your liking for an anime girl face or boy.
The anime face is broken into 4 sections along the centerline. The eyes and ears are placed below the horizontal middle line at 1/2 of the center line’s length (step 7). Only using the lower part of the head, below the horizontal middle line (1/2 of the head length), the face is then broken into 2 sections at 1/4 and 1/8 of the centerline (step 8 and 9, respectively) for the nose and mouth.
—-> Download and Print Anime Drawing Guide

Anime Face Drawing
Draw lines lightly with a pencil.
Anime head
Step 1: draw a circle to start the head and face.
Step 2: add an arch at the bottom left side of the circle (this curving line will guide you for the chin).
Step 3: draw a second arch mirroring the one in step 2.
Step 4: draw a vertical line going down the center of the circle and chin lines.
Step 5: add a horizontal line underneath the chin.
Step 6: add a horizontal line at the top of the circle/ head.
Step 7: add a horizontal line in the middle of the head (guide for the eye and ear placement).
Step 8: add a horizontal line at 1/4 of the length of the centerline (guide for the nose placement).
Step 9: add a horizontal line at 1/8 of the length of the centerline (guide for the mouth placement).
Step 10: draw the outline of the head along the guidelines (circle and chin).
Let’s start this anime sketch! You can make this drawing your own by making the facial features as big or small as you like. (You could also now change to a pen or colored pencil.)
Step 11 (optional): add a hairline of your liking (above 1/2 or 3/8 of the centerline). Skip this step or add a different hairstyle.
Step 12: add an arch for the neck and shoulder anime head base.
Step 13: add a second arch mirroring the one in step 12.
Draw the ears
Step 14: add an ear (a partial oval) between the 1/2 and 1/4 lines.
Step 15: add a second ear (a partial oval) between the 1/2 and 1/4 lines mirroring the one in step 14.
Step 16: draw an upside-down, mirrored s-shape to add the ear detail.
Step 17: draw an upside down s-shape to add the ear detail (mirroring the one in step 16).
Draw the eyes
Step 18: draw a thick arch underneath the horizontal middle line for the eye.
Step 19: draw a second thick arch underneath the horizontal middle line for the eye (mirroring the one in step 18).
Step 20: draw a circle, oval, or an oval shape with a straight flattened bottom (as in the example) under the arch (step 18) for the pupil and iris.
Step 21: mirroring the one in step 20, draw a circle, oval, or oval shape with a straight flattened bottom (as in the example) under the second arch (step 19) for the pupil and iris.
Step 22 and 23: add a line or arch underneath each anime eye.
Step 24: add an oval or circle for the pupil – to make it look like the eye is looking straight at you, place it in the middle of the shape drawn in step 20 and make it overlap/come out of the arch.
Step 25: add another oval or circle for the second pupil the same way as in step 22.
Step 26 and 27: add highlights to the pupil and iris.
Step 28 and 29: above the horizontal middle line (1/2 line), draw an arch for each eyebrow (mirroring each other).
Draw the nose
Step 30: draw a small sideways arch, half circle, arrow shape, or simple line for the anime nose.
Step 31: draw an arch for the mouth – make it smile (inverted arch), frown (arch), or neutral (horizontal line or a dot). Step 32 (optional): add a second, much smaller (inverted) arch under the mouth line to hint at the lower lip. You can add another small (inverted) arch mirroring this one above the mouth line to indicate the upper lip.
Step 33: erase the guidelines.
my favorite drawing supplies
- Sketching Pencils
- Kneaded Rubber Eraser
- Sketch Pad
- Erasable Colored Pencils
- Fine markers
- Sketch and Drawing Art Pencil Set
- Artist drawing set (This is great for new and experienced artists. It’s also something I give as a gift.)
How to Draw Anime Face Video
You now know how to draw an anime face. The more you practice, the more you will be able to individualize the facial features, make a thinner or more masculine chin, make smaller or bigger eyes, make the eyes look to the side, up, or down, give a variety of hairstyles, etc.
This tutorial gives the basic anime face template so you can draw more anime characters. You can change it and make it your own in no time. Keeping the same anime face shape, you can easily try different anime hair styles. If you want more practice drawing eyes here are some tips for drawing eyes. You can also practice learning how to draw anime mouths in different expressions.
Are anime and manga the same thing?
No, anime and manga are not the same. Both originate in Japan, but one major difference that one is a video and one is a book form of cartooning.
Manga, which could be literally read as whimsical drawings, are Japanese comics. Think a book of cartoons. Anime, which means animation, are Japanese animated cartoon videos.
Looking for a unique handmade gift idea? You can draw your family and friends in this manga style as a framed portrait or as part of a handmade card.
Have fun drawing!
Love Drawing? Try these easy tutorials.


Thank you for sharing this information and for the printable sheet! I am excited to give this a shot! and for explaining the difference between Manga and Anime! So simply! I have this desire to be onboard with my grandsons and their interests and this post information will sure help me do just that! I love your blog, work!