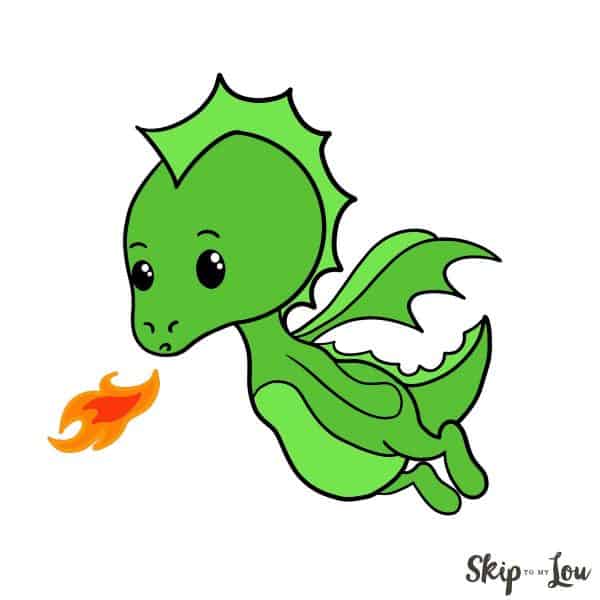
Dragon drawing doesn’t have to be complicated. Follow these easy steps and learn how to draw a dragon step by step. This adorable flying and fire breathing dragon can be an easy dragon drawing starting with a few basic shapes.
My daughter and I have been trying our hand at drawing some mystical creatures and we just love this simple dragon drawing. If you like drawing animals make sure that you check out these things to draw. You’ll find an adorable puppy, kitten, unicorn, and much more but my favorite is the sunflower!

How to Draw a Dragon Step by Step
Here is how to draw a dragon easy! This step by step drawing guide will help you create a cartoon dragon. Okay, let’s get started with this baby dragon!
Download —–> Printable Dragon Drawing Guide
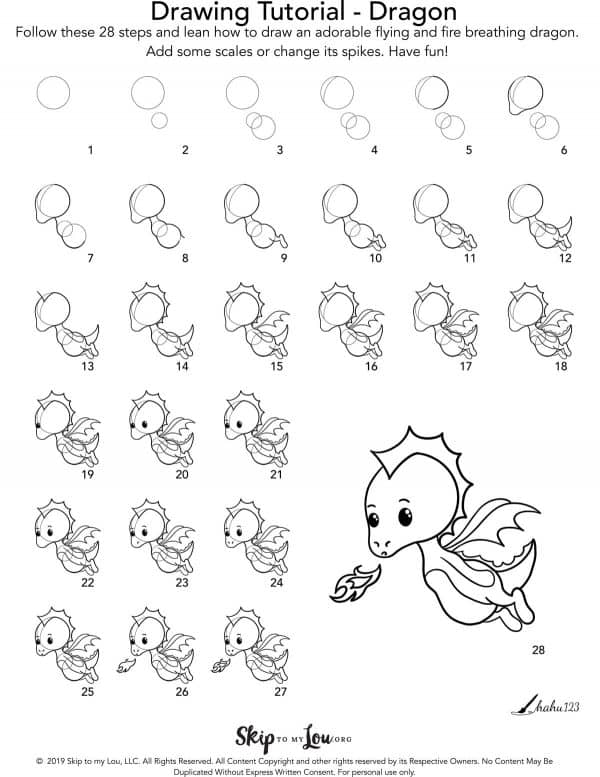
Guidelines (Step 1-4)
Draw these lines lightly with a pencil.
Step 1: draw a circle (head guide) – little tip: think of the circle as the face of a clock.
Step 2: draw a second slightly smaller circle to the right, below the first (chest guide).
Step 3: draw a third circle overlapping the second on the
right side (belly and back guide).
Step 4: for a face guideline, draw a curved/arched line from the middle of the top of the head guide to a third of the circle to the left. If you look at the circle as a clock, you’d draw the line between 12 and 8 o’clock.
Let’s start drawing
You can make this drawing your own by changing the position of the wings, tail or feet, or the distance between the guides, or the facial features. (You could now change to a pen or colored pencil)
Step 5: start right at the top of the head guide and draw a half circle on the right side, from 12 to 6 o’clock.
Step 6: from the bottom middle to nearly the top of the head ( from 6 to 10-11 o’clock) draw the dragon’s little nose/snout and forehead. To draw the forehead, you should leave the head guide and draw it parallel to the face guideline. Now you have the dragon head. Now on to the dragon body.
Step 7: draw the neck and belly of the dragon – start at the head (from the bottom middle/6 o’clock) and draw along the second and third circle (up to 4 o’clock/ a third of the circle to the right).
Step 8: similar to step 7, draw the neck and back of the dragon – follow along with the guides, but do not connect the back line with the belly, instead add a small upward curve at around 3 o’clock for the first hind leg.
Step 9: add the first hindfoot – from the curve created in step 8, draw a foot to your liking. Since this is the foot facing us, you can draw the line inside the circle to indicate the knee. We drew a bean-shaped foot with another inverted arch/curved line to complete the leg.
Step 10: draw a second, smaller hind leg and foot (the same style) below the first – the foot will be away from us, so keep the line connected to the circle, but do not draw inside the circle.
Step 11: starting from the top where circle 2 and 3 meet, draw the first front leg – any style you like. We drew a simple leg with a thicker bottom to indicate the front foot.
Step 12: above the first foot, draw the tail – we drew a curved, pointed tail.
Step 13: we are now ready to draw the spikes – starting at the top of the head, draw an outward curved v-shape along the face guideline, in between the empty space (between 12 and 10-11 o’clock).
Step 14: draw curved spikes starting at the left side of the curved v-shape along the top and back of the head all the way to the dragon’s neck.
Step 15-16: add wings to the back of your dragon – we drew a flat s-shaped line with similar spike shapes matching the rest of the spikes.
Step 17: with the wings in place, we continue drawing the spikes along the back all the way to the tip of the tail.
Step 18: add a belly plate by drawing a curved line over the chest to the first hind leg.
Step 19: draw the first eye right where the bottom of the face guideline meets circle 1. A little tip: leave 1-2 small circles for highlights.
Step 20: draw the second eye a little bigger than the first – place it to the right and slightly higher to the first. Add the same highlights.
Step 21-22: add eyebrows – draw small arches above the eyes.
Step 23-24: add the nostrils – draw small curved lines.

Step 25: add the mouth – any style you like. We drew a small arch, so it looks like the little dragon is breathing fire.
Step 26-27 (optional): add fire – draw the flame and add a second smaller, less detailed shape inside it.
Step 28: Finish the drawing by erasing the guidelines.
You are now all done with your first easy dragon drawing. Hopefully, you have a cute little flying and fire-breathing dragon. Now, it’s time to color or decorate it – maybe with glitter or sequins!
my favorite drawing supplies
- Sketching Pencils
- Kneaded Rubber Eraser
- Sketch Pad
- Erasable Colored Pencils
- Fine markers
- Sketch and Drawing Art Pencil Set
- Artist drawing set (This is great for new and experienced artists. It’s also something I give as a gift.)
This tutorial serves as a basic dragon drawing example. The more you practice, the more you will be able to individualize the drawing. You can change the expression of your little dragon – change the facial features, draw different spikes or wings, add a different tail. Omit or add any details you like. Have fun drawing!
Make More Great Drawings
Create great drawings with these easy drawing tutorials. You will soon be drawing everything from flowers to animals.


This is so fun! My son will love working on this after school one day this week!
Paige