Learning how to draw a unicorn is easy with this step by step drawing tutorial. In no time at all, you can make a beautiful unicorn drawing.
Keep drawing with these fun things to draw.
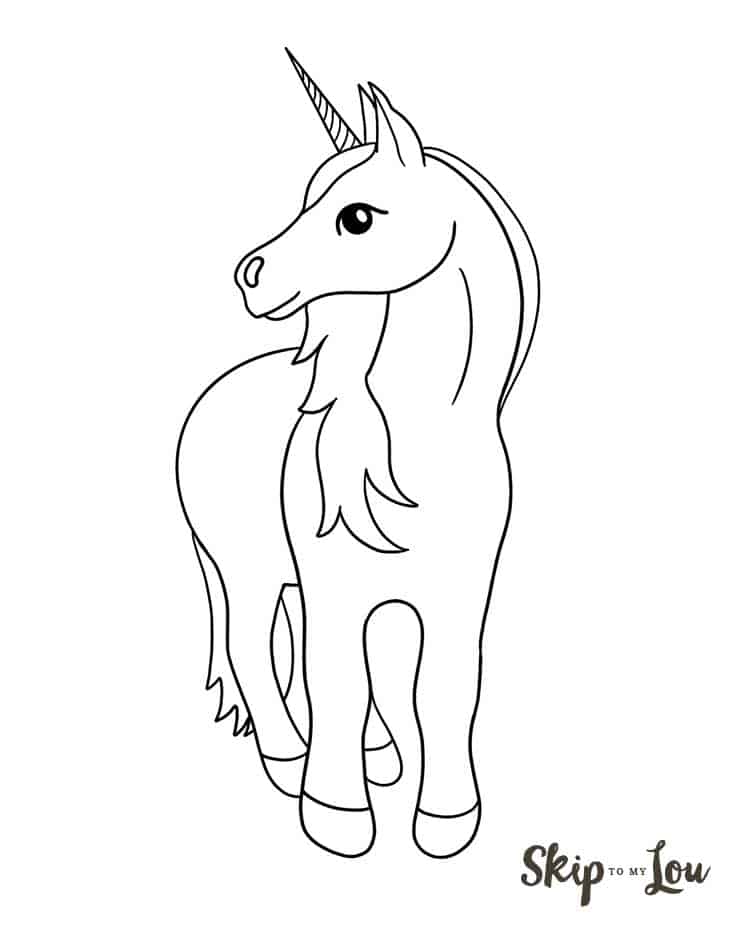
How to Draw a Unicorn
Draw a cute and easy unicorn with this simple guide.
Download —> Printable Drawing Guide
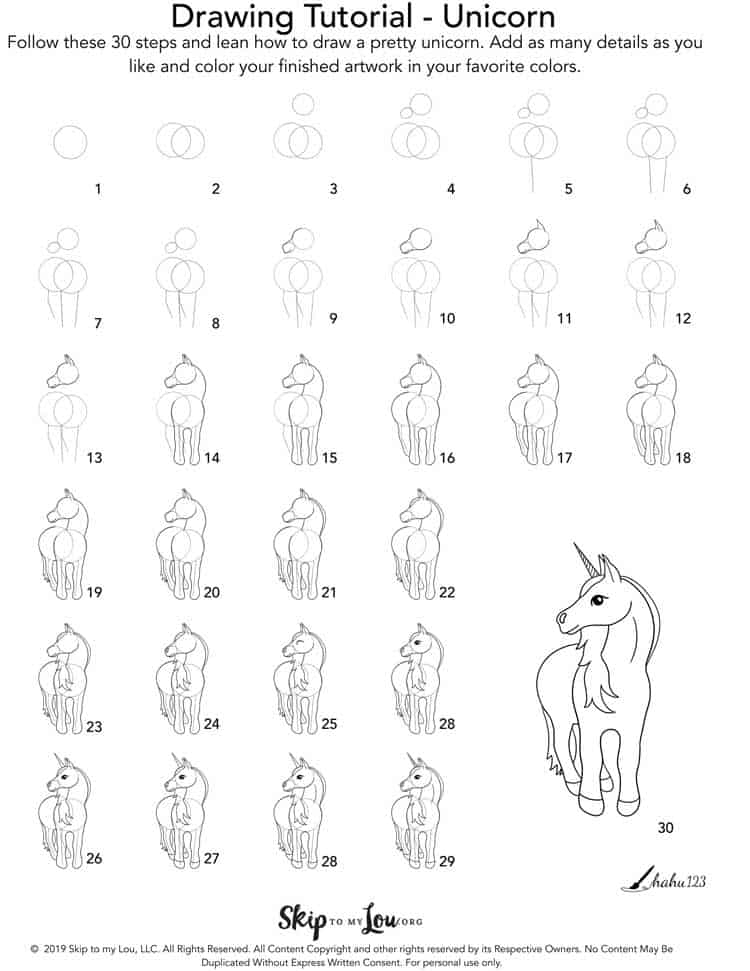
How to Draw a Unicorn Step By Step
Start by lightly drawing unicorn guidelines. These are the trick to a cute unicorn. No need to only make a black and white drawing. Grab some colored pencils (some of our favorite pencils -affiliate link) to make happy drawings of cute unicorns.
(Steps 1-8 draw these lines lightly with a pencil.)
Step 1: Draw a circle (This is the back/body guide).
Step 2: Add a slightly smaller circle overlapping half of the first and slightly lower than the first (This will be the shoulder guide).
Step 3: Draw a third much smaller circle above where circle 1 and 2 meet (head guide).
Step 4: Add a small oval on the lower side of circle 3 and above circle 1.
Step 5: At the bottom, where circle 1 and 2 meets, draw a vertical line (leg guide).
Step 6: At the same height, but on the opposite side, draw the same line mirroring the one in step 5. Both lines can be parallel, we drew them closer together at the bottom.
Step 7: At the bottom of circle 1, slightly to the side, draw a bent/angled line – bent in the middle at approximately 150 degrees.
Step 8: Slightly to the side of where circle 1 and 2 meets, draw the same line mirroring the one in step 7.
Let’s start drawing! you can make this drawing your own by changing the position of the head, legs, and facial features. (You could now change to a pen or colored pencil)
Step 9: starting slightly off the top of circle 3, draw a line along the side of circle 3 and the oval, continue the line inside the oval to form the upper lip of the unicorn. A little tip: don’t just trace the oval, but add a slight bump where the nostril is.
Step 10: Along the bottom side of the oval and circle 3, continue the line for the unicorn head.
Step 11: Add the ear; starting at the top of circle 3, draw a slightly bent line upwards, and draw a double arch back down – you can also just draw a pointy triangle shape.
Step 12: Add a line from the top of the ear down to add detail and depth to the ear.
Step 13: Add a second ear behind the one you created in step 11 – draw the shape the same way you did for the first ear, just a little to the side and smaller.
Step 14: Starting at the top of circle 3, draw an arched line to the side of circle 2, continue along circle 2 and around the leg guides, and back up along the other side of circle 2. Add small bumps for the knees and hooves and don’t close circle 2, leave the top third open.
Step 15: Add a curved line from the bottom middle of circle 3 to where circle 1 and 2 meet. This completes the neck.
Step 16: Starting at the top of circle 1, draw along the circle and around the leg guide. Complete the entire leg or continue with step 17. Add bumps for knees and hooves as in step 14.
Step 17: Finish the first hind leg,
Step 18: add the last leg – draw around the leg guide without drawing over any previously drawn outlines.
Step 19: next to the hind leg from step 16/17, add the tail – draw a line with pointy ends to indicate hair.
Step 20: Finish the tail.
Step 21: Add a curved line nearly parallel to the neckline for the mane.
Step 22: Over the forehead, add a curved line for the mane.
Step 23: Between the top of circle 1, the chin, the neck and shoulder line, add the mane – any style you like.
Step 24: Add a bean shape along the side of the oval to create the nostril.
Step 25: From the middle of circle 3, add a curved arch for the unicorn eye – upper eyelid.
Step 26: Add a circle for the pupil connected directly to the upper eyelid. A little tip: leave a small oval or circle for the highlight in the pupil.
Step 27: Create the unicorn horn – add a pointy triangle shape to the forehead of the unicorn.
Step 28 (optional): Add details to the hooves.
Step 29 (optional): Add detail to the neck.
Step 30 (optional): Add details to the horn.
Step 31: Erase the guidelines.
You are now all done with your first drawing of a unicorn. This tutorial merely serves as a basic example. The more you practice, the more you will be able to individualize the drawing. Draw the mane on the other side and omit or add any details to make it your own. Exaggerate the features to make it into a cartoon unicorn.
Use your imagination to draw a fairy tale with cute cartoon unicorns. This cute unicorn drawing is easy and perfect art for kid’s projects.
my favorite drawing supplies
- Sketching Pencils
- Kneaded Rubber Eraser
- Sketch Pad
- Erasable Colored Pencils
- Fine markers
- Sketch and Drawing Art Pencil Set
- Artist drawing set (This is great for new and experienced artists. It’s also something I give as a gift.)
If you’ve tried this drawing tutorial or any of the others on my blog, please let me know what you thought in the comments below! I love hearing from you! You can also FOLLOW ME on FACEBOOK, INSTAGRAM, and PINTEREST to see more delicious food and what I’m getting up to.
More Easy Drawing TuTorials
If you loved this easy unicorn drawing try these easy drawing ideas.
Unicorn Crafts
Love Unicorns? Try these fun unicorns for kids ideas …
- Stick Unicorn (with printable template)
- Unicorn Valentines
- Unicorn Valentine Box so fun just print of the features and attach to a box
- Printable Unicorn Birthday Card (a great way to wish someone a magical day)


Could you please create a tutorial on “How to Draw a Hippogriff” that combined with a golden eagle and a racehorse on April 25, 2022?
I have trouble drawing a stick figure on a good day. You make drawing a unicorn seem like something I might actually be able to accomplish if I sit down and try.
I love this! My kids love drawing and I think they will love this. Thanks so much, can’t wait to try it with them!
My littlest is going through a unicorn everything phase so this is pretty much a life saver when we are doing art.
So fun! I love learning things like this step by step. I do it with my niece and those I babysit and it’s perfect!
This is fantastic! I can’t wait it!