If you’re looking for a fun and easy way to add some festive cheer to your holiday decor, this 3D Paper Christmas Trees craft is just what you need! It’s simple to make, and you can download the free template to get started right away. Whether you’re decorating your home or crafting with kids, these little trees are the perfect way to get into the holiday spirit. Create a mini forest for your mantle or add a unique centerpiece to your table—this creative project is a wonderful way to make your holiday season even brighter.

Related: Christmas is such a fun time of the year. Family, friends, presents, and more. What’s not to love? Here are some other fun We have other Christmas-themed activities to explore: Left Right Christmas Game, Secret Santa Questionnaire, Christmas Bookmarks, and Free Printable Merry Christmas Gift Tags
Supplies Needed for 3D Paper Trees
- 3D Paper Tree templates (download below)
- Scissors
- White Regular Paper (to make a reusable template, you can also save a step and print directly on green paper)
- Green piece of paper (different colors of green regular printer paper make this fun)
Watch How to Make 3D Paper Christmas Trees
Here is a video tutorial so grab some sheets of paper and follow along:
Download These 3D Paper Tree Templates

How to Make 3D Paper Christmas Trees
Instructions:
Step 1: Start by downloading the 3D paper tree templates (above). Once you have printed them, cut out the two separate templates.


Step 2: Take a piece of square piece of paper and fold it in half. Make sure the folded green paper is the same width as the template.

Step 3: Place the template on the folded green paper and cut it out along the outline of the Christmas tree.

Step 4: Make slits on the inside by cutting along the diagonal lines!

Step 5: Open up the folded green paper to reveal the tree shape. Now push out the first cut section, creasing the paper at the two ends to ensure the cut section extends upwards.

Step 6: Crease the edges of the slits alternating forward and backward up the tree.

Step 7: Crease the third, fifth, and seventh cut sections of paper running along the middle of the tree. You want to leave the second, fourth, and sixth sections for now.

Step 8: Flip the tree over and do the same with the other cut paper sections in the middle of the tree to produce the perfect 3D effect.

Your 3D paper tree is complete… and looking awesome!
Don’t forget to cut the other template and follow the same steps.
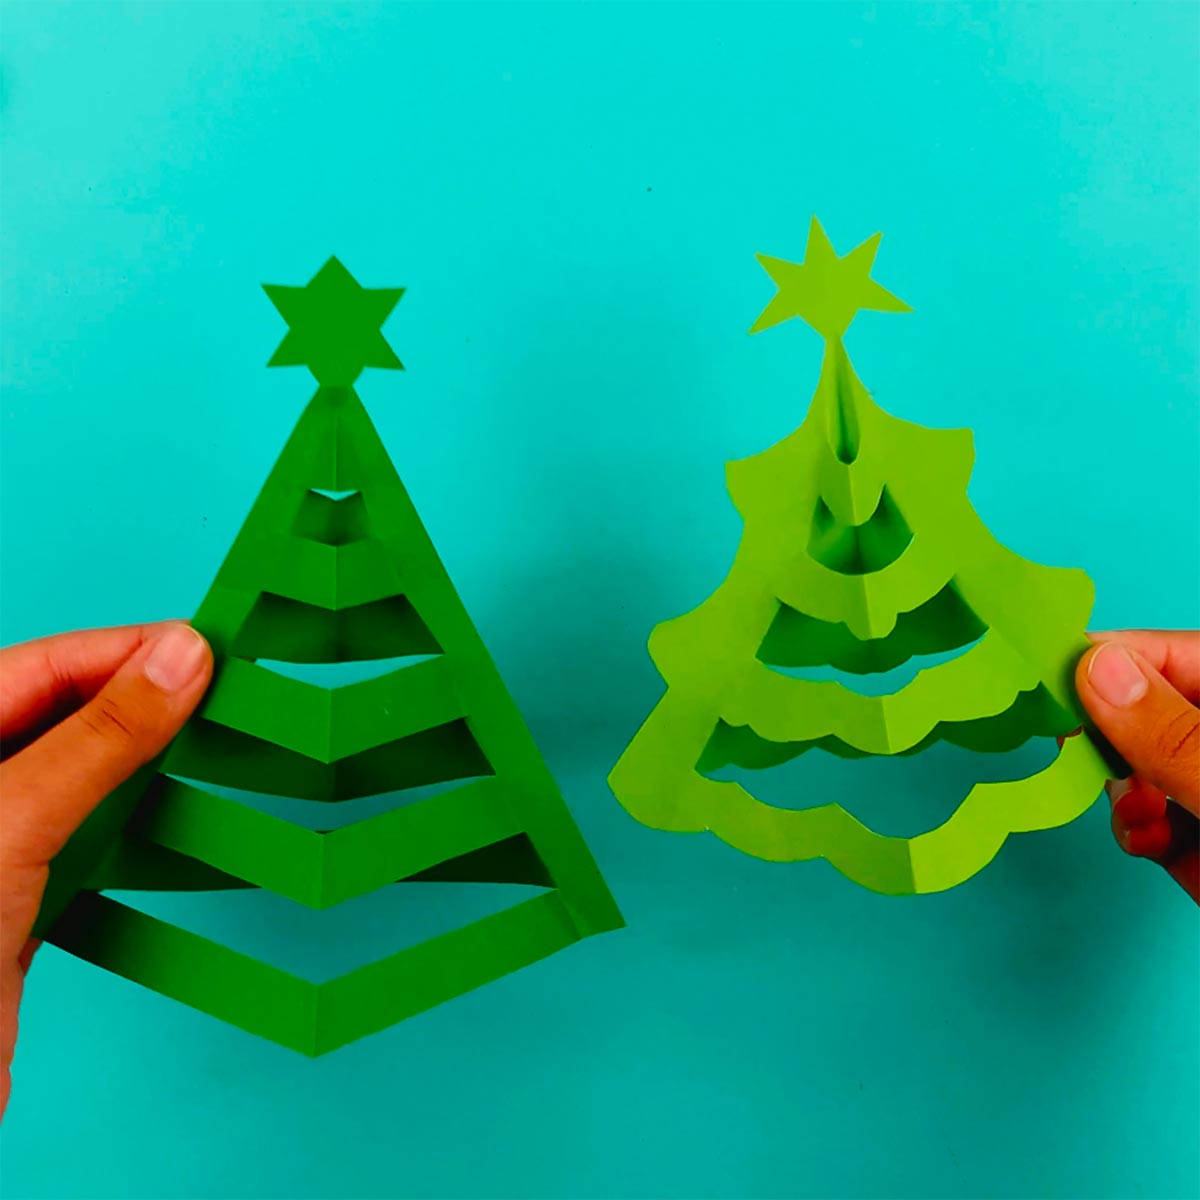
And there you have it—your very own 3D Paper Christmas Tree! It’s such an easy, fun, and festive way to spread holiday cheer around your home. Whether you’re decorating your home or crafting with kids, these little trees are the perfect way to get into the holiday spirit. I hope this project brings a little extra warmth to your season. Don’t forget, that you can always get creative with colors and decorations like rhinestones, markers, crayons, and stickers to make each tree unique. Happy crafting, and I’d love to see how your paper trees turn out! Remember to get creative! You don’t have to just make a green tree. How about making them sparkle with a bit of glitter?
More Awesome Christmas Activities
Here are some more Christmas activities to keep things festive this holiday season!
- Christmas Scavenger Hunt
- Santa DIY Christmas Ornaments
- 210+ Funny Elf Jokes For The Elf On The Shelf
- Printable Christmas Games
- Christmas Unicorn Coloring Pages
- Easy Crochet Wreath Ornament
- Christmas Crafts – more fun simple craft ideas
I would love to keep you fully stocked with creative ideas, yummy recipes, fun crafts, and loads of free printables. Subscribe to Skip to my Lou to get new ideas delivered to your inbox. Follow me on Facebook, Pinterest, Twitter, and Instagram for all my latest updates.


Thanks Fiona!
great fun thanks will try this tday at the kids craft club x