Learn how to draw a bunny with this step by step tutorial. There is even a printable guide and a video to watch to help make this an easy bunny drawing.
Learning to draw really isn’t hard when you start with these easy things to draw.
Download the printable guides and get started with this simple bunny drawing.
- How to Draw a Bunny – written instructions
- How to Draw a Bunny – step by step guide
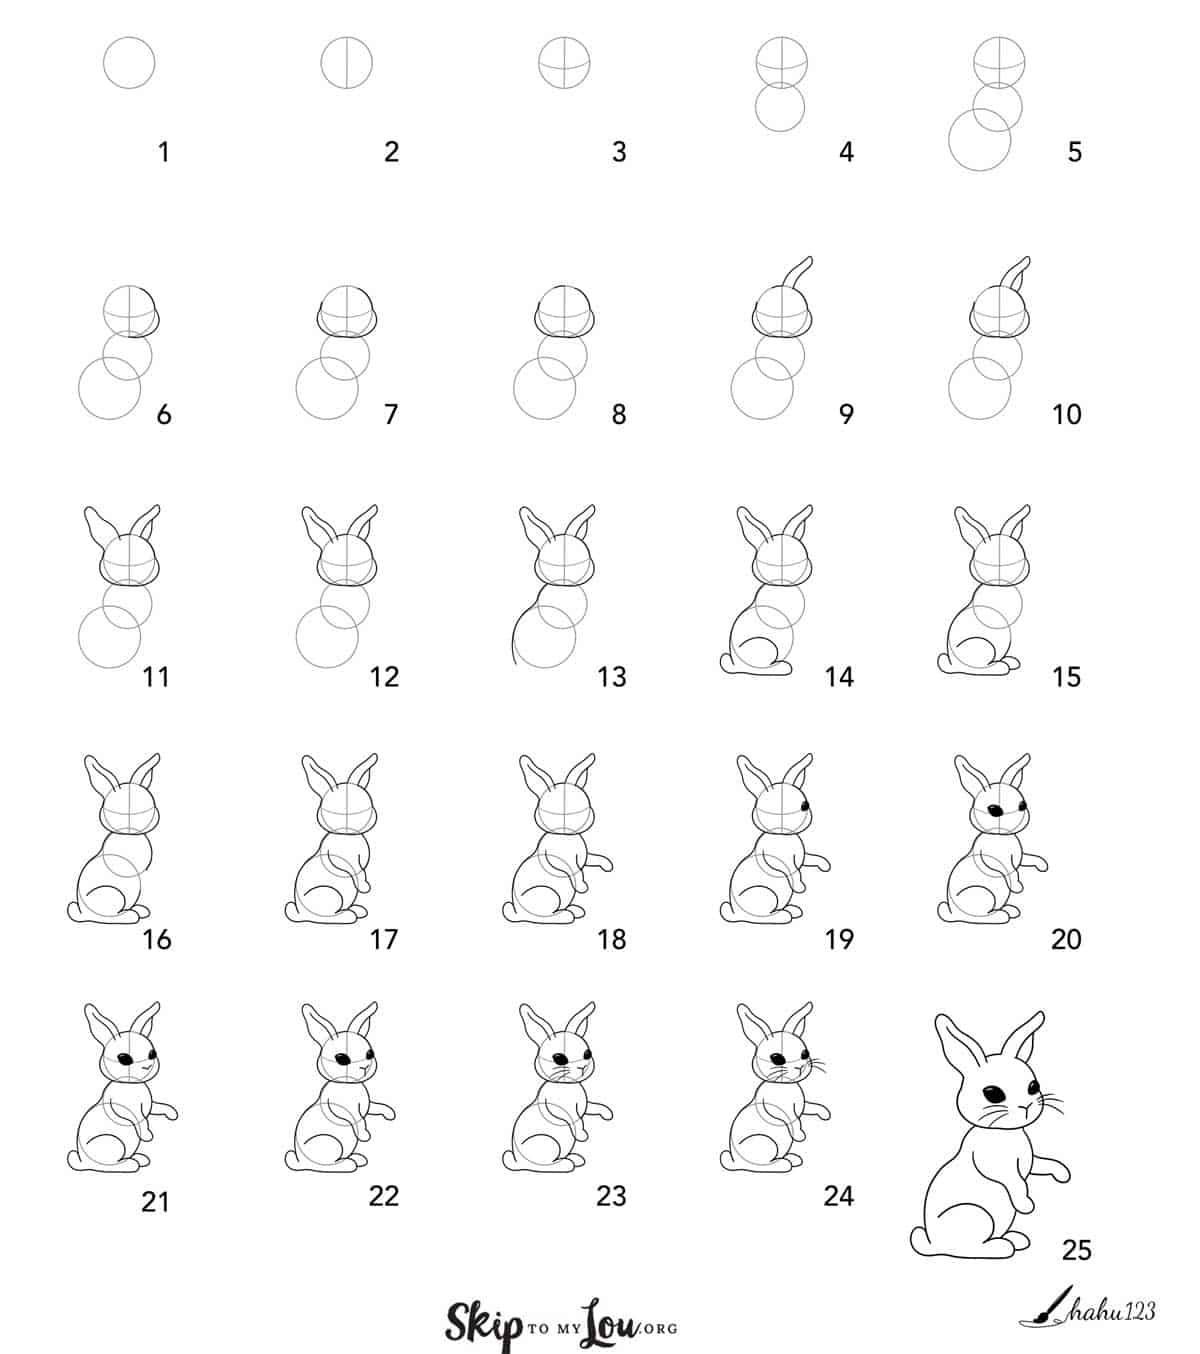
Guidelines (Step 1-5) Draw these lines lightly with a pencil.
- Draw a circle (head guide) – little tip: think of the circles as the face of a clock.
- Draw a straight vertical line down the middle of the circle – from 12 to 6 o’clock.
- Draw a slightly curved horizontal line across the middle of the circle – from 9 to 3 o’clock.
- Draw a second circle slightly overlapping at the bottom of the first.
- Draw a third, bigger circle slightly to the left and overlapping the second (connecting at about 8:30 and 5 o’clock). Let’s start drawing You can make this drawing your own by changing the position of the ears, tail or feet, or the distance between the guides, or the facial features. (You could now change to a pen or colored pencil)
- Start with the little bunny face. For the forehead, draw along the head guide from about 1 to 3 o’clock. For the nose, add a bump leaving the head guide but connecting at 3 and 6 o’clock.
- (similar to step 6) Add the check and back of the head – mirror the bump from 6 to 9 o’clock and from there add a curved line along the head guide to 10 o’clock.
- Add a short curved line for the in-between ear space – from 12 to 11 o’clock.
- Add the first ear – in the space on the right side of the head, draw a curved shape similar to a finger or banana.
- To indicate the inside of the first ear, draw a curved line from a third of the shape from step 9 to nearly 2 o’clock on circle 1.
- Add the second ear – with the same length as ear 1, draw an ear shape in the space on the left of the head.
- Inside the ear to the right, draw a shorter line parallel to the ear’s right outline. This line will help to create some depth and indicate the inside of the ear.
- Add the back – draw along the left of circle 2 and 3. At 9 o’clock of circle 3, leave the guide and continue the curved line till you reach the same height as the bottom of circle 3.
- Add the tail and first hind leg – at the end of the line from step 13, draw a small bump and add the leg. We drew a line with two bumps (a small and a bigger for the foot and knee, respectively). Draw inside the third circle guide.
- Behind the first foot, add a second foot – a slightly smaller bump and a short line along circle 3 to 3 o’clock for the belly.
- Add the chest – draw a line along circle 2 (from where the head meets circle 2 to 4-5 o’clock on circle 2).
- Add the first front leg – draw the leg in between the space on he belly. We drew a flat s-shape for the leg with a small bump for the little foot and going back up with a shorter and flatter s-shape line to complete the leg.
- Add the second front leg – draw a smaller leg similar to the first at about 3 o’clock of circle 2. We drew a simple straight leg with a downward bump for the foot.
- Draw the first eye right where the horizontal guideline and the bunny’s nose bump meet. A little tip: leave a small arch or 1-2 small circles for highlights.
- Draw the second eye a little bigger than the first – place it over where the horizontal and vertical guidelines meet. Add the same highlights.
- Add the nose – draw a small outward curved v shape under and to the left of the first eye.
- Add a short vertical line at the bottom of the v shape to indicate the bunny’s mouth. Step
- Add the whiskers
- Draw 3-5 thin, curved lines next to the nose on each side.
- Erase the guidelines.
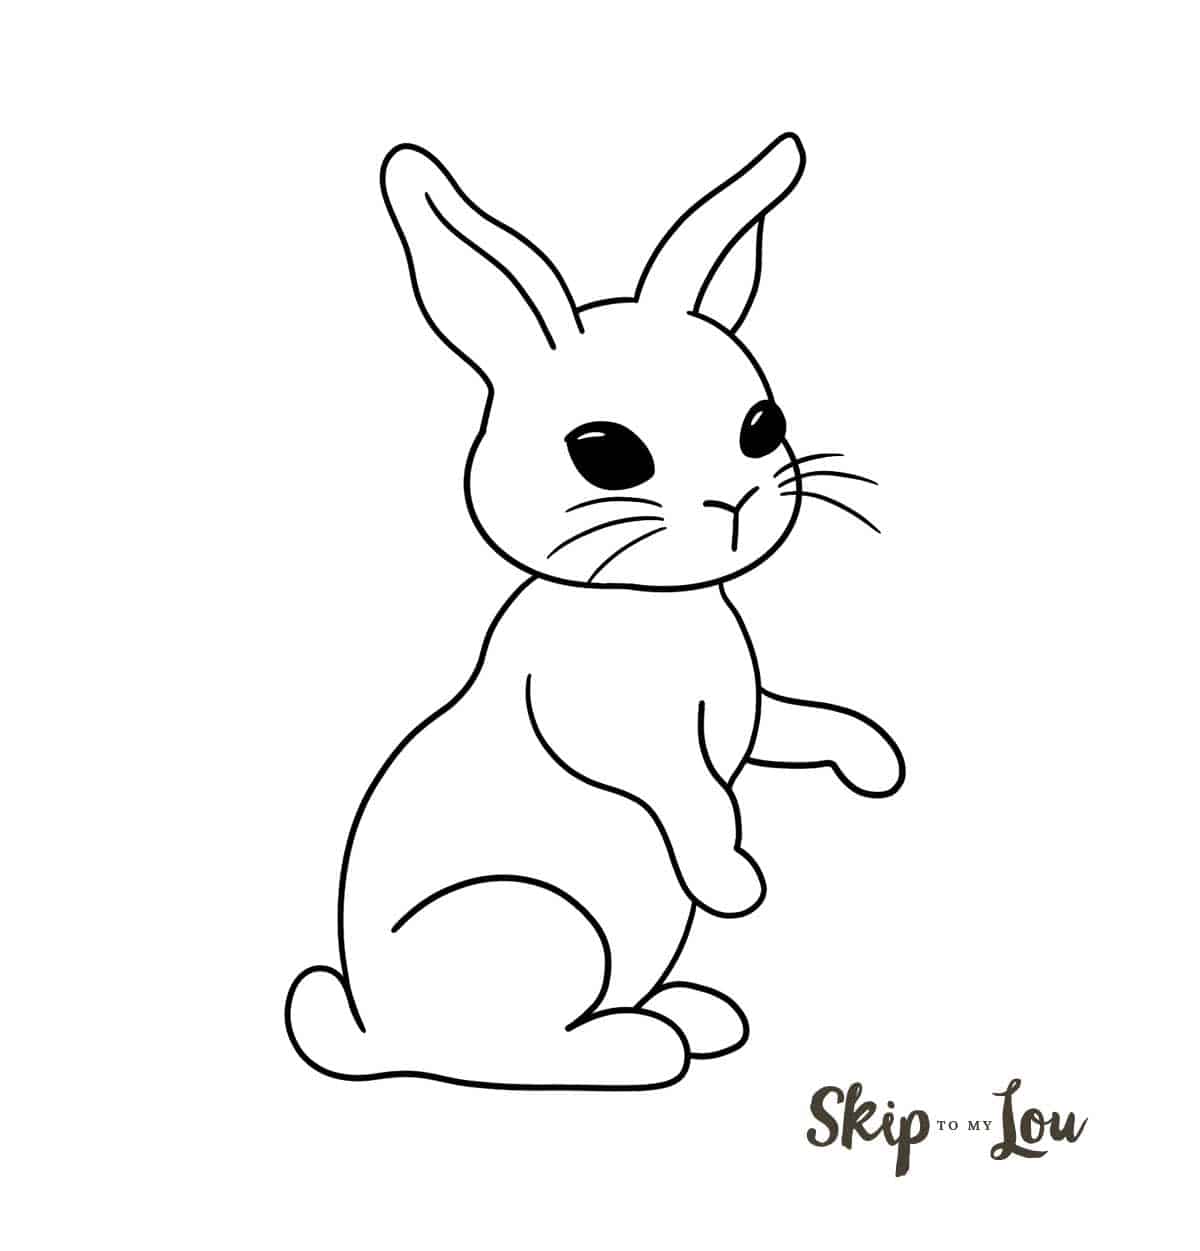
You are now all done with your drawing of a little fluffy bunny.

my favorite drawing supplies
- Sketching Pencils
- Kneaded Rubber Eraser
- Sketch Pad
- Erasable Colored Pencils
- Fine markers
- Sketch and Drawing Art Pencil Set
- Artist drawing set (This is great for new and experienced artists. It’s also something I give as a gift.)
Now, it’s time to color or decorate it – maybe with tissue paper, cotton balls or glitter! This tutorial merely serves as a basic example. The more you practice, the more you will be able to individualize the drawing.
Once you’ve got a solid bunny outline, you can change the expression of your cute bunny friend. Change the facial features, draw differently shaped ears (flapping, one up and the other down, etc.), add a different tail (fluffier, like a cloud). Omit or add any details you like.
Have fun and hoppy drawing!
How to Draw a Bunny Video
Love Bunnies?
How about these fun bunny crafts…
More Drawing Tutorials
Do you like to draw animals? These step by step tutorials will show you how to draw!
I would love to keep you fully stocked with creative ideas, yummy recipes, fun crafts, and loads of free printables. Subscribe to Skip to my Lou to get new ideas delivered to your inbox. Follow me on Facebook, Pinterest, Twitter, and Instagram for all my latest updates.


My kids loved this. What an easy way to teach them to draw.