Learn how to draw a sunflower step by step. While it might look like alot of steps you will be amazed how quick they go. In no time at all you will be drawing beautiful sunflowers.
Drawing is a great past time. Check out all these things to draw!

I would love to keep you fully stocked with creative ideas, yummy recipes, fun crafts, and loads of free printables. Subscribe to Skip to my Lou to get new ideas delivered to your inbox. Follow me on Facebook, Pinterest, Twitter, and Instagram for all my latest updates.
LET’S START A SUNFLOWER DRAWING
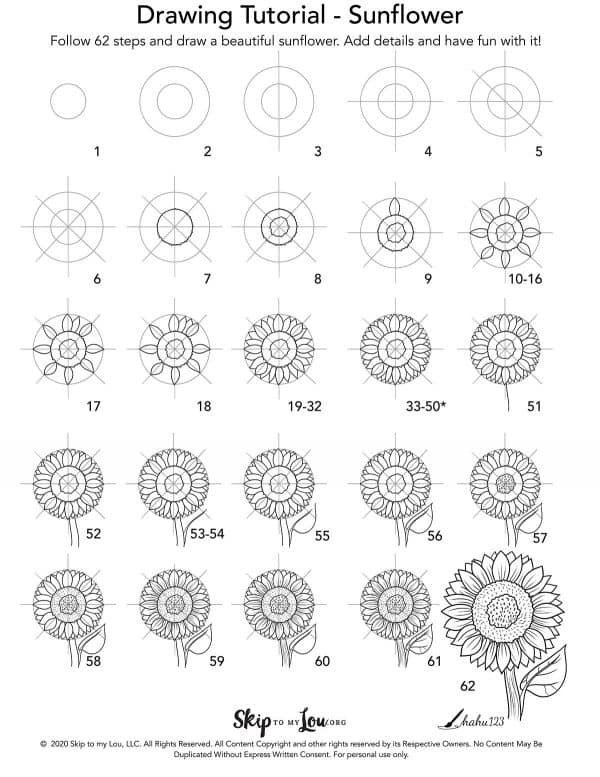
Guidelines (Step 1-6) Draw these lines lightly with a pencil. You will erase these guides when you are finished.
Step 1: draw a small circle – little tip: think of the circles as the face of a clock.
Step 2: draw a bigger circle around the first one.
Step 3: draw a vertical line through both circles – from 12 to 6 o’clock.
Step 4: draw a horizontal line across the middle of the circle – from 9 to 3 o’clock.
Step 5: draw a diagonal line through both circles – from 11:30 to 4:30.
Step 6: draw another diagonal line through both circles -from 2:30 to 7:30.
Print out the illustrated guide to show you how to draw and the written instructions and you are ready to go. You can also just follow along on your computer or phone. The step by step instructions are written below

How to Draw a Sunflower
Let’s start drawing! You can make this drawing your own by changing the position and form of the petals, as well as the stem and leaf.
(You could now change to a pen or colored pencil or wait until the end to add colors if you like)
Step 7: draw a squiggly circle along the inner circle to create the disc floret.
Step 8: add another but smaller squiggly circle inside the first one – no worries about this circle not being perfect, it can be uneven to create a more natural look.
Step 9: add the first petal – at 12 o’clock, draw the petal along the guideline right on top of the big circle.
Step 10-16: add seven more petals along the guidelines the same way as in step 9. Each petal should be the same size, but they can vary in shape slightly. No need to make them exactly alike.
Step 17: add a petal slightly behind the first one from step 9. You create this illusion by starting to draw the new petal at the middle of the first petal.
Step 18: draw yet another petal next to the one in step 17 – in the remaining space between the petal from step 17 and the one on the next guideline. This petal looks like it is behind two petals.
Step 19-32: repeat steps 17 and 18 around and mix it up a bit – change which petal is in front and which is behind, there are no rues, just add them as you like.
Step 33-50*: add even more petals – behind all these beautiful petals, add little points in between the petals – you can also add them randomly. * the number of steps
may vary, depending on how many points you add in total. You might even add another round of petals after these.
Step 51: draw the stem – draw a slightly curvy line at the bottom, coming out from in between the petals.
Step 52: add the second part of the stem – draw a matching curvy line next to the first.
Step 53-54: add the leaf stem – draw a diagonal curvy line from the stem. Then, starting at the end of this line, draw a second curvy line back to the stem.
Step 55: add the leaf – at the bottom of the leaf stem, draw a curved line nearly the shape of one side of a heart.
Step 56: complete the leaf – complete the leaf by adding another slightly more stretched curved line nearly mirroring the one from step 55.
Step 57: add texture to the inner disc floret – draw many little c-shaped lines inside the inner squiggly circle.
Step 58: add texture to the disc floret – in the outer circle, draw many little slightly curved lines randomly around.
Step 59: add texture to the petals – draw 1-3 thin curved lies inside each petal.
Step 60: add texture to the stem – draw a few thin, curved lines inside the stem.
Step 61: add texture to the leaf – draw a few thin, curved lines inside the leaf.
Step 62: erase the guidelines.

Watch this video for more help! You will see how easy it comes together.
You are now all done with your drawing of a big and happy sunflower. Now, it’s time to color or decorate it -maybe with tissue paper, cotton balls or glitter!
my favorite drawing supplies
- Sketching Pencils
- Kneaded Rubber Eraser
- Sketch Pad
- Erasable Colored Pencils
- Fine markers
- Sketch and Drawing Art Pencil Set
- Artist drawing set (This is great for new and experienced artists. It’s also something I give as a gift.)
This tutorial merely serves as a basic example. The more you practice, the more you will be able to individualize the drawing. You can change the angle of the sunflower, add more leaves, draw an entire bouquet, and add a pretty bow, and so much more. Omit or add any details you like.
Have fun and happy drawing!
Sunflower Love!
Being a Kansas girl the sunflower is a favorite of mine. Since we celebrate Kansas Day every year you will find loads of sunflower crafts and food turned into sunflowers.
More Things to Draw
If you loved drawing sunflowers you might like to try one of these drawing tutorials.
I would love to keep you fully stocked with creative ideas, yummy recipes, fun crafts, and loads of free printables. Subscribe to Skip to my Lou to get new ideas delivered to your inbox. Follow me on Facebook, Pinterest, Twitter, and Instagram for all my latest updates.


I love these step by step tutorials. They make drawing easy.