Welcome to our post on “How to Draw a Mouth!” As one of the most expressive facial features, the mouth is essential to creating realistic and captivating portraits. In this tutorial, we’ll provide simple steps on how to draw different shapes of lips and improve your overall drawing skills.
This post is a step-by-step guide to mouth drawing, including different types of lips and how to create realistic effects. By the end of this tutorial, you’ll have learned various techniques for drawing lips and be able to apply them to your own drawing of the human face. Whether you’re an aspiring artist or just looking to improve your drawing skills, this post is perfect for you.
There are many benefits of this post. By learning how to draw a mouth, you’ll be able to add a new dimension to your portraits and create more realistic and expressive facial features. With basic shapes and simple steps, you’ll be able to improve your drawing skills and create more captivating art. So, grab your pencils and let’s get started!
Come and join Skip to My Lou to experience a world of delightful and captivating family activities! Our step-by-step tutorials on drawing, coloring, and crafting are great for creating unforgettable moments with your loved ones.
Related: Check out How to Draw a Dog and How to Draw a Butterfly for more drawing inspiration.
This article contains affiliate links.
Easy Mouth Drawing
Drawing a mouth can be done anywhere, whether at home or in a studio. All you need is some paper and pencils, and you’re good to go! Whether you’re an amateur artist or a professional, this post can help you improve your drawing skills and create more realistic portraits.
Essential Drawing Supplies for Drawing a Mouth
Gather these art supplies before you begin your mouth drawing:
- Sketching Pencils
- Kneaded Rubber Eraser
- Sketch Pad
- Erasable Colored Pencils
- Fine markers
- Sketch and Drawing Art Pencil Set
- Artist drawing set (This is great for new and experienced artists. It’s also something I give as a gift.)
How to Draw a Mouth Step-by-Step
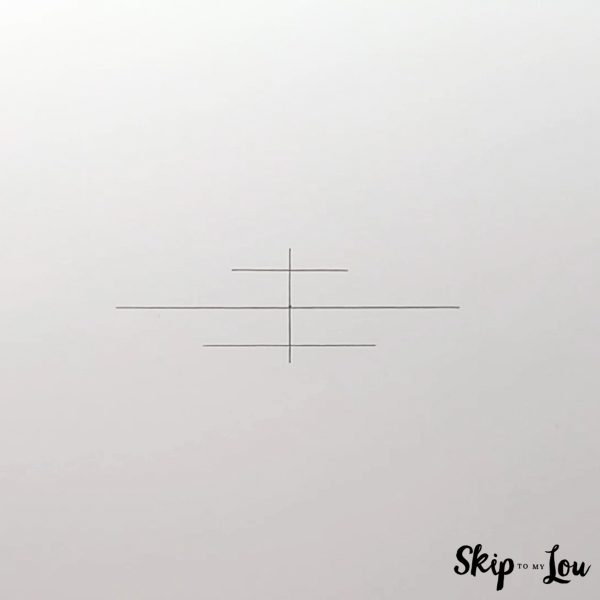
Step 1
To begin with, let’s draw some guidelines.
Firstly, in the center of the page, draw a long horizontal straight line.
Secondly, draw a shorter vertical line that bisects the horizontal line in the center.
Lastly, draw two more parallel horizontal lines at the top and bottom. The bottom line should be slightly longer than the top line.
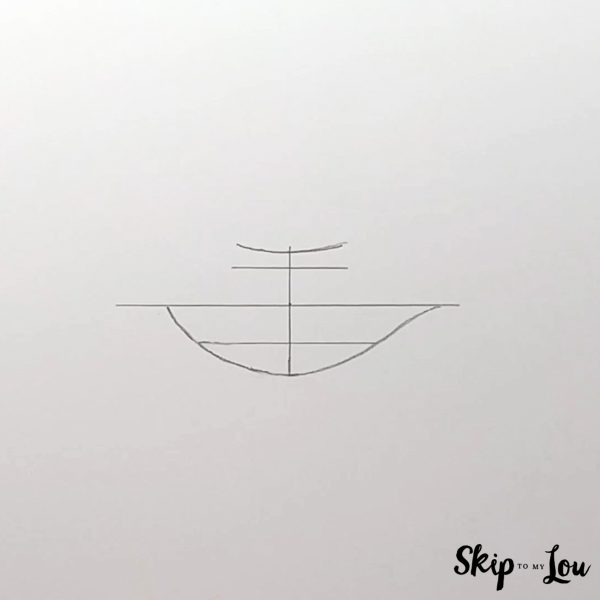
Step 2
Now we’ll add some curved lines to further develop the mouth shape.
To begin with, starting on the left of the middle line, draw an upside-down semicircle using the bottom guidelines to help. As can be seen in the reference photo, try to stretch the semicircle further on the right side.
After that, draw a short line with a slight curve at the top to form the bottom of the top lip.
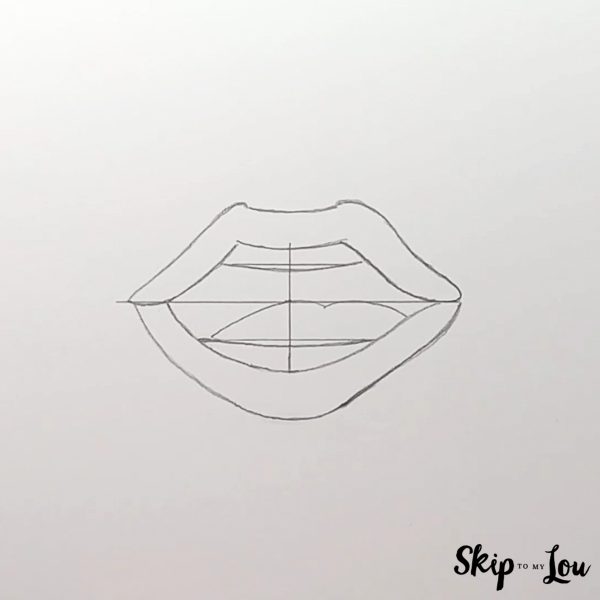
Step 3
Next we’ll connect the ends of our lines to make the shape of the mouth.
Firstly, on the left side, connect the end of the slightly-curved short line at the top, to the center line below with a curved line that goes to the left. After that, repeat this on the right side, with a slightly more stretched-out line to complete the corners of the mouth.
Secondly, underneath the smaller top and bottom horizontal guidelines, draw curved lines that bend slightly downwards so there are lines for the bottom and upper teeth.

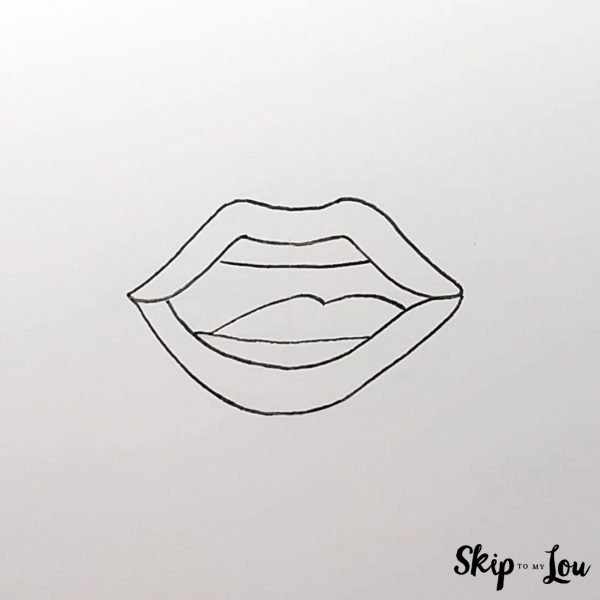
Step 4
Let’s make the shape of the lips, and add a tongue to our mouth drawing.
To begin with, above and below the center horizontal guideline, start the drawing of the lips with smooth lines that follow the mouth shape as can be seen in the reference image. For realistic lips, pay close attention to the dip at the top-center of the lip so there’s space for the cupid’s bow.
After that, draw a tongue in the bottom half of the mouth. Use upward curves that bend to the right with a slight indentation in the center of the mouth.
Step 5
You should now have completed your open mouth drawing.
It’s now a good idea to use an eraser to rub out the guidelines.
After that, you can trace the remaining lines with a marker to make your drawing stand out more.
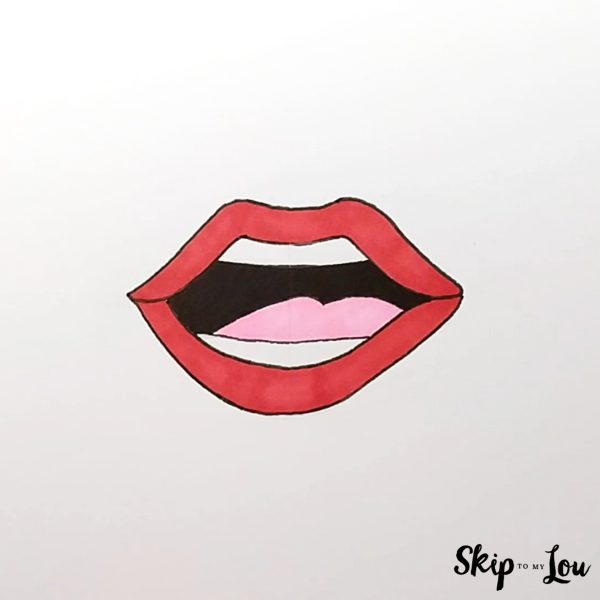
Your Finished Mouth Drawing
Here, we’ve chosen colors for a more cartoon lips style.
If you like, you can add more depth to your mouth drawing by adding shading to the lips. Start by selecting a slightly darker tone than the base color of the lips, and use it to add a slight shadow along the edge of the lips.
Another way to add shading is to darken the area around the mouth slightly, especially in the corners of the lips. This will create a sense of depth by emphasizing the darkest part of the mouth, where the lips meet the skin.
When adding shading, it’s important to think about the direction of the light source. Imagine where the light is coming from and use it to determine which parts of the lips would be in shadow and which would be highlighted. This will help you create a more realistic mouth drawing.
Next time, why don’t you try drawing different styles of mouth? You can try other lip designs, such as thick or thin lips. Also, you could even try drawing the rest of the face.
More Fun Drawing Tutorials
Try these drawing tutorials if you’re looking for more fun activities:
- Drawing a Volleyball can be a fun and creative activity with this guide.
- Perfect for beginners, this guide on How to Draw a Basketball is easy to follow.
- Create a prehistoric masterpiece with this tutorial on How to Draw a Dinosaur.
- To produce a realistic and beautiful bird drawing, you can use this Simple Bird Drawing Tutorial.
- Sharpen your artistic skills by trying this guide on How to Draw a Book.
I would love to keep you fully stocked with creative ideas, yummy recipes, fun crafts, and loads of free printables. Subscribe to Skip to my Lou to get new ideas delivered to your inbox. Follow me on Facebook, Pinterest, Twitter, and Instagram for all my latest updates.


