Let’s learn how to draw a book with this easy step-by-step tutorial. Drawing a book or stack of books is fun for young and self-taught artists. Besides being common, a book comprises basic shapes such as rectangles, cuboids, and curved lines. Therefore, a closed book is a great way to enjoy your next drawing lesson.
The main features of books include book spines, pages of the book, and book covers. This beginners’ guide outlines the step-by-step instructions for drawing closed books.
Simple and Fun-filled for Children and Beginners
Young artists over the age of 6 and beginners can use this guide.
This step tutorial is a great way to develop basic motor skills for children. With these skills, you can draw a book by combining simple shapes and adding small details.
The art supplies you will need are already in your home. They include:
- A reference book
- Plain paper or drawing book
- A pencil and pens
- Eraser
Good luck, and enjoy this drawing craft blog of how to draw a book
How to Draw a Book in 6 Simple Steps
Let’s try these six simple steps to draw an entire book.
It’s fun to draw the book’s pages; afterward, you can bring these to life with different colors.
Besides, you can choose if you want to draw a graphic novel or a fairy tale book.
The best part of this learning process is that you can use a little bit of creativity on the book title and cover.
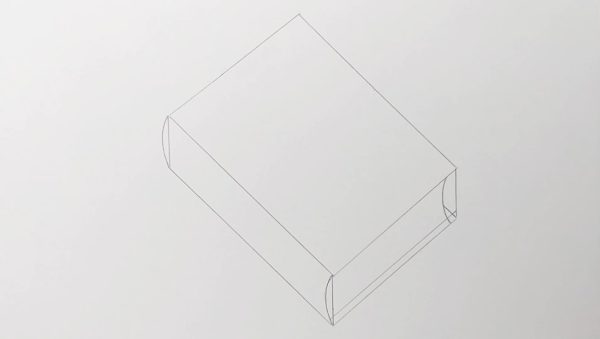
Step 1: Draw the Outline of the Book
The first step is drawing the outline of the book. Using the reference book, you can start with a front, side, or top-point perspective.

You should start with the top point perspective since it covers a wider area.
The top view is a triangle inclined at a slight angle on the table surface. This helps you create a three-dimensional drawing of the book.
Using a pencil and ruler, draw a rectangle proportional to the top of your book. A faint line is ideal because you will erase it later.

Step 2: Draw Lines on the Lower Side to Form a Cuboid

A rectangular top of your book drawing creates a two-dimensional illusion of the cover of your book.
The next step of this book drawing tutorial is adding the side view. Using your pencil, draw lines from the lower end of the triangle and join them.
The above cuboid shape shows the top and sides of the book. The cuboid can have different heights depending on your reference material size.
Books with few pages have smaller heights than bulky ones.
Step 3: Add Small Curved Lines on the Side Edges
The following easy step in this step tutorial is creating an illusion of pages. You can do this in different ways, but the simplest one is adding small curved lines at the edges.
Use your pencil to draw arches on the three vertical lines joining the top book cover and the bottom. Make them faint to avoid making your drawing untidy.
The arches on the vertical lines enhance the three-dimensional touch. Small details on the side and book spine add life to the book. There are many ways of creating an illusion of pages of the book. A simple way is by using parallel lines on the front side of the book.
Step 4: Create the Spine
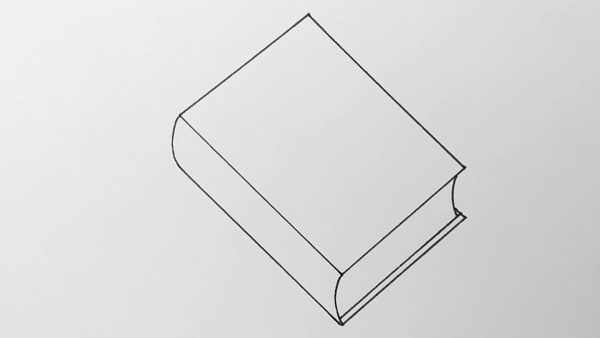
The next step in this drawing guide is adding the spine. A book spine joins the top and bottom cover of a book. It also protects the pages of the book from tearing off.
Whether you are drawing your favorite book or bullet journal, a few decorative elements can add a realistic touch to your drawing.
The book spine contains details, such as the title and author. In the next step, you can create an illusion of these details using different drawing techniques.
Step 5: Add Small Details

In the previous step, you learned how to draw the book spine. However, your drawing only includes line work and simple shapes.
In this step, let’s learn how to add small details to your book and make it look more realistic. Here are a few helpful pointers.
- Many younger artists love Mo Willems and Piggie’s books. A colorful pig image on the front cover plays the trick nicely.
- For older self-taught artists, the title of your first book on the shelf is ideal—for example, Human Anatomy, with a human frame on the front cover.
- Adding your drawings to make the cover attractive. For example, colorful ice cream cones for children’s books.
The most common way to add extra detail on the spine includes drawing a set of lines to mimic the details. Many books have the author’s name in bold; therefore, you should use a darker pencil or pen on the spine.
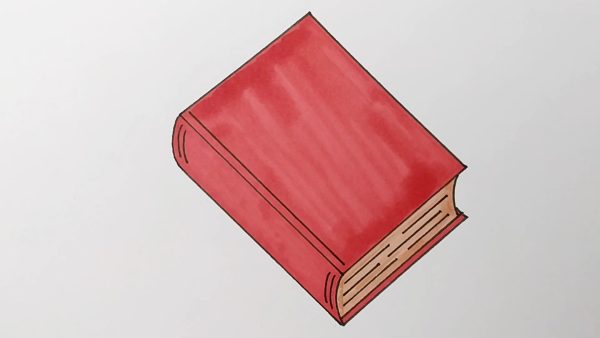
Step 6: Shade Your Drawing Using a Pen
The last step in this guide is shading your drawing. Your book has the most details, but you have to make it colorful.
Before shading, use a pen to trace the book’s outline and make it bolder. You can erase the pencil outline from the previous steps.
Different things to guide you in the color choice include:
- Book content. A fictional book, for example, can have an imaginary drawing of green eggs.
- Target audience. Choose bright colors for the front cover of children’s books.
- Images and shapes on the covers. Use brighter and darker shapes for non-fiction books, for example, a human figure on a textbook cover.
When sharing your drawing, vary the intensity. A darker shade at the bottom and a lighter shade at the top create contrast making your drawing appear real. It also enhances the three-dimensional aspect.
Draw a Book in 6 Steps
Congratulations on following this step guide to the end. You can now draw an open book, a book step, or a stack of books on a shelf using the above steps.
You can modify the above steps to suit your preference and create your own story. See you in our next tutorial.
My Favourite Drawing Supplies
- Sketching Pencils
- Kneaded Rubber Eraser
- Sketch Pad
- Erasable Colored Pencils
- Fine markers
- Sketch and Drawing Art Pencil Set
- Artist drawing set (This is great for new and experienced artists. It’s also something I give as a gift.)
More fun how to draw activities
- Our most popular drawing tutorial is how to draw a dog.
- Is a cat your favorite pet? Learn how to draw a cat.
- You might like this butterfly drawing.
- Try how to draw a bee.
- You might also like to have some fun with how to draw eyes.
- How to Draw a Cow easy tutorial.
I would love to keep you fully stocked with creative ideas, yummy recipes, fun crafts, and loads of free printables. Subscribe to Skip to my Lou to get new ideas delivered to your inbox. Follow me on Facebook, Pinterest, Twitter, and Instagram for all my latest updates.