Seeking the perfect home spa gift, check out this towel wrap for your hair. This simple DIY towel wrap for your hair is a great gift packaged with lotion and other toiletries.
Bath bombs are a perfect addition to any home spa gift package. You might like my soothing DIY bath bomb recipe it is so simple to make and will soothe aches away.

I would love to keep you fully stocked with creative ideas, yummy recipes, fun crafts, and loads of free printables. Subscribe to Skip to my Lou to get new ideas delivered to your inbox. Follow me on Facebook, Pinterest, Twitter, and Instagram for all my latest updates.
One of my favorite things to do is make and share gifts that have a purpose. You will find this DIY towel wrap is great for long hair for absorbing water to help it dry more quickly.
In addition to using these myself, I share them with friends who enjoy pampering themselves. It is the perfect wrap to pull long hair from your face for facials or applying make-up. They are such a simple gift with so many benefits – what’s not to love? Wrap it up with this amazing sugar scrub!
Needed Supplies and materials
The supplies and materials needed for this hair towel wrap are minimal. Here’s what you need. (This section includes affiliate links.)
- Sharp fabric scissor
- Tape measure
- Fabric pencil
- Sewing machine
- 1 bath towel with at 36 inches of space between the ribbing
- 6 inches of 1/2 wide elastic
- A thread of your choice (matching or contrasting)
Hair Towel Step By Step Instructions
To begin, start by printing my printable pattern.
Printable Towel Wrap for Hair Instructions
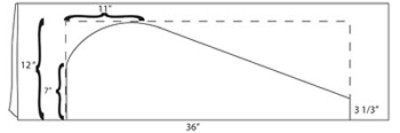
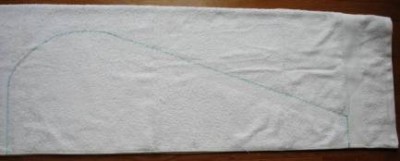
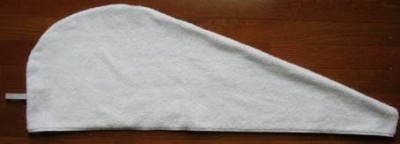
Fold the bath towel in half right sides together lengthways. Measure 36″ across the bottom of the towel (opposite) from the fold.

Cut out your shape.

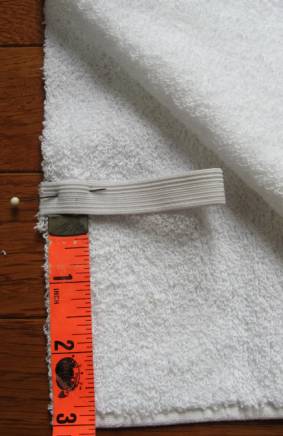
On the long end (where the back of the head goes) place a 6-inch piece of elastic folded in half about 3 inches up from the bottom.

Stitch around the towel 1/2 inch from the edge leaving the bottom open. Zig zag stitch or overcast your seams to prevent unraveling.

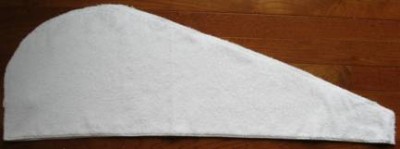
Turn the sewn fabric right side out and viola you have a finished towel wrap.

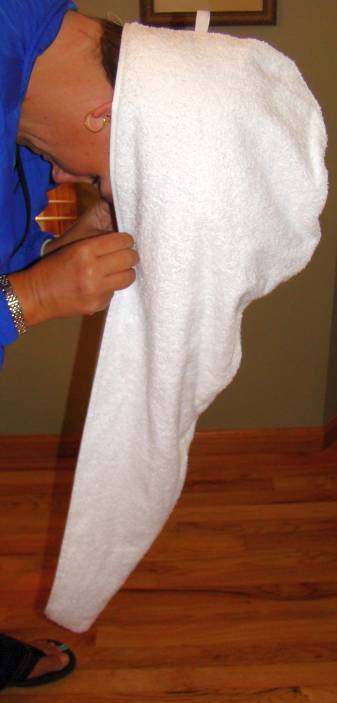
My sweet friend Jenni will model how this works. After your shower or bath you lean over and place your wet hair in the towel.

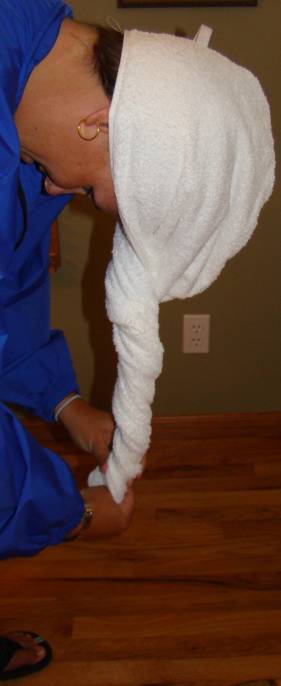
Then starting at your forehead you twist to the end–catching all of your hair inside.

Take the end and pull it over your head and fasten in the back in the elastic loop! How cool is that?
I found the idea for this great project at Perfect Little Stitches. I though adjusted the measurements for my version for a slightly different fit.
More Towel Gift Ideas
When making up gift baskets for those you want to spoil check out my Good Vibes Care Package. The towel wrap for hair and a child’s hooded towel are perfect additions.
Have fun sewing!
I would love to keep you fully stocked with creative ideas, yummy recipes, fun crafts, and loads of free printables. Subscribe to Skip to my Lou to get new ideas delivered to your inbox. Follow me on Facebook, Pinterest, Twitter, and Instagram for all my latest updates.
Printable Tutorial
Just click print for a handy guide.

DIY Towel Wrap for Your Hair
Equipment
- Sharp fabric scissor
- Tape measure
- Fabric pencil
- Sewing machine
Ingredients
- 1 bath towel with at 36 inches of space between the ribbing
- 6 inches of 1/2 wide elastic
- A thread of your choice matching or contrasting
Instructions
- Fold the bath towel in half right sides together lengthways. Measure 36" across the bottom of the towel (opposite) from the fold.

- Cut out your shape.

- On the long end (where the back of the head goes) place a 6-inch piece of elastic folded in half about 3 inches up from the bottom.

- Stitch around the towel 1/2 inch from the edge leaving the bottom open. Zig zag stitch or overcast your seams to prevent unraveling.

- Turn the sewn fabric right side out and viola you have a finished towel wrap.

- Here a model demonstrates how the towel wrap for hair this works. After your shower or bath, you lean over and place your wet hair in the towel.

- Then starting at your forehead you twist to the end–catching all of your hair inside.

- Take the end and pull it over your head and fasten in the back in the elastic loop! How cool is that?


Came across a similar project but it utilized a button at the back. Then I searched and found yours. Just whipped one up with my new sewing machine and it’s wonderful, no sloppy towel sliding off the side of your head. Thanks!
http://assets.skiptomylou.dev/wp-content/uploads/2008/09/towel-wrap-8.jpg
Betty, I have done that too!
I bought a new towel especially to make this pattern. Do you think I can find it??? How can you lose a towel? I made it out of an old one and it will be great for me and I will find something pretty for gifts etc. Many, many, thanks for something quick and easy!!
This is great! I just knocked out three of them in an hour and a half. Pattern to finish. I recommend a heavy duty needle.
Thank you sew much I have been looking for an easy pattern to make one and here it is. Now I have it..YIPPPPPEEEEE
My sister bought one of the for me ~ I love it. Being a sewer I decided I would make them as gifts. I started buying microfibre clothes from Woolies. I made a small one for my niece. I have recently found packs of large microfibre cleaning clothes at Red Dot in great colours.
PS: I rounded the end of my pattern off
I have a couple of these I have used for years but cannot find them anywhere. Thank you for sharing the pattern so I can make some new ones! Love it!
My little boy loves to help me sew. we were looking for a project he could do for his big sister for Christmas. We made one of these towel wraps for her and it was so easy! She couldn’t believe her little brother had made it!
It worked out so well that we just had to make another one!
We are making several of these now to keep as gifts for friends/family.
THANKS so much for the tutorial!!
Thanks for the easy instruction.it will work great for me.
Thank you for the easy to read pattern, I make these every Xmas for my family, I have to make at least 20 and this year I lost my pattern, so thank you so much, Merry Christmas to you and a Happy New Year.
Me encantó aunque me costó encontrarlo muchas gracias.-
GRACIAS SE VE TAN LINDA Y PRACTICA, BESOS
GILDA
Kerri –
I made a few of these out of used flannel receiving blankets and my 3 year old daughter loves them! I’m sure your 5 year old would enjoy them, too!
Would this work on a 5 year old?