Learn how to draw a nose easy! With a few simple pencil strokes, this tutorial and video will show you how to draw a realistic nose. You’ll learn how to start your nose sketch with 3 basic guidelines and then continue nose drawing step by step.
Drawing facial features can be tricky, but every face definitely needs a nose! I think that you will find this technique helpful in making nose drawing easy. If you are learning how to draw a face be sure to check out how to draw eyes. Practice makes perfect! Also, try your hand at these easy things to draw. I especially love the sunflower and rose, but my niece loves drawing the unicorn.
How to Draw a Nose
How to Draw a Nose Step by Step Drawing Tutorial
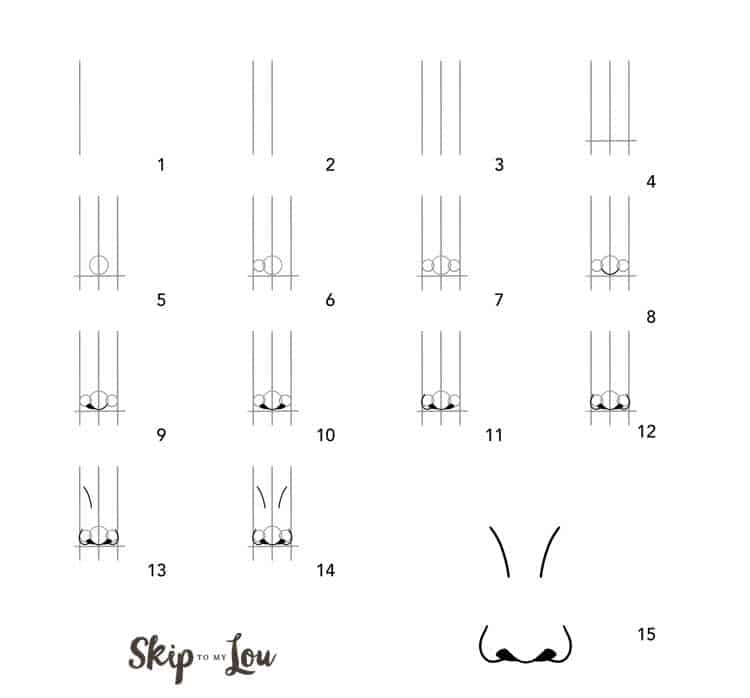
Nose Guidelines (Step 1-7) Draw these basic shapes and lines lightly with a pencil.
Step 1 (optional): (these likes will be useful if you want to draw this nose within the face tutorial) draw a straight vertical line.
Step 2 (optional): draw another vertical line parallel to the first.
Step 3 (optional): draw a third line, at the same distance and parallel to the second.
Step 4 (optional): draw a horizontal line at the bottom of the three lines.
Step 5: at the bottom of those guide grid, in the middle (if you used step 14), add a circle for the ball of the nose.
Step 6: add another smaller circle overlapping to the left of the first. It will be the edges of the nostrils.
Step 7: mirroring the one in step 6, add another small circle to the right side.
Let’s start drawing (You could now change to a pen or colored pencil)
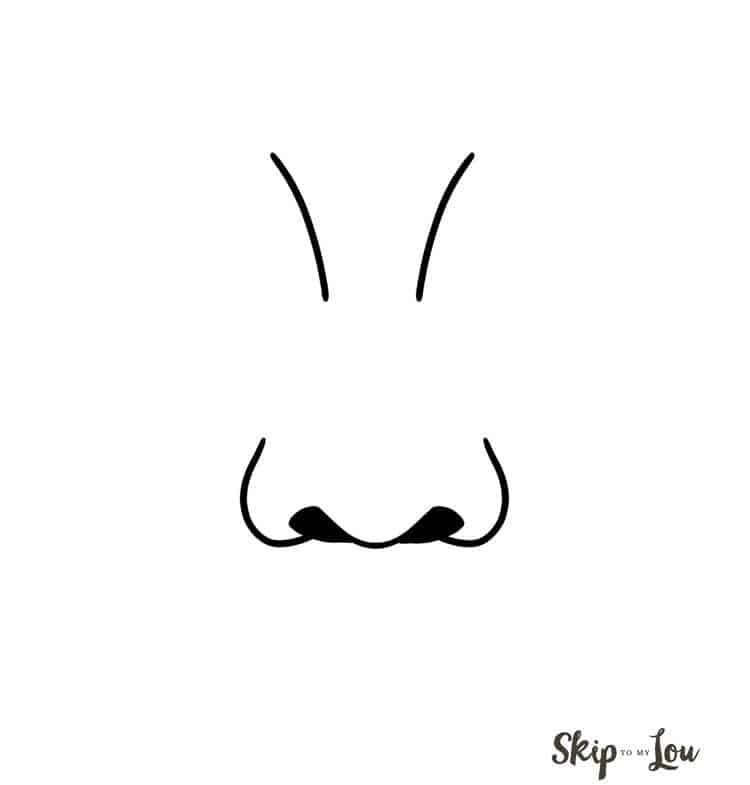
Step 8: at the bottom, trace the middle guide and draw a curved line right in between the space where the small circles meet the bigger one.
Step 9: add the left nostril – along the bottom of the left guide circle, draw a rounded triangle shape that connects to the curved line (from step 8).
Step 10: mirroring the nostril created in step 9, draw a second nostril to the right.
Step 11: add the nose wings – along the left circle guide and the left vertical line, draw a curved line.
Step 12: mirroring the wing created in step 11, draw a second curved line for the right nose wing.
Step 13: at the top of circle above the nose (at the length of the bigger circles diameter and right above where the small and bigger circle guides meet), draw a curved line to indicate the back of the nose.
Step 14: mirroring the line added in step 13, draw a second curved line for the bridge of the nose.
Step 15: erase the guidelines.
- Download —-> Printable Step By Step Easy Nose Drawing Illustration
- Download —-> Printable Numbered Written Instructions Nose Drawing
Now, you know how to draw a realistic nose drawing of a simple nose. You can color it and add shading. Little coloring tip: add shade around the wings, one side of the back and the bottom of the nose and add highlights to the tip of the nose, along the back of the nose, and to the middle of the wings.
Although it’s not a side view, keep in mind from which side the light is hitting your nose and add the highlights and shades accordingly. The shades will help give the shape of the nose.
This tutorial merely serves as a basic example and may be an easy nose drawing for kids to learn too. The more you practice, the more you will be able to individualize the drawing. You can change the dimensions, make the nose bigger or smaller, round or pointy, or add a hump by inverting the curved lines of the back of the nose. Omit or add any details you like.
my favorite drawing supplies
- Sketching Pencils
- Kneaded Rubber Eraser
- Sketch Pad
- Erasable Colored Pencils
- Fine markers
- Sketch and Drawing Art Pencil Set
- Artist drawing set (This is great for new and experienced artists. It’s also something I give as a gift.)
Here are a few more things to draw. Happy drawing!


Drawing noses is very hard. Thanks for the easy tutorial.