Learn how to draw a bear with this realistic bear drawing tutorial. Drawing a realistic polar bear or grizzly bear will be made easy with this drawing guide
Bookmark Skip to My Lou for more easy step by step tutorials like How to Draw a Dog and How to Draw a Butterfly. I have so many fun things to draw.

Let me know what you want to learn how to draw but for today, get ready to have fun with this simple bear drawing made easy.
Supplies for Drawing a Bear
So, for drawing animals today, you will need the following supplies:
- paper (sketch pad or loose paper)
- pencil (and or pen)
- eraser
How to Draw a Bear Step By Step
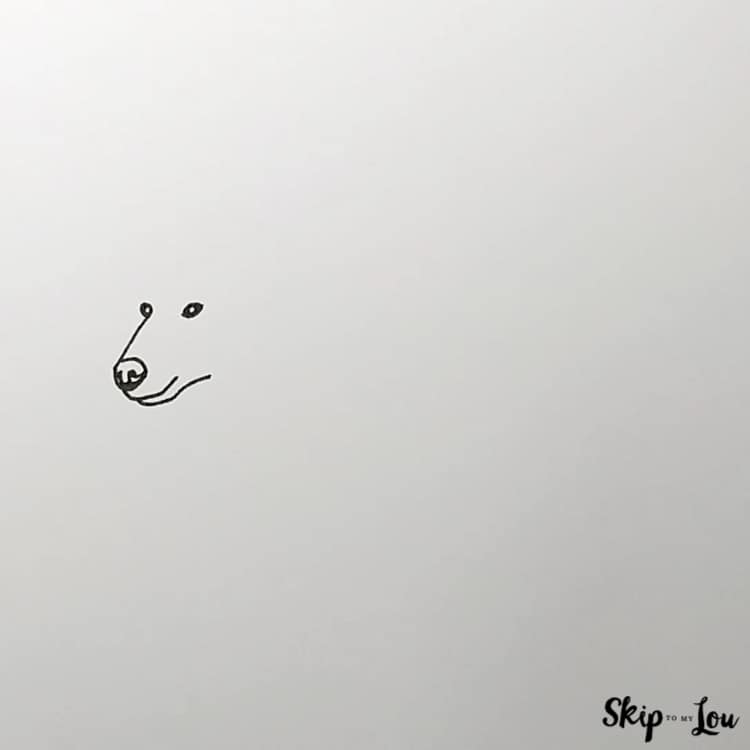
- Start by locating the middle of your paper and draw the bear’s head on the left side of the paper in the middle. Draw a slanted 6 for the snout and in the circle of the 6 draw a mushroom shape for the nose. Add a shadow line under the mushroom and shade the nostril area.

- Second, draw the eyes at the top of the snout using small football shapes. Notice how the eye on the left side is slightly smaller and tilted up and down compared to the eye on the right? Because the bear is facing at an angle it is helpful to use this technique for drawing animals in a realistic way. Complete the upper and lower jaw by curving down from the nose with a slanted wide J shape and another curving line under that for the lower jaw.
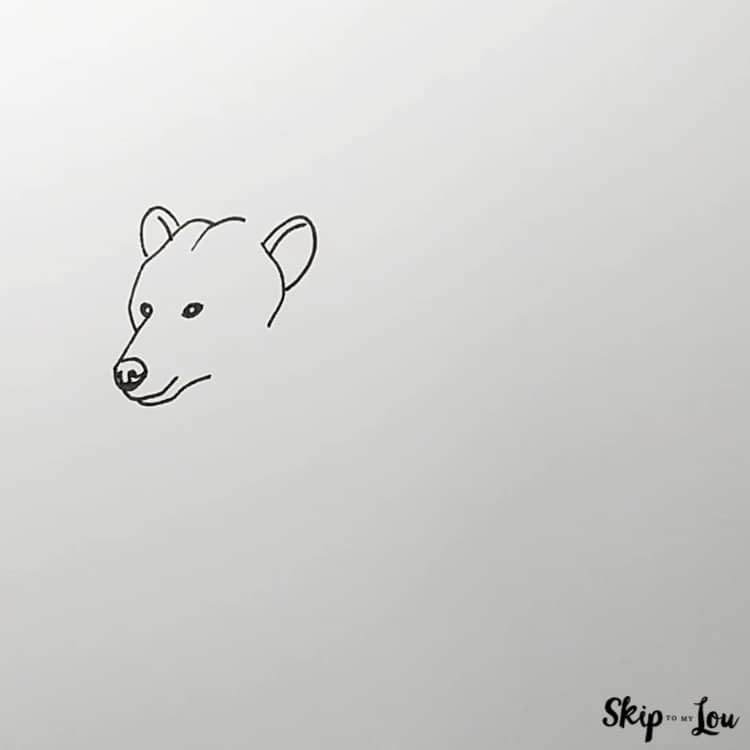
- The left side of the bear’s skull can be drawn by starting a little below the left eye and drawing upward in the shape of an old-fashioned telephone hand piece. Then draw a curved line in the middle of his forehead, skip some space and draw the right side of his face with a curved line ending at the same level as his eyes. Now draw the ears using upside down U shapes adding a curved hatch mark inside each ear to show the where the ear folds.
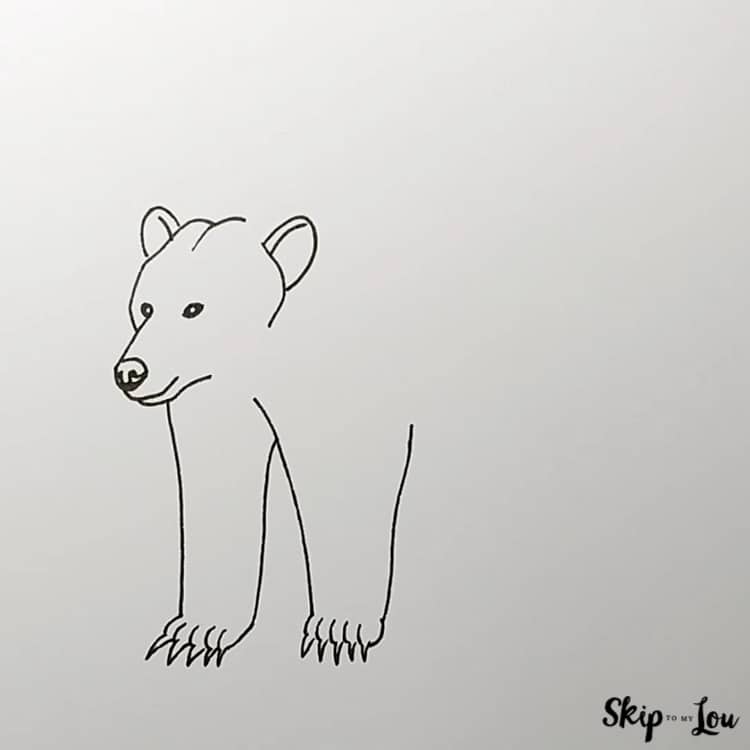
- And in step four, learn how to draw a polar or grizzly bear’s front legs and front paws. Draw the left leg using a long U shape, but, since this bear is walking, draw his paw slightly flattened by angling out and using small curved strokes to show his 5 toes. Go back and add 5 triangle shaped claws to each toe. Draw the right leg using a wide V shape adding the five toe and claws at the bottom like you did on the left leg.
- From the top of his head on the left, draw an upward sloping line that curves back down like a roof. Then draw the back and back leg with a curving line going right and then down.
- Next add the lines for the leg, paw, abdomen and rib cage. Start by curving up from the front leg with a wide J shaped line and drawing a wide 7 shaped line down to form the back leg. Next add 5 toes and 5 claws.
- Draw the other back leg using a U shaped line and add toes and claws to the bottom of leg. You have just learned how to draw a polar bear!
- And finally, give your drawing dimension by using light short stokes on his snout, around jaws, eyes and in ears like in the picture. Moving to his body, use curving strokes to define rounded areas and slanted straight strokes to show angular details. Finally, add detail lines on his legs, paws and toes. Was this bear drawing easy?


my favorite drawing supplies
- Sketching Pencils
- Kneaded Rubber Eraser
- Sketch Pad
- Erasable Colored Pencils
- Fine markers
- Sketch and Drawing Art Pencil Set
- Artist drawing set (This is great for new and experienced artists. It’s also something I give as a gift.)
Video of how to Draw a Bear
More Fun Bear Crafts
I would love to keep you fully stocked with creative ideas, yummy recipes, fun crafts, and loads of free printables. Subscribe to Skip to my Lou to get new ideas delivered to your inbox. Follow me on Facebook, Pinterest, Twitter, and Instagram for all my latest updates.