Have you ever wondered how to make Shrinky Dinks? You know, shrinky dinks, the thin plastic that shrinks in the oven. To make DIY shrinky dinks you need to save your #6 plastic containers (like the clear containers from the salad bar).
It’s a fun craft that you can do with your kids, and they’ll love the result, that’s for sure. We’ll take you through the whole process!
Crafts for kids: DIY Shrinky Dinks
Save the whole container, even the textured sides, and bottoms. It all works and flattens out nicely. The ridges on the sides give a nice space to color! We burned up most of the afternoon making DIY shrink plastic and used every bit of my large stash of #6 containers and were left wanting more! When your plastic runs out you might be interested in this huge list of kids crafts and activities, this summer bucket list and these free coloring pages. So many ideas to keep kids busy and engaged!
What is a Shrinky Dink?
Shrinky Dinks are children’s activity that was hugely popular in the 80’s. Special plastic sheets when heated in an oven, shrink to small hard pieces without altering their color or shape.
How do you make Shrinky Dinks?
You can purchase the special plastic sheets (affiliate link) and follow manufacturer instructions. Typically, shrinky dink plastic is first colored with permanent markers or colored pencils. Next cut out the shapes and bake at 325 degrees Fahrenheit for about 1-3 minutes. At first, the Shrinky Dinks will curl up, but then they will flatten back out. Once they flatten back out, bake for 30 more seconds.
Homemade Shrinky Dinks Supplies
It is really an easy activity. This is what you will need to make them:
- permanent markers
- regular hole punch
- #6 plastic
- oven
- cookie sheet covered with aluminum foil or parchment paper
- scissors to cut the plastic
How to make Shrinky Dinks
Here is the shrinky dink instruction you need! Cut a shape out of the plastic (plastic shrinks about 1/3 of the original size). Our 2″ circle became about 3/4″ when shrunk.

Color one side of the shape with a permanent marker. The color becomes more intense once it shrinks. If you are wanting to attach your shape to something don’t forget to punch a hole before placing in the oven.
Place the plastic on a thin cookie sheet (not the insulated type) covered with parchment paper or aluminum foil. Bake plastic at 350 degrees for 2- 3 minutes. Each oven is different so watch closely. You will see the plastic curl up and then it will flatten back out. It does give off some fumes so we left a window open for ventilation!

We added a jump ring to some of our shapes and strung on cording along with beads to make necklaces.

Some of the small shapes we placed on id wire rings along with some beads to make beverage markers.
Ball started as a 2″ circle, finished size was about 3/4″
Tag started 3″ long by 1 3/4″ wide, finished size was about 1 1/4″ long by just under 3/4″ wide

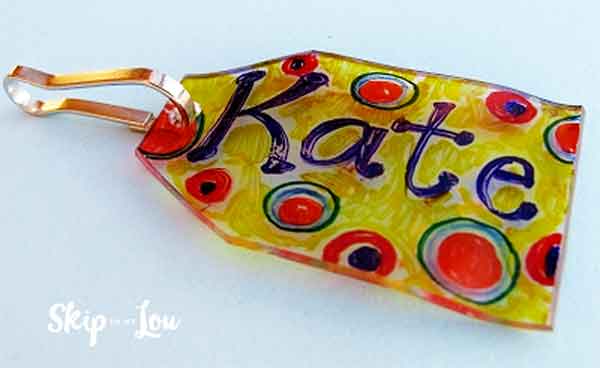
On a larger shaped tag (starting size 4″ long by 2 3/4″ wide) we placed a clip so it could be a zipper pull. Punch two holes side by side to make the finished hole big enough for the clip. I think these zipper pulls would make the cutest Valentine’s -attach a note that says “You pull at my heart!”

How do you make a shrinky dink ring?
Then we really got rolling and made rings. Our shrinky dink rings are a bit sloppy but we are still wearing them. It took some trial and error to find the right size. For my size, I started with a strip 5″ long by about 1″ to 1 1/2″ wide. Pull it immediately from the oven and quickly while it is still very hot wrap it around a Chap-stick tube. My son needed to make his 5 1/2 inches long and I (an adult must do this part–it is hot and you must work fast!) wrapped it around a child’s chunky marker. If you make a mistake and get a miss-shaped ring or it is too long just send it back into the oven. Once it is warm it can be trimmed with scissors, it will also flatten back out and you can give it another go. For more information on making shrinky dink rings you will want to visit Planet June. Here rings are lovely!

After we had used every piece of plastic my son said ———bracelets! We could make bracelets. So we are now saving more plastic!
Homemade Shrinky Dinks Tips:
- I was able to use a regular ink pad and stamp designs on the plain plastic with great results!
- Look for the #6 stamp on the bottom of the clear containers

- #6 – PS: polystyrene is used in takeout food containers. It has been found to leach styrene–a neurotoxin and possible human carcinogen–and has been banned in cities like Portland, Ore. and San Francisco. Okay, so there is a downside to the craft! Using a toaster oven outside might be the best thing to do!
- I remember my grandmother melting white Styrofoam cups in the oven enough to make them look like hats. I think she did something for Mother’s Day with them!
- I did think the melting plastic left a lingering odor in my oven. Before using my oven for food I turned it on to 400 degrees and let it bake for about 20 minutes to get rid of the smell. Again, a small toaster oven reserved for craft projects and used in a well-ventilated area (like outside) is the safest way to make homemade shrinky dinks!

What do you use to color on Shrinky Drink Plastic?
To color the recycled plastic, it is best to use sharpie permanent markers. The colors darken as the plastic shrinks. Colored pencils work great on store bought sheets. The commercial sheets have a rough surface. Clear smooth sheets or the recycled #6 plastic will need to be sanded lightly in order for the color stick onto the plastic.
Other Fun Crafts For You To Try With Your Kids
- Three easy ways to make PERFECT pom poms {Craft}
- Salt Painting For Kids {Craft}
- How to Make a Perfect Paper Cup Mechanical Claw Machine {Craft}
- Create The Perfect Ribbon Bow in 12 Simple Steps
- Bookmarks for Kids
- How to Make Adorable Felt Donuts
I would love to keep you fully stocked with creative ideas, yummy recipes, fun crafts, and loads of free printables. Subscribe to Skip to my Lou to get new ideas delivered to your inbox. Follow me on Facebook, Pinterest, Twitter, and Instagram for all my latest updates.
I agree with you
Any tips for making really large ones (final size 3″)”
There was a previous comment that said to lay parchment paper on the bottom AND top of your item and it would come out flat. That would be worth a try. If that didn’t work you might try a slightly lower temperature to give it more time to flatten out or for you to poke it down (a bamboo skewer works great).
Here are some tips for using your printer to print a design on the plastic sheets.
Lightly roughen the side to be printed with super fine grade sandpaper. This helps the ink hold to the paper and not smear.
Don’t put pages on top of each other even after you think they are dry.
Let the printer cool down between each sheet. It gets hot inside the printer and the plastic will melt,
I’m doing a C initial keychain and I’ve done it 3 times but I can never get it to not curl up in a weird way or lay completely flat ): do you have any idea on how I could fix it? I’ve tried leaving it in longer for about 5-7 minutes to see if it would uncurl further but it doesn’t seem to work.
Can I use a Sharpie Marker to trace a design on the slick side of frosted Shrinky Dink paper from the store?
Basically I want to trace a design for the kids to color.
Thanks for answering my question about using #1 plastic. I will just throw out what I saved. Too bad.
Thank you for the heads up about sanding shiney surfaces before colouring! I’m new to this. A few questions. Oven door open or closed? Bake paint side up? Will #1 plastic work? Thanks for your time.
hi i just got shrink paper and new markers but they dont work on the shrink paper like to know why thanks