If you are looking for a last minute gift idea, something that works up quickly, this free crochet ear warmer pattern is sure to become one of your favorites!

Here are some reasons you might like this crochet earwarmer:
- it’s a free pattern
- it works up in less than 1 hour
- it uses less than 1 ball of bulky yarn
- it is soft, warm, and comfortable
- it works great as a cowl too!
For those of you who like pattern sets, there is also a free pattern available for a matching pair of fingerless mitts…you can get the fingerless mitten pattern here.
Crochet Ear warmer Supplies, Terms, and Abbreviations
- Yarn: Lion Brand Yarns Unique (Grapevine)
- Hook: 6.50 mm (K)
Designed to fit: Adult Size Medium (~22″ circumference, 4.5″ height)
Gauge:
Ribbed Band: 4 sc = 1 inch; 3 rows = 1 inch
Main Ear Warmer Pattern: 5 dc st sets = 4″; 1 row = 0.75″
Abbreviations: R – row/round, ch – chain, chs – chains, blsc – back loop single crochet, st – stitch, sts – stitches, sc – single crochet, dc – double crochet, sl st – slip stitch, sk – skip, sp – space, (8) – the number in the brackets at the end of the Row/Round is the total number of stitches in the Row/Round, ( ) – crochet the instructions between brackets the number of times indicated, * to * or ** to ** – repeat all of the instructions included between the * *, or ** **, the number of times specified, dc st set – double crochet stitch set (for the purposes of this pattern a dc st set is 2 dc sts worked between 2 sts)
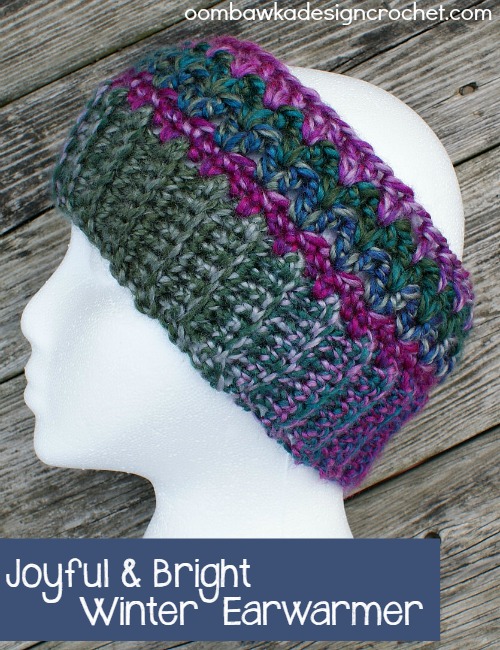
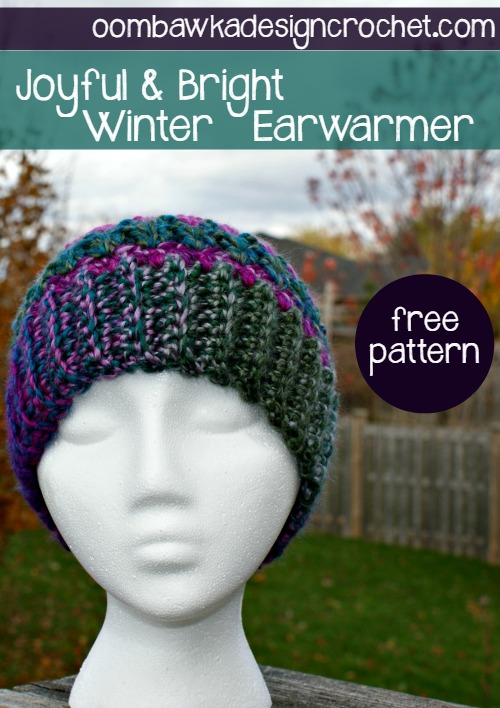
Joyful and Bright Winter Ear Warmer Free Crochet Pattern
Ribbed Band:
The band is worked in rows. Leave an 8″ tail at the beginning – you will use this later to whip-stitch the band together. The finished length of the ribbed band is 17″ unstretched and the band is approximately 2.5″ wide.
Chain 9
R1: Beginning in the 2nd ch from the hook, 1 blsc in each st across, ch 1, turn (8)
R2: 1 blsc in each st across, ch 1, turn, (8)
R3-R52: repeat R2 (8)
Do not finish off – continue to the Earwarmer Pattern below.
Ear Warmer Pattern
This section is worked in rounds. Slip stitches do not count as stitches in the totals at the end of the rounds. Do not work into the slip stitches – you may wish to use a stitch marker to remember which stitch is a slip stitch.
R1: Ch 1 and turn to work along the row ends of the ribbed band; work 1 sc in each row end for a total of 52 sts, sl st to the 1st st to join (52)
Using the 8″ tail of yarn (from the beginning of the ribbed band section), neatly whip-stitch your ribbed band together. Need help with the whip-stitch? View this tutorial for assistance: How to Join with a Whip Stitch Seam
R2: 1 sc in each st around, sl st to the 1st st to join (52)
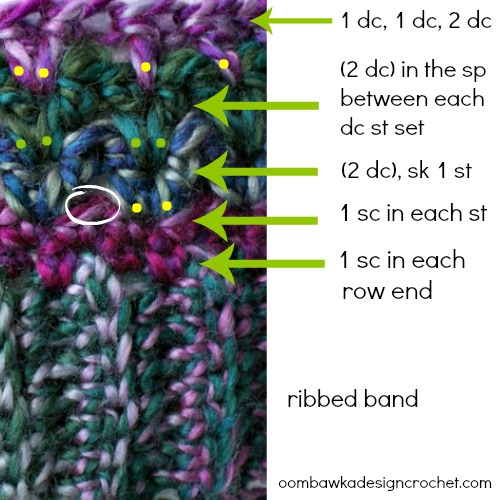
R3: (ch 3, 1 dc) in the 1st st, skip 1 st, [work 2 dc (we will call this a dc st set) in the next st, sk the next st] around; sl st to join in the space between the initial ch 3 and the 1st dc of the round (25 dc stitch sets)
R4: (ch 3, 1 dc) in the same sp as you sl st joined, (work 2 dc in the sp between the 2 sts that make up the next dc st set) around; sl st to join in the sp between the initial ch 3 and the 1st dc of the round (25 dc stitch sets)
R5: (ch 3, 1 dc) in the same sp as you sl st joined, *(work 1 dc in the sp between the 2 sts that make up the next dc st set) 2 times; (work 2 dc in the sp between the 2 sts that make up the next dc st set)* work the instructions from * to * 2 times, (work 2 dc in the sp between the 2 sts that make up the next dc st set) 13 times, **(work 2 dc in sp between the 2 sts that make up the next dc st set); (work 1 dc in the sp between the 2 sts that make up the next dc st set) 2 times** work the instructions from ** to ** 2 times, finish off and weave in ends.
If you love crochet please visit Rhonda at Oombawka Design for more free crochet patterns.
My Favorite Crochet Tools
- If you are like me and like to crochet on the go this tote is a stylish way to keep everything you need at your fingertips!
- My MOST FAVORITE tool is these portable scissors that always make it through security and fit perfectly in my hook case.
- A️ yarn bowl is a beautiful way to wrangle yarn while crocheting
- Keep organized with this crochet hooks kit with a case. This 85-piece kit has over 2,500 ⭐️⭐️⭐️⭐️⭐️ five-star reviews.
- Crochet Stitch Dictionary: 200 Essential Stitches with Step-by-Step Photos is the most helpful resource to keep handy!
Easy Crochet Projects for You
- Crochet Sweater Patterns For Everyone
- Crochet Star
- Crochet Wreath Ornament tutorial
- Crochet Stitches
- Crochet Baby Blanket Patterns
- Crochet Scarf Patterns
More Crochet Patterns
Feel free to get stitiching with one of these free patterns!
I would love to keep you fully stocked with creative ideas, yummy recipes, fun crafts, and loads of free printables. Subscribe to Skip to my Lou to get new ideas delivered to your inbox. Follow me on Facebook, Pinterest, Twitter, and Instagram for all my latest updates.


I have made several of these mittens and love them, but still not sure I’m doing row 16 right. How many stitches are there suppose to be around the finger part? also when I turn on row 16 do I stitch around the 2 chains that I did on row 15? I have a little hole there right under the base of the thumb. I stitch it up, but still not so sure about going around that row 16. thanks, Jean
Answered my own question, ear warmers finished. 25 sets PLUS ch3/1dc = 26 total.
I think for the next set I will leave off one of the rounds. But, I love them.
Am I going crazy over here? I commented asking if in R3 (25 dc stitch sets) does that include the ch3/1 dc. If so then I’m coming up short and my math tells me it should be 26 sets including the ch3/1dc to initially start the round. I’ve frogged and restiched this 3 times now and coming up w/ the same thing every time.
Just lovely
On R3 – (25 dc stitch sets) – does this include the ch3/1dc?
Hi, my daughter posted this on fb and I used to crochet, many moons ago. By chance, do you do video, like a you tube for re-beginners,like me, that has the basic steps? I’m hoping that it will be like bike riding.
I believe that this pattern can also be modified (shortened) to make matching boot cuffs. Just measure around the upper calf of the person who will be wearing them and make your band/cuff about an inch shorter than the measurement. Then add the pattern for the rounds on the side of the band/cuff just as you do for the earwarmer. Love this design! Can’t wait to get some of that yarn to make a whole set!!! 😀
Cute project, but where is the PRINT button to print if off? I seem to be missing it.
Super cute! Will be making some of these for Christmas gifts!