Friendship bracelets are a great summer craft. Do you remember making them when you were younger? Bracelet making by far was one of my favorite crafts! I love the colorful strings, different patterns, and beautiful braids and knots.
I remember making them with my friends, trading them at school, and giving them as gifts. I have noticed they are making their way back on children’s wrists lately, and thanks to the Pura Vida Bracelets craze, even teenagers are getting back into the stranded bracelet fun! If you need some cute nail designs to go with your colorful bracelets, check out these cute summer nail designs.
Easy and Fun Friendship bracelets
These are different than the macramé knot tying bracelets. These are all done by finger weaving loops. Depending on which loops you use you get a different bracelet pattern. The first bracelet it a flat 7 strand braid (which I will demonstrate).
Friendship Bracelet Supplies
- Embroidery Floss in a variety of colors. Embroidery floss is a loosely-twisted 6-strand thread. Buy it in stores that sell sewing supplies or craft. Usually, it’s sold by the “skein”, which is a bundle of thread about 8 yards long.
- Scissors
- Pins
- Nimble fingers
Friendship Bracelet Video
These friendship bracelets really aren’t tricky, use this video to get the hang of the technique. It uses just a couple of easy steps.
How to Make Friendship Bracelets
Learn the basics with these step by step instructions.
1. Start the bracelet by cutting 7 strands of embroidery floss about 24” long. You can adjust the length of thread once you get a hang of the pattern. Take both ends and tie it in a knot.")
2. Pin the knot to a pant leg or pillow with a safety pin. Separate the stranded loops and put them on your fingers (4 strands on one hand and 3 on the other).
")
3. You will always be working with the hand that has only three strands on it. In the picture above it will be my right hand. Your pinky does all the work.
Depending on how you want your bracelet to look you will loop your pinky under that strand and pull the end loop (#7 and #8) through them all.
")

4. For the flat braid you loop your pinky through the 2, 3, 6, and 7.
")

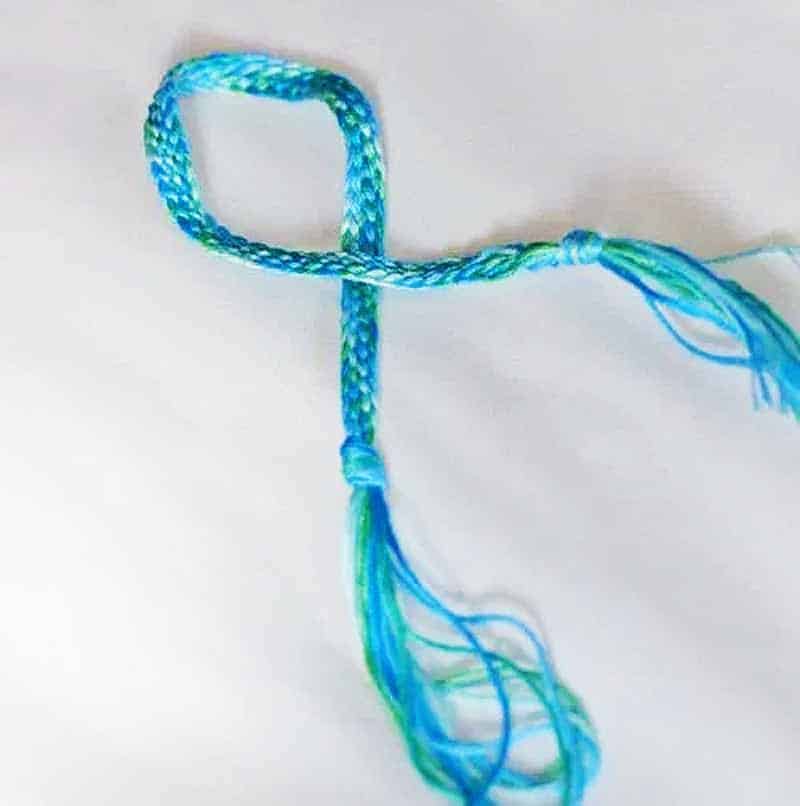
5. Then grab that last loop with your pinky (letting go with the pointer finger) and pulling it through the rest of the strands and tighten. Now you have 4 loops on your opposite hand.


6. Shift the loops on your hand with 3 loops on them towards your pointer so that pinky is free again.

7. Keep finger weaving back and forth with your pinky until you have reached the desired length. Un-loop all of your fingers and tie an overhand knot in the end.


Your kids will be kept busy making string bracelets all summer. They might even want to sell their finished bracelets. I used to have a bracelet making stand and sold them on my street corner for $.25. Since inflation, I am sure they could get $1.00 for them. {giggle}

by Beckie from Infarrantly Creative and Knock Off Décor
Friendship Bracelet Patterns
- Once you have this bracelet mastered, here are 15 styles to try. Don’t worry if that first bracelet doesn’t turn out perfect–they definitely get better with trial and error, and lots of practice!
- Try this chevron pattern. Such pretty color combinations.
- How about a round one instead of flat? The round designs us a braiding disc or braiding loom.
- Rope bracelets would be great to give to friends.
- Fabric Scrap Friendship Bracelet What a great way to use those fabric scraps and this technique is super easy.

- Easy Yarn Friendship Bracelet The yarn in this friendship bracelet makes it easier for younger kids to make. Simple and fun way to let them in on the fun.

I hope you loved learning how to make bracelets. Now have fun with these crafty ideas.
Kids Crafts and Activities
- Wow and amaze your kids with Oobleck. This stuff will keep them busy for hours!
- At our house we LOVE slime. We give you all the details and amazing recipes on how to make slime.
- Kool-Aid isn’t just for drinking. How about How to dye hair with Kool-Aid?
- Learn to sew!
- Learning how to cross stitch letters is another great activity involving string. It is great for younger kids too!
- Another fun kids craft you might try is this scratch art.
- Keeping kids busy and engaged all summer long can be a challenge. I have 50 ways to keep kids entertained this summer. You will find links to all the instructions, tutorials and free printables with each idea listed.
- If you need even more boredom busting ideas print off this 100 Summer Fun Activities Ideas list! Check them off as you go.
Pick out the ideas most important and interesting to you and create a summer bucket list.


This is great idea 🙂 Im trying this one fr sure
It’s beautiful without all the complex process. Definitely something to try. Kudos for posting this guideˇ^^/ˇ
These are so cute! OK, which fingers do you use to get the square braid? I kept looking at the directions, thinking I was missing it! : ) Am I just blind? In any case, these are adorable and I love the idea of weaving it, rather than doing all those knots–that’s where I lose my daughter! : )
Thanks ~ so much fun and good pic on the creating process ~ ^_^
Carol (artmusedog)
This brought back so many memories of embroidery floss safety pinned to my jeans. Thanks !
Soooooooooooooooooooo confused!!!!!!
Bless your heart! I used to make these when I was a kid and I’d totally forgotten how!! Now I have the instructions so I can teach my daughters. Thank you!!!!
Ha- I hadn’t thought of that style of bracelet since camp in elementary school! I can even remember one of the girls who taught it to me. Her name was charity and I thought it was the prettiest name ever.
love this. Gonna try it with my kids! Thanks for the tutorial!
Fantastic!! I am putting crafts together for all my grandaughters and this is one more to add to them. They really are going to love this one. Now I need to pick up floss in their favorite colors. I need to hurry because some of them are getting mailed out.
Tell me you’re going to show this on youtube so I can actually see how it’s done. I’d love to try.
So cool. I may have to try it
wow, I’ve made alot of bracelets but never one like that. I may have to try it and see if my GS girls can do it.
I adore friendship bracelets, when I was little we used to make them at school for each other. I love how there can be different patters, widths and colors. Now, it is even fashionable, so one cannot go wrong by wearing these bracelets. Love the explanations on how to do it.
I loved making these as a child. I was just thinking that I needed to reteach myself so that I could teach my son 🙂 Thanks for sharing!