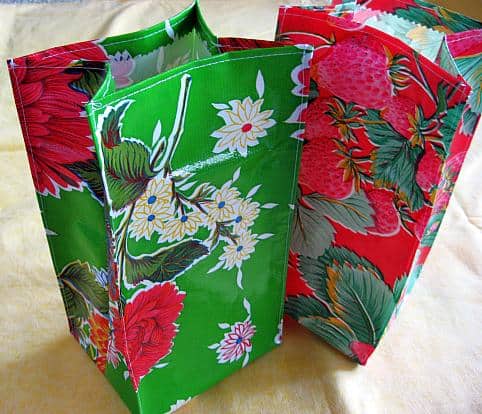
This DIY lunch bag made from oilcloth is a stylish way to take your lunch and also makes a useful gift for a friend. With some basic sewing skills and a small piece of oilcloth, you can easily make a homemade lunch sack to brighten up your meal.
This easy pattern can also be used to make a doodle bag or the most adorable felt lunch playset for kids. So fun!
Lunch Time!
A group of friends and I share a tradition of taking our kids’ teacher’s lunch during teacher appreciation week. We tally up the number of lunches we need, notify our teachers and then gather in the morning to assemble the lunches. One friend makes this delicious chicken salad, another brings croissants for the sandwiches, one brings fruit, another makes a wonderful pasta salad, and another friend makes these awesome brownies. We add a water bottle for an easy drink and I take care of the packaging.
Last year I made these paper lunch sacks, but this year I made reusable lunch bags with oilcloth. It only took minutes to make each one and it will be something the teacher can use all year long.
What is oilcloth?
Oilcloth is a tightly woven fabric that is treated on one side (usually with linseed oil) to give it a waterproof finish. The fabric is usually cotton, but can also be linen, and the finish makes it easily wipe-able. You can find it at most fabric stores and is often used to make table cloths.
Here Are the Supplies You Need
- cardboard to make pattern
- 2- 15 X 12 inch pieces of oilcloth fabric
- scissors
- ruler
- clothespins or clips
- thread
- sewing machine
How to Sew a Cute lunch bag
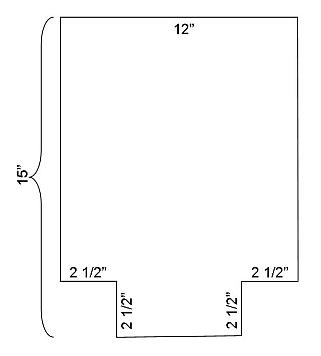
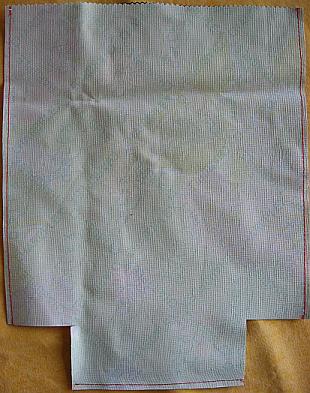
Step one: Make a pattern out of cardboard measuring 15 x 12. Cut a 2 1/2 inch square out of each bottom corner.
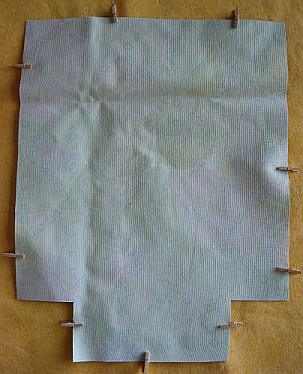
Step Two: Take two pieces of oilcloth right sides together and draw around your template. Cut out. I used small clothespins to hold the pieces together.
TIP: Mini clothespins work great but I have become a huge fan of these plastic sewing clips made for sewing.
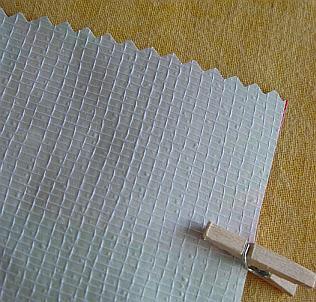
Step Three: I used pinking shears to cut across the top (very optional- I thought it gave the edge a finished look)
Step Four: Sew down each side and across the bottom. I used a stitch length of 5 and 1/4 inch seams on the entire bag. My machine handled the oilcloth beautifully, if you have trouble a piece of tape on the bottom of your presser food can help keep the oilcloth from sticking.
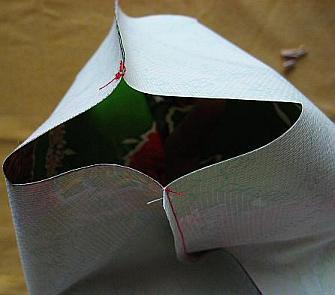
Step Five: Fold in bottom of bag bringing bottom seam and side seam together
Step Six: Pin bag bottom to bag side with clips
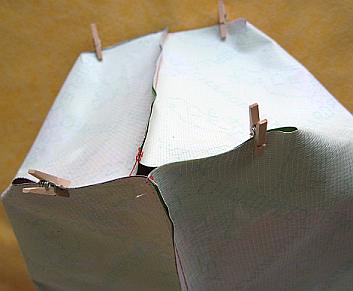
Step Seven: Sew across on each side
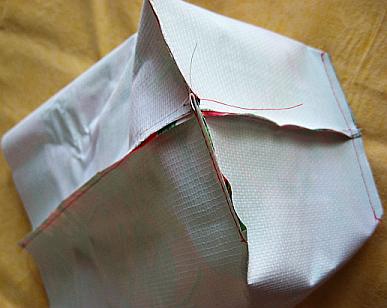
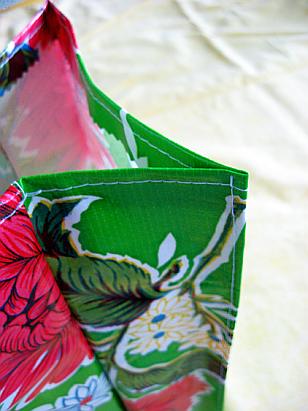
Step Eight: Turn bag right side out and fold in top of bag about 1/2″ and then top stitch

Step Nine: Measure about 2 1/2 inches from middle side seam on all four corners, finger press, clip with clothes pins
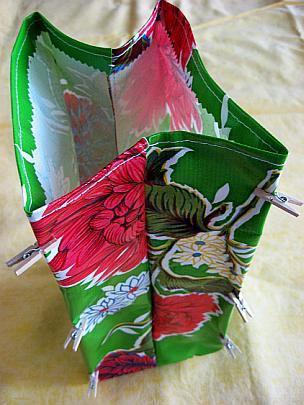
Step Ten: Top-stitch closely to the corner fold on each of the four sides
Finished! This really is an easy project to make cute lunch bags for friends to take their lunch to work or pack kids’ lunches. You can add an ice pack to keep your lunch cool, and I recommend hand washing the bag if you have a spill. I would really love to know, do you call it a lunch sack OR a lunch bag–and where are you from? I find it is called both here in the midwest.
If you’re sending this cute lunch sack with a loved one, you’ll want to make sure that you add one of these cool lunch box notes (over 100 designs to choose from). Stay tuned for a reusable snack bag and sandwich bag sewing pattern as we are trying to get away from single use plastic bags at our house and start using more reusable storage bags.

My Favorite Sewing Tools
I would love to keep you fully stocked with creative ideas, yummy recipes, fun crafts, and loads of free printables. Subscribe to Skip to my Lou to get new ideas delivered to your inbox. Follow me on Facebook, Pinterest, Twitter, and Instagram for all my latest updates.
More Cute Lunch Bag Ideas
I would love to keep you fully stocked with creative ideas, yummy recipes, fun crafts, and loads of free printables. Subscribe to Skip to my Lou to get new ideas delivered to your inbox. Follow me on Facebook, Pinterest, Twitter, and Instagram for all my latest updates.


thank you! great idea!
this is amazing! i’ve been wanting to get a Vera Bradley lunch sack but i don’t want to spend the money. I’ve just recently gotten really into sewing after my mom taught me how to use the sewing machine. This is a great idea for me to use with some stylish fabric! Thanks!
This is so cute! I am going to link this on my blog after I complete mine. 🙂 I also want to link another of your projects. You have such great ideas!
mommyoftwo247.blogspot.com
So cute!! Thanks for sharing. I linked to it on my blog http://ificould-ificould.blogspot.com/2010/04/oil-cloth-lunch-sacks.html
Thanks!!
What a nice tutorial of lunch bags. Really good I can use this, making this adorable bag is absolutely lovely. For me, hand-made stuffs are absolutely sweet when you give it to the person you really cherish. Because you exert your effort just to create such reusable gift. 😉 Well if you’re a type of a person who’s not good in sewing you might like to check it site –> Happy Tiffin The site offers a variety of steel tiffins made from quality stainless steel food grade in which you can guarantee that its safe to use.
this afternoon I’ll write a post about bags and I’ll add this idea on my post 😀
bye bye Laura
thanks SO much for this tutorial!! i made one and linked to your blog!
http://mfnusz.blogspot.com/2009/10/lunch-bag.html
I have the perfect amount of oilcloth leftover from a picnic blanket to make a few lunch sacks. It’s on my list for this weekend. Thanks!
Hope to post pics of the finished products on Monday, but for now, I’ve linked to your post here: http://make-happy.blogspot.com/2009/09/my-weekend-to-craft-list.html
Thanks so much for the tutorial. I just made them for my kids for the first day of school. I am still “perfecting” my sewing skills (hahhahaha) and even I was able to make them quickly. Thanks for sharing.
I love your site. I used your pattern for a lunch bag to make this for my son:
http://lazyquilter.blogspot.com/2009/08/go-green.html
I gave you credit for the pattern. I hope it was ok to do this!
I have been looking for a simple lunch bag pattern. I have the cutest oilcloth that will now become lunch bags! Thanks for sharing such a detailed tutorial!!!
~gloria
This is a great pattern. Much easier than the one published on the Martha Stewart website. To add a little contrast to the bag, I used two different colors/designs of fabric. It looks cute when they meet in the crease and rolled over the top of the contrasting piece.
This is a Fabulous idea and Thank You not only for showing us how to construct the bags, but a great website to purchase oilcloth! I make my children’s lunch almost every day, and every day I use those little plastic bags I think about how wasteful it is to use them! Because of your cute tutorial, I am going to make these and matching sandwich/snack bags as well to cut down on our carbon footprints! Thanks again!
What a great idea. The teacher’s must love you for this. Very cute!
~Tonya
so==here is a good websit to visit if looking for oil cloth and is in the us
http://www.mendels.com/fabrics10.shtml
if this doesnt work go to http://www.MENDELS.com and search oil cloth