Here is a simple tote bag pattern to walk you step-by-step through how to make a super cute tote. The best part is that it’s reversible! Make one for yourself — or make a dozen as gifts!

With a little practice, you can turn out these simple bags on a sewing machine in no time. Lined totes are super easy, and they can be made in so many cute variations. Plus, don’t miss our pattern for a matching zippered pouch!
Tote Bag Pattern: Supplies needed
For this reversible tote bag sewing project, you will need the following fabric pieces:
- 2 pieces of fabric 13 1/2 inches X 14 inches (outside)
- 2 pieces of fabric 13 1/2 inches X 14 inches (lining)
- 1 piece 4” X about 44″ long
How to Make a Tote Bag
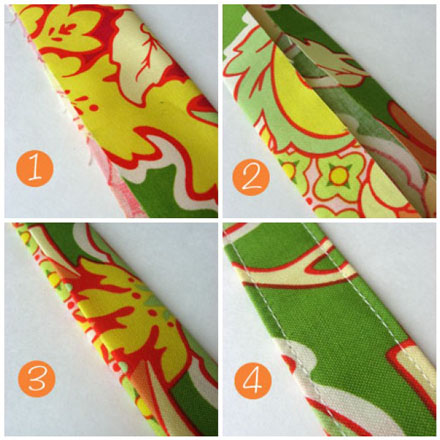
First, let’s start by making the straps.
1. Cut a piece of fabric 4″ X 44″ long. Press fabric in half lengthwise.
2. Open the fabric up and press each outside edge to the center.
3. Fold fabric in half and press.
4. Top-stitch down each side of the strap close to the edge. Cut the fabric in half so you have two straps about 22 inches long each.
Now let’s make the tote bag
1. Cut four pieces of fabric 13 1/2 inches X 14 inches.

2. Lay the lining fabric right sides together and sew on three sides. Leave one side open for the top! Next, sew your outer fabric pieces right sides together on three sides.
For this project, the bottom of the bag is 13 1/2 inches wide and the sides 14 inches long. But the bag can be made any size.

3. Now we need to “box” the bottom of the bag. Pinch the bottom corner together and stitch across 1 1/2 inches from the corner. Do this for the lining and also the outer fabric.

4. Repeat until all four corners have been sewn.

5. Place the lining fabric inside the outside fabric right sides together. I slipped the lining fabric up a bit so you can see how it slips in.

6. Place straps in between right sides of the fabric on each side about two to three inches from the side edge.

7. Pins straps and the top edge of the bag well. Stitch around the top of the bag 1/2 inch from the edge. Leave a 2-3 inch opening for turning the bag (I usually leave this on the side).

8. Turn bag inside out.

9. Push lining inside the bag and topstitch all the way around to hem the top of the bag. This will close up the opening used for turning.
Topstitching also makes the seams more durable, so they won’t strain and pull apart if you use the tote to carry heavy stuff.

Finished! How exciting! You did it. I hope you make tons of totes with this tote bag pattern! They make great gifts.
Tips for the Perfect Reversible Tote Bag
Here are some other optional tips that might help:
- Maybe you need longer or shorter handles than the size in this pattern. To modify, just drape a measuring tape over your shoulder and see what feels right to you.
- You can use a heavy canvas or Duck cloth — in which case you’ll need to adjust your sewing machine needle accordingly.
- If you use a lightweight fabric, you may want to line it with a fusible fleece — just follow directions on the fleece packaging to fuse it to the wrong sides of one set of your fabric pieces.
- Are you feeling ambitious? You might experiment with adding pockets or dividers!
- Tote bags are perfect for taking your lunch to work, transporting groceries, or packing gym clothes. Cut down on plastic bags with washable, handy-dandy, eye-catching totes!

Now that you know how to make a tote bag you might also like to make a matching pleated zippered pouch to go with your new tote! A zippered pouch is really the perfect use for extra fabric leftover from making a tote bag. You will be surprised at how easy it is to put in a zipper with this zippered pouch tutorial.
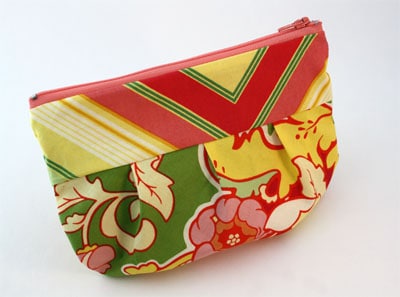
The fabrics for these projects are from the talented Heather Bailey. I used the vibrant Pineapple Brocade in green and the chic Zag Stripe in gold.
With so many fabric choices available, the possibilities are truly endless! Have you tried this pattern yet? I’d love to see the tote bags you’ve made—feel free to share your creations!
Want to make your tote bag more personal? Try these easy appliqué monograms with free printable letters.
Tote bags remind me of things like baskets and other containers that you store things in. Check out these great DIY Fabric Storage Containers. They bring function and decoration to any room.
Other Sewing Projects to Try
- A Simple Scrunchie Sewing Pattern {Craft}
- How to Make a Fabric Corner Bookmark – Fun & Easy!
- Fabric Coffee Sleeve Tutorial
- Hot Pad Tutorial
- DIY Appliqué Gift Bag
- Vintage Doll Quilt Tutorial For Beginners
I would love to keep you fully stocked with creative ideas, yummy recipes, fun crafts, and loads of free printables. Subscribe to Skip to my Lou to get new ideas delivered to your inbox. Follow me on Facebook, Pinterest, Twitter, and Instagram for all my latest updates.


What a fantastic tutorial, so easy to follow, with wonderful results. I am very new to sewing, but really enjoyed making this bag, will be making lots more – Thank you for posting this tutorial
Loved this – easy to make. I changed it by using an old fabric belt for the handle, and making it run from seam to seam as a long over the shoulder type one.
I love this! Just learning how to sew and this looks like something I might be able to do on my own, thank you so much for sharing. =)
I am 16 and I have probably only used a sewing machine 5 times in my life. This bag was so easy to make!!! I made it for a bag for my school books and it looks GREAT! Instead of 13 1/2 by 14 inch rectangles I did 20 by 17 inch rectangles and a 2 inch corner stitch. I also only did one long strap which I attached at the side seems. I love it and I think I will be using this for Christmas presents this coming year!!! Also, (to anyone who doesn’t sew very often) I couldn’t really wrap my head around the concepts from step to step at first but I did exactly as it said I didn’t mess up once. They really are easy step to step instruction.
Hello!
I made three bags recently, and I modified your instructions to account for my mistakes. 🙂 Here they are; feel free to use them, if you want.
— Lea
You will need:
2 pieces fabric 14 1/2 inches X 16 inches (outside)
2 pieces fabric 14 1/2 inches X 16 inches (lining)
1 piece 4” X about 44″ long, or 2 pieces 4″ x 28” long (longer straps)
The Straps
1. Press strap fabric in half lengthwise.
2. Open fabric up and press each outside edge to the center.
3. Fold fabric in half and press.
4. Top-stitch down each side of strap close to the edge. Cut fabric in half so you have two straps about 22 inches long each.
The Bag
Sew lining fabric right sides together on three sides and also outer fabric right sides together on three sides.
Pinch bottom corner together and stitch across 1 1/2 inches from corner. Repeat until all four corners have been sewn. Press long sides open.
Turn lining fabric right side out. Pin straps to right side of lining fabric, matching edges, about 2-3 inches from the side seam. Make sure the straps are oriented the same way.
Insert lining and straps into outside of bag (which is still inside out). Pin straps and top edge of bag well. Stitch around top of bag 1/2 inch from edge. Leave a 2-3 inch (no less!) opening for turning bag. I usually leave the opening on the side.
Turn bag inside out. Push lining inside the bag and top stitch all the way around the top of bag. This will close up the opening used for turning.
Just whipped up 3 of these bags today for a new family at our church that has 3 little girls. The mom came up to me after church on Sunday and asked how I got my kids to sit so nicely (she caught them on a good day), I told her that each had a church bag. When I woke up this morning I said to my husband that I wanted to make the girls each a bag…he said that it was a good idea. I used your tutorial over a year ago to make trick or treat bags for my kids. So quick & easy! Thanks!
Hi,
I also made my first bag with your tutorial! Thank you, thank you, thank you. It was very easy with your explaination and pictures! My three little girls ara all waiting for there own now, so I know what tho do with my sewing machine and fabrics! Again, thank you so much!
Kind regards
Francesca
This was the first project I made with a sewing machine. I’m 48, and my partner got me one for Christmas. (I’d asked for one, after years of watching Project Runway.) Anyway, this seemed doable, and it turned out quite nicely. No one will mistake it for Louis Vuitton, but it’s something I could take out in public. Thanks!
Thank you so much for this tutorial! It was so clear and easy to understand, even for a novice sewer like me. I needed a tote bag to lug my books and stuff to school and thought, surely I can make one myself and then after messing up on my own I found this and I did it! Thank you!!!
Just finished making this tote. What fun , so easy and it turned out great. These make great gifts and now with plastic bags being banned all over the place they are very handy too!!!!!
Hi… I just made two tote bags from your tutorial and I love them. Very easy and simple, the results are so pretty. Both of my girls love their new tote bags. Thank you…! Keep sharing and happy sewing…
Just made my first tote bag today using your tutorial as a guide. It was very easy to follow. Thanks so much!
I love this pattern – I attempted my first tote today and it tote’s came out awesome! I changed it around a bit to be able to make use of the fabric I had laying around, let me know what you think! http://elizamiddleton.wordpress.com/2011/12/11/rainy-sundays/#
@Sanaya for step #5 you take the 2 peices of fabric that are the same pattern and sew 3 sides. you dont sew the top because that will be the opening of the bag. thats the best i can explain it. im not sure if you cheaking anymore but tried to help good luck
Thank you so much for this tutorial. I haven’t sewn in awhile and the visauls really help. I’m making bags for my X-mas gifts! Aloha!