Are you ready to take your art to the next level by learning how to draw a face? I am here to help you master the art of face drawing from the top of the head to the bottom of the nose. Drawing realistic faces can be challenging, but it doesn’t have to be intimidating. By breaking down the process into easy-to-follow steps and mastering facial proportions, you’ll be drawing faces in no time!
This post will provide a step-by-step guide on how to draw a face, with tips on how to get the correct proportions of the face, add depth and detail, and create portraits that are both expressive and true to life. So, whether you’re a beginner or an experienced artist looking to hone your skills, grab your pencils and let’s get started on this face drawing journey together!

Drawing supplies for how to draw a face
- Sketching Pencils
- Kneaded Rubber Eraser
- Sketch Pad
- Erasable Colored Pencils
- Fine markers
- Sketch and Drawing Art Pencil Set
- Artist drawing set (This is great for new and experienced artists. It’s also something I give as a gift.)
Step-by-Step Instructions for Drawing a Face
To draw a face we begin by sketching the basic proportions of the head and face. This includes the placement of the eyes, nose, mouth, and ears. Next, add in more detail to each feature, focusing on the shapes and shading to create depth and dimension. Once you have the basic structure of the face down, you can add in the finishing touches. Lets start!
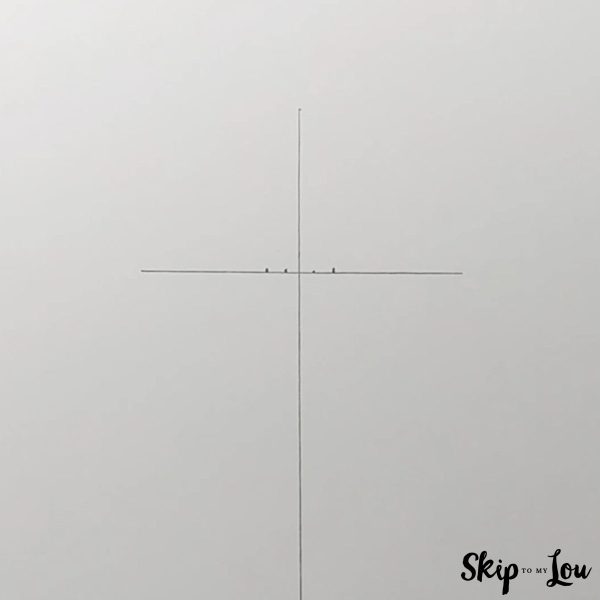
Step 1 – Draw a horizontal and vertical line
Draw a horizontal line and a vertical line intersecting each other. A vertical line will act as a middle line, and we will help align the rest of the face to this line. From the intersecting points, mark four points at 1 cm each on the left and right of the vertical line, as shown in the image.
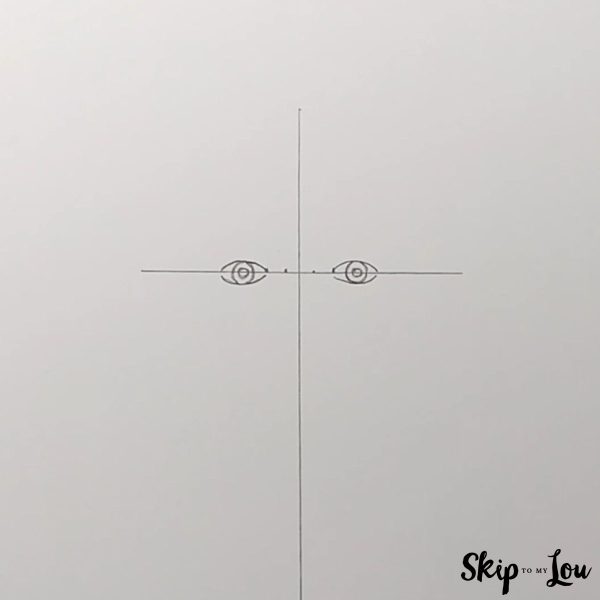
Step 2 – Draw Realistic Eyes
In this step, we will draw eyes. From the second point marked on each side of the vertical line, using curved lines, trace the outline of the eyes. Under the curved lines, make a circle to draw the inside of the eye. This should touch the eye line. Then make a small circle inside the bigger circle. Make sure you make your curved lines the same on both sides to get perfect eye level.
Step 3 – Draw eyebrows at the top of the eye
From point one marked on the horizontal line, trace another curved line to make eyebrows on both sides. Now you can see the center of the face along with the eyes. Make sure the corners of the eyes are touching the horizontal line to get the perfect shape. While tracing, use light pencil strokes to erase any mistakes easily.

Step 4 – Draw A beautiful long nose
Using the first points on our horizontal line, draw slightly curved lines below the line towards the vertical lines to make the tip of the nose. To make the base of the nose, draw rough triangles around the tip, as shown in the image.

Step 5 – Draw beautiful lips
Draw a horizontal line below the nose after a 2 cm gap. Considering this the center line, draw the upper lip with a curve in the center and lower lip. Make sure that the bottom lip bulges out.

Step 6 – Give an Outline of the face
In this step, we will give an outline to the human face. Very carefully using light pencil strokes, using curved short lines at different angles, outline the face. Make the bottom of the chin U shape and the shape of the head slightly round.

Step 7 – Draw Ears, Neck, and Hair
Once you have a head shape, it is time to draw ears. Using curved lines, touching the outline of the face, draw ears on both sides of the face. Take the help of the horizontal lines. The top of the ears would be above the horizontal line.
Use the same point on the horizontal line to draw hair. Using simple curved lines, trace the hair outline. Hair outlines changes for a female face. Keep it simple to get a realistic image, especially if you are a beginner artist.
Using a curve short line, draw the neck at the bottom of the face. Checkout the image below for details

Step 8 – Final touches
To get perfect features of the face, it is important to erase the helping lines carefully. Before erasing, use a dark pencil or marker to sketch the complete outline. Draw a little wavy line to the hair. Once done, erase the helping lines and extra lines from the middle of the face.
Drawing a face may seem daunting at first, but with the right approach and some practice, it can be a great way to express your creativity and capture the essence of the human face. By following the simple steps outlined in this post, you can learn to draw a face with correct proportions and equal parts, and use specific tutorials to explore different facial expressions, head shapes, and different hairstyles.
The good news is that anyone can learn to draw a face, even if you are a beginner artist. Remember that each face is unique, and you can experiment with different styles and techniques to find what works best for you. Don’t be afraid to make mistakes, and keep practicing to improve your skills.
You might like to draw
Enhance your drawing skills by practicing more:
I would love to keep you fully stocked with creative ideas, yummy recipes, fun crafts, and loads of free printables. Subscribe to Skip to my Lou to get new ideas delivered to your inbox. Follow me on Facebook, Pinterest, Twitter, and Instagram for all my latest updates.


