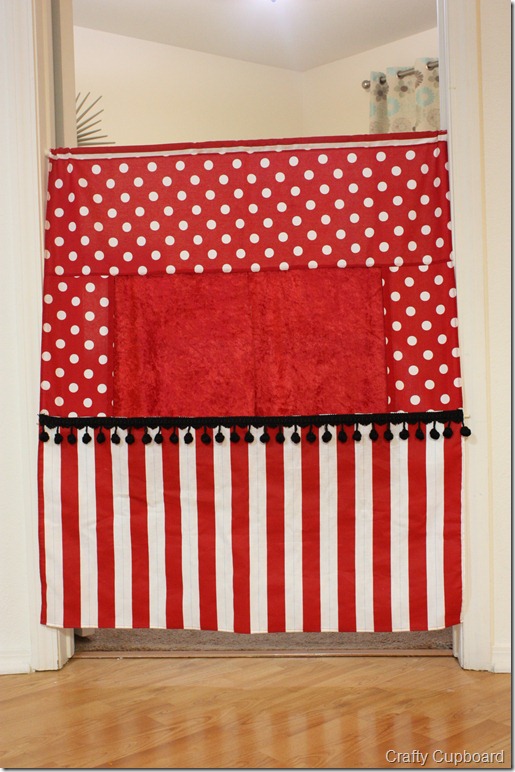
Here is a DIY project that brings hours of imaginative play. This easy-to-sew doorway puppet theater is just the thing! With a few simple supplies and some basic sewing steps, you’ll create a charming theater that fits right in any doorway. It’s perfect for sparking creativity and setting the stage for storytelling. It makes a wonderfully thoughtful handmade gift for little performers.

If you’re short on space but big on creativity, this easy-to-make doorway puppet theater is just the solution! This theater fits neatly in any doorway, transforming a simple spot into a stage for endless fun. When playtime is over, it’s easy to take down and store. Doorways aren’t just for doors anymore—now they’re for puppet shows!
Related: If you prefer a hammer over a sewing machine try this Recycled Puppet Theater made from an old wood hutch from a dresser.
DIY Puppet Theater Supplies
- Fabric pieces cut to the following measurements: (of course you can you any pattern of fabric but to make the tutorial easier to understand I labeled the fabric pattern I used)
POLKA DOTS (for the top of the theatre): (1) at 14” x 36”, (2) at 8” x 13”
STRIPE (or bottom of the theatre): (1) at 29” x 36”
CURTAIN: (2) at 12” x 14”
DOWEL POCKET: (1) at 1 1/2” x 34” - 1 yard of decorative trim that is at least 1″ wide, and some ribbon to complete this look
- Fabric Scissors
- Sewing Machine
- Thread
- Ruler
- Rotary Cutter
- Dowel
- Cafe Curtain Tension Rod – This telescopic rod fits inside the door frame. It will accommodate different sized door frames.
TIP: Consider using machine washable fabrics for the fabric of the doorway theater. If you do, be sure to prewash.

How to Make a Doorway Puppet Theater
Make a double 1/2” hem on one 13” side of your two 8” x 13” pieces.

Pin the hemmed piece with it’s 8” side to the long side of your large polka-dot piece with raw edges even.

Stitch it down, and repeat with the other hemmed piece on the opposite end of the long polka-dot piece. I finished my edges with my serger, which I strongly recommend finishing yours in whatever way you can (serger, zig-zag, rolled hem, etc.).

Iron your finished edge toward the long piece

and top-stitch it down nice and pretty.

Now, with your bottom stripe piece, do the same steps as above, pinning the 8” pieces, sewing, finishing, and top-stitching.

Now, make your side and bottom hems. I did a double 1/4” hem.
Next, work on the top. Your top hem (I used a separate piece of fabric, so ignore my top) is going to be a rod pocket for your café curtain rod. Iron down a 1/4” hem, then a 2” hem. Stitch it down, and you’ve created a rod pocket.

Now, pin your two curtain pieces to the top of the curtain “window.” Use lots of pins! I used some fun crushed panne fabric for a more theatrical look. Carefully top-stitch right over your existing stitching.

Next, finish the sides of your dowel pocket. I used muslin so it would be fraying everywhere if I didn’t serge it.

Pin any decorative trim or ribbon to the bottom of your “window” while at the same time pinning the dowel pocket on the back. Carefully stitch your trim down, using two rows of stitching about 3/4” apart. You will tackle two birds with one stone doing this:


Next, attach some ribbon 3” from the top of your “window” on both sides for tie backs. These ties will hold your curtains open. I suggest using Velcro on your ribbon for little kids, but I didn’t have any on hand!

Place a café curtain compression rod in your top pocket, and a 1/4” dowel in your dowel pocket (you might want to trim a tiny bit of your dowel, I think I will), and hang that doorway theatre up! The dowel rod will help the hang and give it a taut appearance.
You have now created a fun place for kids’ imaginations.

And there you have it—a delightful doorway puppet theater ready for much fun! Not only is it a great addition to any playroom, it also encourages endless imaginative play. Whether it’s for your own kids or a Christmas gift, this DIY theater will be a hit. Enjoy the magic of storytelling and happy sewing!
Melanie at the Crafty Cupboard. is the creative genius behind this real winner of a gift for the imaginative child in your life!
Now for the Puppets…
Looking to add some fun characters to your new puppet theater? Here are some easy ideas for creating puppets from felt, paper, and fabric! With just a few supplies, you can make anything from playful animals to friendly monsters. These simple, handmade puppets will spark even more creativity and keep kids entertained with hours of puppet fun!
- Free printable groundhog puppet
- Felt bunny puppet
- Groundhog finger puppet
- The cutest turkey finger puppet
- Little hands can make this foldable cat hand puppet
- Lego Batman Shadow Puppets
- DIY Toilet Paper Tube Puppets – free printable creates a whimsical set of puppets
- Homemade Sock Puppets
- Cookie Monster Sock Puppets
- DIY Shadow Puppets
Now you are ready for a puppet show! There’s no limit to where your children’s imagination can take them! With just a bit of creative play and a dash of curiosity, a simple puppet theater can transform into a castle, a pirate ship, or even a jungle safari. Let their minds explore, and watch as everyday moments become grand adventures! Maybe there will be a surprise appearance from mom and dad.
I would love to keep you fully stocked with creative ideas, yummy recipes, fun crafts, and loads of free printables. Subscribe to Skip to my Lou to get new ideas delivered to your inbox. Follow me on Facebook, Pinterest, Twitter, and Instagram for all my latest updates.


Thank you for the fun tutorial. I used your pattern as a base but changed the measurements slightly to fit my doors. Story time just got kicked up a notch in my house!!
Wonderful idea, thank you! I am making two of these now, one for my own kids for Christmas and one for their cousins. I had a question, though – did you hem the curtain pieces? or does crushed panne not require it? Thanks! (P.S. – Sadly, I don’t have a serger.)
That’s a really cute idea!! One of our users just pinned this up to her Pinspire collection and I just wanted to verify that this was okay with you. We’re a young startup from Berlin so we don’t want to step on anybody’s toes. Don’t hesitate to get in touch for the link (masterpinspire@gmail.com)
Super cute – – i think i may know a child who would love this! Thanks for the idea!
Love, love, LOVE it! What a fantastic idea. Can’t wait to whip some of these babies out.
If anyone is looking for an even simpler one, I made one for my girls. I took two cafe tension curtain rods and one yard of fabric. cut the fabric in half so it was half a yard by 22 inches times two, then cut one of those in half again. I hemmed the bigger piece and hemmed one side big enough to put the tension rod through, then hemmed the smaller pieces and ran both of them through. Then there’s a curtain that opens and closes easily. Does that make sense? Here’s a picture.
http://1.bp.blogspot.com/_9oT3yyZOnAM/TRo_5qg-z_I/AAAAAAAAKe8/_shcHs9W2v0/s1600/dec%2B25%2B321%2B%2528Small%2529.JPG
What a great idea to put it in the doorway. Love the mix of patterns.
Very cute! My girls received one as a gift many years ago, but unfortunately the “lived in” area of our house is short on doorways. 🙁
What a super-cute puppet theater!
Fab Idea! Love it! 🙂
That is a SUPER CUTE puppet theater!
The majority of people that have families don’t have a lot of extra room so this is great!
If you attach a large piece of felt with two short pieces of dowel in pockets, so it kind of stands out behind, you can cut out either fabric or paper pictures or objects to be scenery and then use velcro to attach them. Besides, then it hides the view of the next room too.
Oh my goodness! SO CUTE!!! I can not wait til my little one is born and gets big enough for me to make one of these 🙂
Fabulous! I want one! 😛 Hmm… Maybe I’m too old? NAH!!! 🙂
Cute idea. i love the pom pom fringe.