This 4th Of July Decoration is fun to make with kids and perfect to decorate for the holiday bonus it doubles as a game! Kids will love helping you make these and playing with them. This is just one of the many Kids Crafts and Activities we are sharing this summer here on Skip to my Lou . Just check out this boredom buster idea list for even more inspiration. Welcome Natalie…
Hi there it’s Natalie from Fern & Maple here today. A big thank you to Skip To My Lou for inviting me to be a part of their fun summer series! This is my first time joining and I’ve had a lot of family fun pulling together this post for you. I enjoy sharing fun party ideas, DIY, crafts and more so pop on over for a visit!
Well, let’s talk 4th of July! It’s coming up quickly and you may already be in the midst of trying to get things ready for family celebrations. So why not let the kids help you this year? If they are anything like my 2, there will be one who loves to help and another who needs to be tricked into it! I have a few cute and easy projects the kids can help you with to decorate the table AND they can even make their own activities to keep them busy on the day.

Best of all you can make all of these with tin cans and either scraps/supplies around the home or things you can pick up from your local craft or dollar store. First, the must have supplies:
- Tin cans (various sizes depending upon the craft)
- Twine or string
- Scissors
- Glue
- Drill OR screwdriver & hammer to punch holes in the cans
- Any red, white, blue & gold crafting materials you can find around the house (or stop by your local craft store or dollar store); for example: stickers, ribbon, duct tape, paint, googly eyes, faux flowers, lace or leather scraps
- Crafting tools; for example: paint brushes, markers, sharpies, chalk pens etc.


The Table:
First let’s have the kids help decorate the table – they can use the cans to make everything from potted plants to cutlery holders.

Follow these easy steps:
- Step 1: Ensure the tin cans are empty, clean and the outer paper layer and top lid are removed.
- Step 2: Let their imaginations go wild decorating the cans with the supplies above.


Once the decor is dry and the glue set you have a collection of decorated cans . These are just some of the ideas the kids and I came up with for our table, don’t let this limit your family’s imagination. There are so many uses for a decorated tin. Here are the additional supplies you need for each:
- Potted plants or flower vases – just add soil & a plant or water & flowers


- Pencil or cutlery holders – just add pencils or cutlery!
Tip: For cutlery, line with greaseproof paper or a napkin

- Place setting centerpieces – this is the basic decorated can but with a name label added; the kids made one for me and one for my husband and filled them with treats!


Tip: Use chalkboard labels for adding names

The Games:
Next the kids can create the games they can play on the day – follow steps 1-2 above and then here are the following steps to create each of the retro games my husband & I remember from our youth.
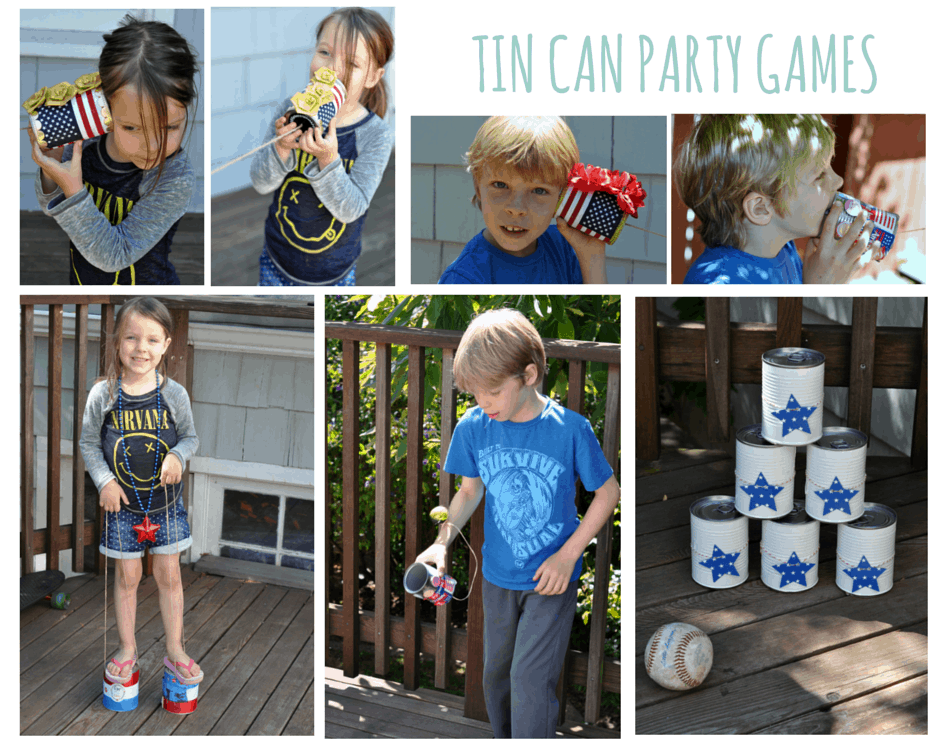
Tin Can Phones
Our family has an old cord phone attached to the wall at home. It doesn’t work anymore but it entertains the kids endlessly. They don’t understand why or how you would use it – especially since it doesn’t play Minecraft! So my husband & I thought we would take a step further back in time and show the kids how we used to communicate with our friends at summer. I still remember tin can talks with my neighbour next door and they were awesome for tree house to ground communications! We showed the kids how easy it was to make tin can phones work, their faces were priceless!

Tip: Keep that string tight/taut & don’t let it touch anything!
- Step 3: Take 2 tin cans and punch small holes in the center of each of the tops of the cans. To do this you can either use a drill or a sharp screwdriver and a hammer.


- Step 4: Measure out the length of string, your choice but between 30-90 feet is great, we just measured out between the front and back yards.
- Step 4: Thread string through both holes, one end in one can, the other end in the other can. Push it through the outside/top of the can and tie the ends of on the inside if the can. Tip: Tape over the ends of the string to narrow the string to make it easier to thread through the holes.


- Step 5: Step apart from each other until the line is taut and then one person speaks into their can while the other puts their ear to the other and listens

- Step 6: Sit back & watch the reaction
Tin Can Stilts (for racing!):
- Step 3: Take 2 larger size cans and punch small holes on opposite sides of the can near the top (place at the end where the lid of the can still remains NOT the end where the lid was removed). To do this you can either use a drill or a sharp screwdriver and a hammer.


- Step 4: Measure out the 2 lengths of string, one for each can. Length will depend on who is standing on the cans. I got the kids to stand on top and measured the height from the kids feet up to their waist (so they could bend their arms and pull tight on the string to help them walk). Then I doubled the length and added the can width so it allowed for the string to come up each side, creating a loop they can hold.


- Step 4: Thread the string through both holes and tie off at the top. Tape over the ends of the string to narrow the string to make it easier to thread through the holes.
- Step 5: Help the kids onto the cans, then holding one string in each hand they need to lift the can at the same time as moving their foot. It may take a couple of tries before they get used to doing it themselves, but before you know it they will be racing!
Tip: Use larger size cans for this activity to fit little feet!

Swinging Ball Toss:
- Step 3: Take a tin can and punch a small hole in the center of the top of the can. To do this you can either use a drill or a sharp screwdriver and a hammer.
- Step 4: Measure out the length of string, your choice but between 1-2 feet, the longer it is the more challenging it becomes.
- Step 5: At the end of the string attach a ball that will fit fairly comfortably into the can. I used lightweight practice golf balls that have holes in them so are easy to tie onto the string. If you only have a ping pong or rubber ball you can put a hole in it and screw in an eyelet screw that the string can easily pass through to tie off.
- Step 6: Get your children to try and swing the ball up in the air and catch it in the tin can. Most catches in a row wins! This leads to competition every time!


Carnival Tin Can Toss
- Step 3: Take 3-6 (or more if you dare) decorated tins and stack them off center to create a pyramid


Step 4: Give the kids a tennis ball and a marker to stand behind and get them to try and knock the cans down, just like they do at carnivals….only it’s possible! Put the pyramid on a cake stand to add to the challenge (all the cans must be knocked off the stand to win).

SAFETY TIPS
- Holes should be done by adults or with adult supervision
- Try and use cans without ragged edges if the kids are going to use them. You can also line the top edge with duct tape to protect little hands
Here are some other fun DIY’s if you are having a party this summer; a photo booth and prop bar perfect for a luau or tropical get together and yarn craft flower fun the kids can do too.
Thank you for having me over today!!
I would love a follow on Fern & Maple’s Social Media!! I’m a blogger, party & brand stylist, crafter, event planner & “handler” of a Canadian husband, USA /Aussie born kids & a choc lab Elsa. My blog is the life of a New Zealander living abroad and bringing the party with her!
Facebook || Pinterest || Twitter || Instagram


