Summertime means it’s time to help young entrepreneurs learn how to make a lemonade stand. Selling lemonade is a great way to get the kids outside and have fun while learning. To get you started here is my free lemonade stand plan with instructions you can build in an afternoon. Let the fun and learning begin!
If you don’t have time to build your own lemonade stand but still want the fun, here are some free lemonade stand printables.

How kids Benefit from a Lemonade Stand
As a mom and educator, I’ve always believed kids understand best when you make learning fun. Allowing your kids to have a lemonade stand helps them in so many ways. For instance, they develop valuable social skills and grow their confidence with each customer they greet. In addition, they can also begin to understand business and money skills which are valuable throughout their life.
For more benefits for selling lemonade check out “6 Reasons Why Having a Kid Lemonade Stand is Good for Them.”
Supply List For this DIY Project
- 4′ X 8′ X 1/2″ sheet of plywood (for the structure)
- 4′ X 4′ X 1/8″ sheet of Masonite (for signs)
- 4 – 4″ strap hinges (hooks sides to front)
- 2 – 3″ door hinges (hooks top to front)
- 36 – 8 X1/2 flat head Phillips wood screws
- 2- 8 X 5/8 Philips metal screws (hooks plastic PVC coupler to sign)
- 2 nails approximately 2″ long
- Drill
- Drill bit #8 or 11/64″
- 2 – 6′ x 1″ schedule 40 PVC pipe (for banner poles)
- 2 – 1″ PVC slip couplers
- 2 – 3-inch L-brackets
- 4 – 8 x 3/8 flat Phillips metal screws
- Paint (of your choosing)
 How to Make a Lemonade Stand
 How to Make a Lemonade Stand
 Before you start building precut the structural and sign components.
Cut from plywood:
- Countertop 48″ x 18-1/2″
- The Face of the Stand (Front) 36″ x 48″
- Side Panels 36″ x 18-1/2″
Cut from Masonite:
- Sign for the front of the stand 22″ x 32″
- Top sign (Banner) 18″ x 48″
Note: You can make the banner extra fancy by adding a few curves to the rectangular cutout.
Building Plan:

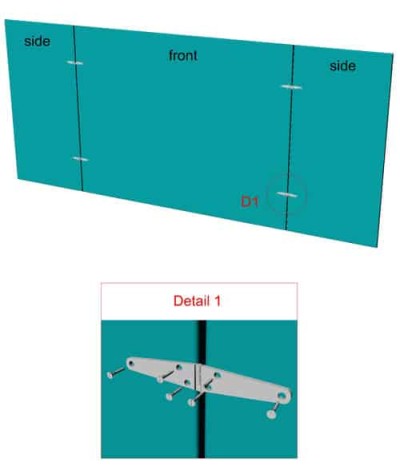
Note: Ensure there is a little gap (pencil-sized) between the side panels and the face to allow for the sides to fold properly for storage.


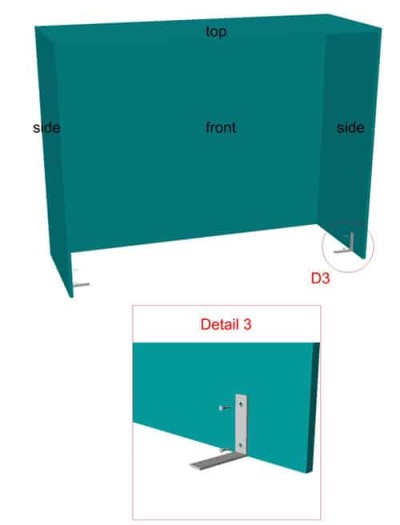
To stabilize the base of the stand, secure the two L-brackets with two wood screws to the base of each side-panel.

Here, detail D4 depicts how to attach the banner.
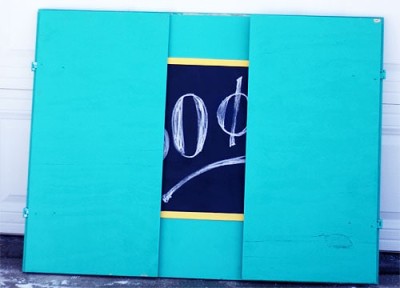
Now for the fun part, the kids have been waiting for. Have fun painting your stand and decorating your signs however you like.
The best part is when you are finished selling lemonade the stand folds flat for easy storage! To fold the stand, remove the banner poles and the two nails you inserted into the countertop. Once this is done, the top will fold down in the back of the stand. The two side panels will fold forward, over the face of the stand.

These girls are on their way to making their first million!

Grab some extra PVC pipe to make a marshmallow shooter. This will keep them busy in between customers.
As always my DIY supplies are from my goto store Lowes.
Enjoy!

HOW TO MAKE A LEMONADE STAND
Equipment
- Drill
- Drill bit #8 or 11/64"
Ingredients
- 1 4' X 8' X 1/2" sheet of plywood (for the structure)
- 1 4' X 4' X 1/8" sheet of Masonite (for the signs)
- 4 4" strap hinges (hooks sides to front)
- 2 3" door hinges (hooks top to front)
- 36 8 X 1/2 flat head Phillips wood screws
- 2 8 X 5/8 Philips metal screws (hooks plastic PVC coupler to sign)
- 2 nails approximately 2" long
- 2 6' x 1" schedule 40 PVC pipe (for banner poles)
- 2 1" PVC slip couplers
- 2 3"-L-brackets
- 4 8 x 3/8 flat Phillips metal screws
- The paint of your choosing
Instructions
Cut from Plywood
- Countertop 48" x 18-1/2"
- The Face of the Stand (Front) 36" x 48"
- Side Panels 36" x 18-1/2"
Cut from Masonite
- Sign for the front of the stand 22" x 32"
- Top sign (Banner) 18" x 48"
Building Instructions
- Secure the side panels to the face of the stand with the 4" strap hinges and flat head Phillips wood screws. You will need six screws for each hinge. The hinges should be placed on the exterior side of the stand. Each hinge should be placed approximately 9" from the top and bottom of the panels, as depicted here. See Note 1.

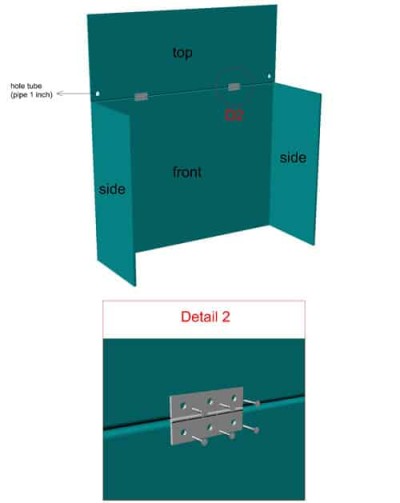
- Prepare and attach the countertop.2A: Drill two 1-1/16" holes into the countertop, so that the 1" PVC banner poles can be inserted later on. The holes should be approximately 3" from the edge of the countertop as pictured below.2B: Next, secure the countertop to the face of the stand using two 3" door hinges and six wood screws, as pictured below. Be sure to place the door hinges to the inside of the stand to allow it to fold down for storage. It's important to leave a small gap (pencil-sized gap) to allow the countertop to fold properly.

- To stabilize the base of the stand, secure the two L-brackets with two wood screws to the base of each side-panel. The brackets should be 6" from the back edge of the stand and flush with the ground. Refer to the picture for the positioning of the brackets.

- Attach the banner.4A: Put the 1" PVC couplers on top ends of both 6' pipes. The added thickness will help support the weight of the sign aka banner.4B: Secure the sign to the two PVC pipes using the two 8 x 5/8 metal Phillips screws. Be sure the screws go through the coupler and pipe.4C: Next, insert the two 6' x 1" PVC pipes with the sign attached into the holes in the countertop. The pipes should touch the ground when inserted. Finally, tack two nails into the back edge corners of the countertop securing it to the side panels. See note 2.

- Have fun painting your stand and decorating your signs however you like.
- The best part is when you are finished selling lemonade the stand folds flat for easy storage! To fold the stand, remove the sign and the two nails you inserted into the countertop. Once this is done, the top will fold down in the back of the stand. The two side panels will fold forward, over the face of the stand.


Notes
Want more DIY Projects – Try these:
Let’s keep in touch!
I would love to keep you fully stocked with creative ideas, yummy recipes, fun crafts, and loads of free printables. Subscribe to Skip to my Lou to get new ideas delivered to your inbox. Follow me on Facebook, Pinterest, Twitter, and Instagram for all my latest updates.


I can’t get the doors to collapse to the front and have everything fold in on itself. How did you do this?
Sides are 36×18. Also when connecting the sides you will need place the side board in position to make the fitment right which will allow enough room for opening and closing.