
HOW TO MAKE A LEMONADE STAND
Skip To My Lou's Free How to Make a Lemonade Stand Plan
Servings 0
Equipment
- Drill
- Drill bit #8 or 11/64"
Ingredients
- 1 4' X 8' X 1/2" sheet of plywood (for the structure)
- 1 4' X 4' X 1/8" sheet of Masonite (for the signs)
- 4 4" strap hinges (hooks sides to front)
- 2 3" door hinges (hooks top to front)
- 36 8 X 1/2 flat head Phillips wood screws
- 2 8 X 5/8 Philips metal screws (hooks plastic PVC coupler to sign)
- 2 nails approximately 2" long
- 2 6' x 1" schedule 40 PVC pipe (for banner poles)
- 2 1" PVC slip couplers
- 2 3"-L-brackets
- 4 8 x 3/8 flat Phillips metal screws
- The paint of your choosing
Instructions
Cut from Plywood
- Countertop 48" x 18-1/2"
- The Face of the Stand (Front) 36" x 48"
- Side Panels 36" x 18-1/2"
Cut from Masonite
- Sign for the front of the stand 22" x 32"
- Top sign (Banner) 18" x 48"
Building Instructions
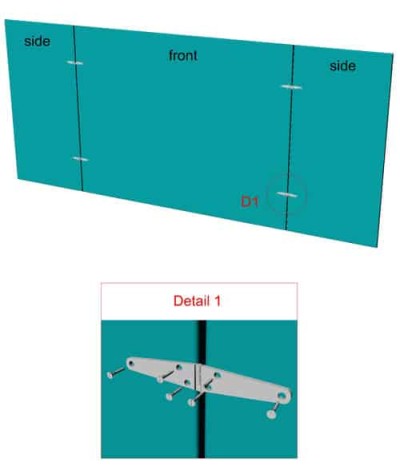
- Secure the side panels to the face of the stand with the 4" strap hinges and flat head Phillips wood screws. You will need six screws for each hinge. The hinges should be placed on the exterior side of the stand. Each hinge should be placed approximately 9" from the top and bottom of the panels, as depicted here. See Note 1.
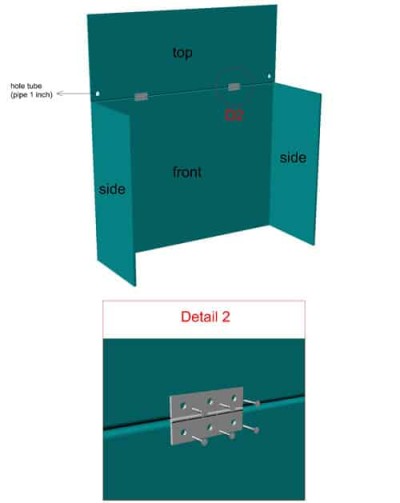
- Prepare and attach the countertop.2A: Drill two 1-1/16" holes into the countertop, so that the 1" PVC banner poles can be inserted later on. The holes should be approximately 3" from the edge of the countertop as pictured below.2B: Next, secure the countertop to the face of the stand using two 3" door hinges and six wood screws, as pictured below. Be sure to place the door hinges to the inside of the stand to allow it to fold down for storage. It's important to leave a small gap (pencil-sized gap) to allow the countertop to fold properly.
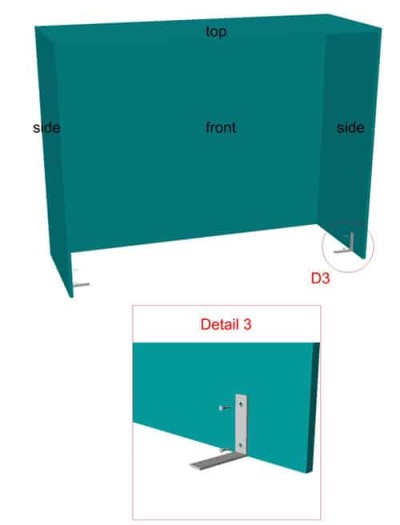
- To stabilize the base of the stand, secure the two L-brackets with two wood screws to the base of each side-panel. The brackets should be 6" from the back edge of the stand and flush with the ground. Refer to the picture for the positioning of the brackets.
- Attach the banner.4A: Put the 1" PVC couplers on top ends of both 6' pipes. The added thickness will help support the weight of the sign aka banner.4B: Secure the sign to the two PVC pipes using the two 8 x 5/8 metal Phillips screws. Be sure the screws go through the coupler and pipe.4C: Next, insert the two 6' x 1" PVC pipes with the sign attached into the holes in the countertop. The pipes should touch the ground when inserted. Finally, tack two nails into the back edge corners of the countertop securing it to the side panels. See note 2.

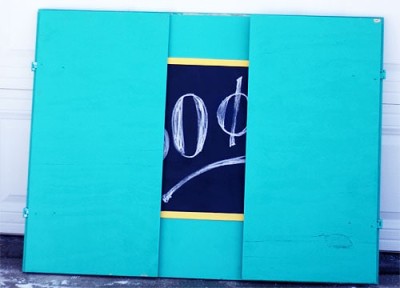
- Have fun painting your stand and decorating your signs however you like.
- The best part is when you are finished selling lemonade the stand folds flat for easy storage! To fold the stand, remove the sign and the two nails you inserted into the countertop. Once this is done, the top will fold down in the back of the stand. The two side panels will fold forward, over the face of the stand.
Notes
Note 1: Ensure there is a little gap (pencil-sized gap) between the side panels and the face to allow for the sides to fold properly when in storage.
Note 2: Remove the nails when you collapse the stand for storage.