This post is in partnership with Adobe Photoshop Elements 2018. All opinions and ideas on how to make personalized note cards are my own.
Create your own cute 3D personalized note cards to make your greeting cards extra special and heartfelt! Adobe Photoshop Elements makes it so easy!
Personalized Note Cards Supplies
- 8 1/2″ X 11″ white cardstock
- envelope for 4″ X 6″ inch card
- Computer
- Photoshop Elements 2018 (download your free trial here)
- Printer
- Photo
- 2 Dimensional flower embellishment (found at craft stores)
- Pen
- Glue or tape to attach the flower embellishment

How to Make a Photo 3D
Use Adobe Photoshop Elements 2018 to create darling 3D personalized note cards. In this quick video, I will show you how easy it is to use the Out of Bounds Guided Edit to make 3-dimensional looking note cards. Adobe Photoshop Elements 2018 offers many Guided Edits that provide step-by-step instructions to make it easy to give your photos amazing effects.
VIDEO
How to use the Out of Bounds Guided Edit in Adobe Photoshop Elements 2018
Choose the Guided mode at the top, then Fun Edits. Next, select Out of Bounds. We will use the Out of Bounds Guided Edit to make a subject pop out of the photo with this 3-dimensional effect.

Open up a photo and select add frame in the right column. Click and drag the frame into place. Position the frame so that part of the main subject is inside the frame and part remains outside. For my photo, I want the arm to stay outside of the frame. Select the green checkmark to confirm.

The screen will become gray outside of the frame. Select the green checkmark to confirm.

Use the selection tool to select the part of the image that you want to extend out of the frame. Make sure to select a little bit of the area inside the frame too!

Select the Out of Bounds Effect and watch the magic happen. Change the background by adding a background gradient. There are many options from colors to patterns to choose from. I am choosing white to make the arm really pop.
A small, medium or large shadow can be added for more dimension.

Choose file, then print.

Select portrait orientation and then 4 X 6 as the print size. Drag the photo to the left of the box with the hand, then with the arrow drag the entire box to the bottom of the page. This will allow enough paper to turn the photo into a folded notecard.

Print in color on heavy cardstock. Fold and trim to size.

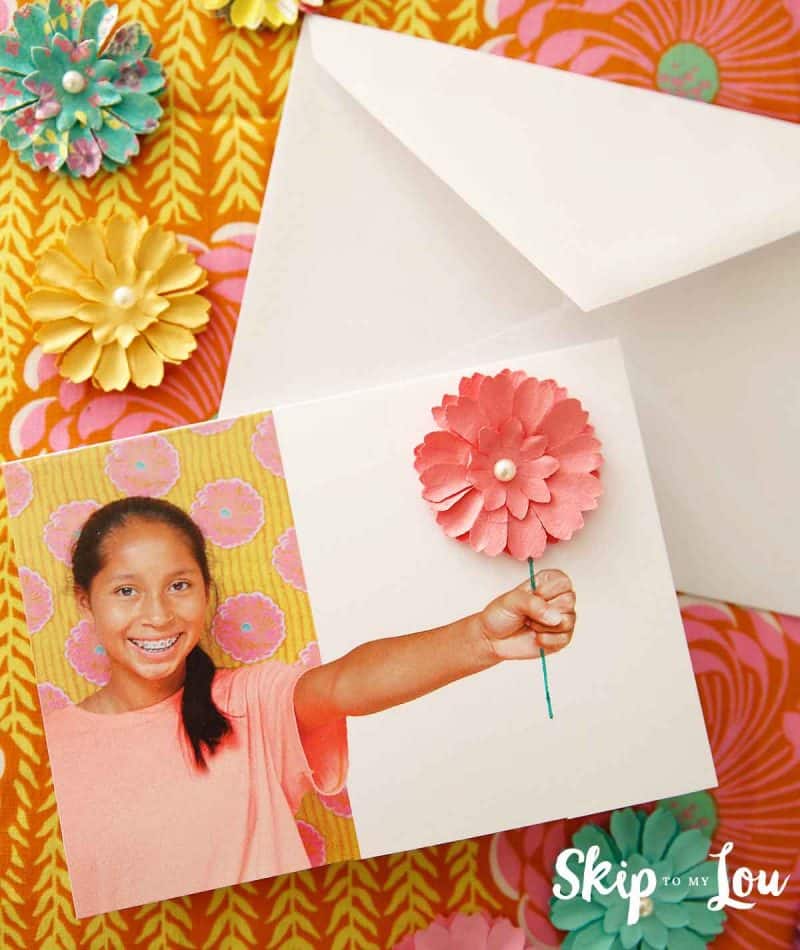
Add a flower embellishment with a bit of adhesive.

Draw a stem…

This is a great project for kids to get involved. Have them write a little note to make the notecard extra special! Who wouldn’t love to open a card with such a sweet smile and handwritten sentiment?

It is also easy to select Expert mode at the top and add a custom greeting with the type tool!

Now you can hand deliver flowers anytime.

I love how easy it is to edit my photos without loads guesswork and professional training! Adobe has made it possible for me to easily edit like a pro and make cool stuff. Did you see my Travel Memory Shadow Box, DIY Custom Watercolor Photo Canvas and DIY Fabric Paper Printed Notebook Cover?
You can try out Adobe Photoshop Elements 2018 for free. Download your free trial here.


Wow. What a clever idea. My daughter just love optical illusions and things that play with perspective so she is going to love this cute personalized note card that makes it look like they are holding the flower out. I can’t wait to try this!
Love this idea! These are absolutely adorable!
Love this! Such a cute idea ❤️
Love this! Thanks for the ideas
I love this !!! You could use it for so many occasions!
This is such a great tutorial and such a fun card. I love it.