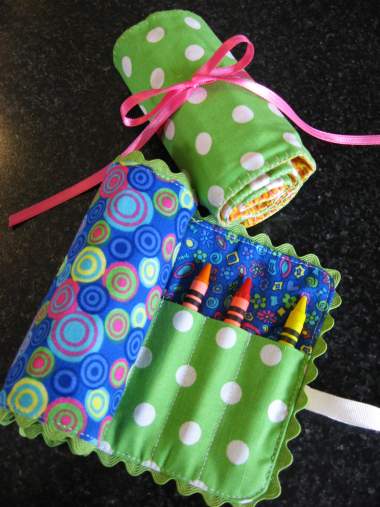
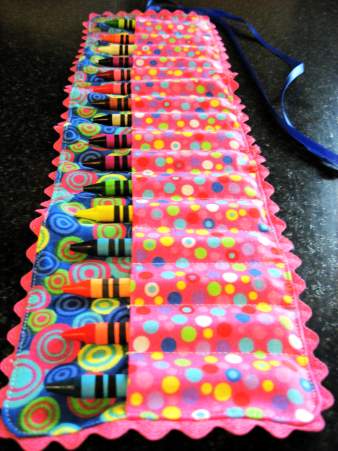
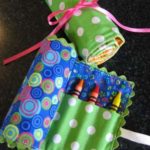
Every parent needs a stash of crayons to help a little one stay busy. This crayon roll is a fun way to keep track of crayons and have them readily accessible. I’ve included easy-to-follow instructions to make this DIY craft super simple, and it is cute enough to give as a gift!
RELATED: These fabric roll organizers work great to hold other things too. Make the pockets more narrow on the make-up brush holder to hold colored pencils or markers.
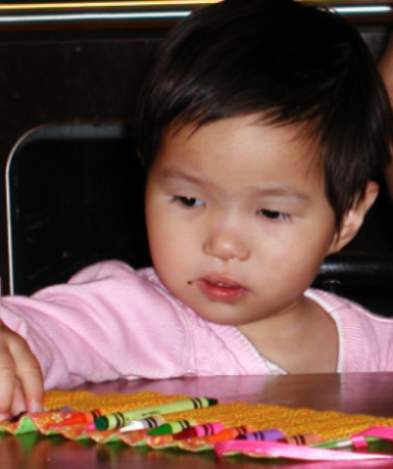
To welcome my new niece home from China on Sunday, I whipped up a crayon roll. I wasn’t able to give it to her in person but my mom said she was mesmerized by all of the crayons and how they slip into their own pocket.
Here are the supplies you’ll need
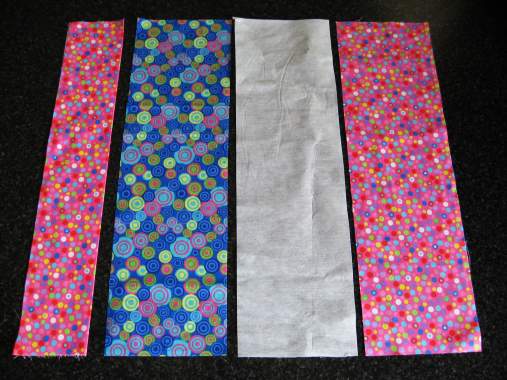
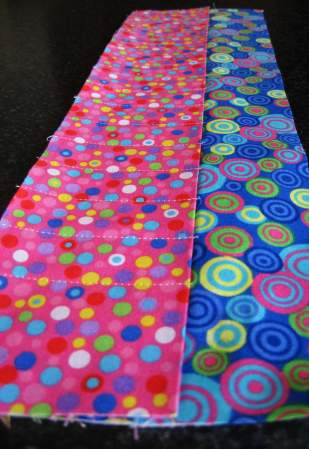
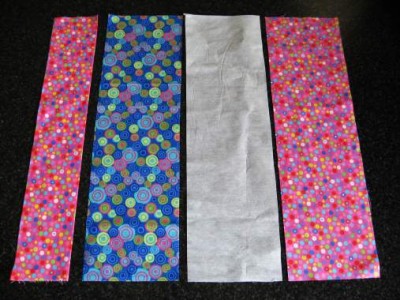
- Two pieces of fabric 5 X 16 1/2 inches (for the outside and inside)
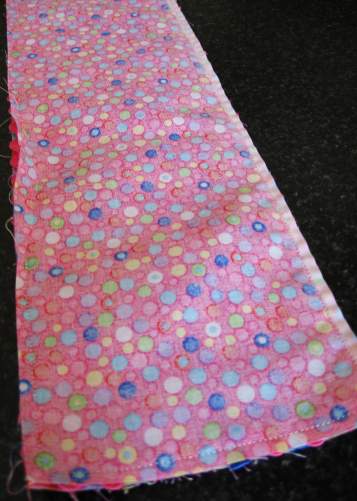
- One 6 X 16 1/2 inch piece of fabric folded in half lengthwise and pressed (for the pocket)
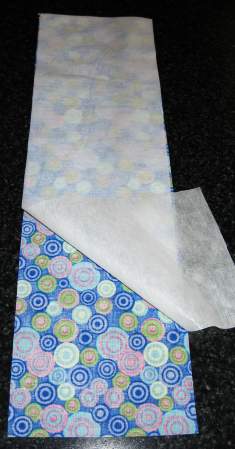
- One piece of lightweight fusible interfacing 5 X 16 1/2 inches
- One package of ric rac trim
- 30 inches of ribbon
- One package of 16-count crayons
TIP: A rotary cutter, ruler and mat make it really easy to cut out these pieces. I love this folding cutting mat that also serves as an ironing board. (affiliate links)
How to Make a Crayon Roll in Five Easy Steps
Step One: Iron the interfacing to the wrong side of the 5 X 16 1/2 piece of fabric that you want to be on the inside.
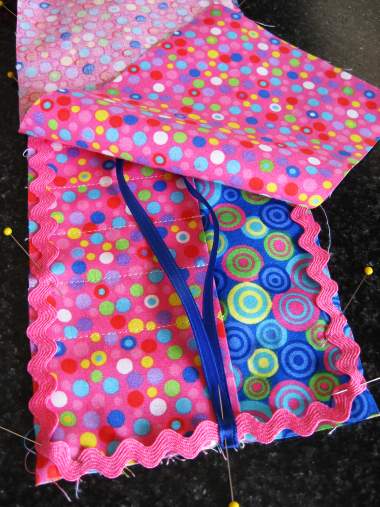
Step Two: Line up the bottom edges of the folded piece and the piece with interfacing and then pin them together. Starting over from the edge 1 1/4 inches sew lines parallel with the edge starting from the top of the crayon pocket, back-stitching at the top to reinforce. Sew the lines one inch apart across the pocket. You will have 1 1/4 inches on each side.
Step Three: If you want to use ric rac, pin it around the edge as shown. Fold the ribbon in half and pin it on the edge.
Note: On the one, I didn’t use ric rac I did a blanket stitch around the edge when finished.

Step Four: Pin the remaining piece of 5 X 16 1/2 inch fabric right sides together with the pocket piece. Sew around edges with 1/4 inch seam. Leave about 3 inches across the bottom for turning.
Step Five: Trim corners, turn, press and topstitch being careful to catch all layers of the opening to close.
Welcome home Faith! We are so happy to have you join our family! How very lucky we are indeed to have you! Do you have a special child in your life that would love to have a fun way to hold their crayons?
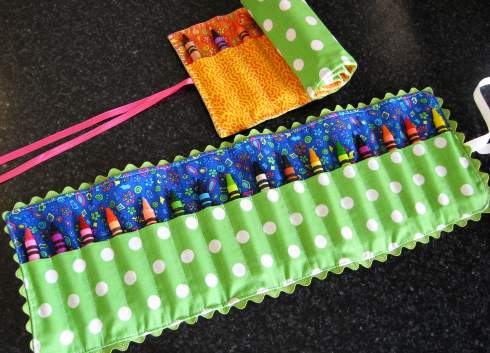
Crayon Roll Variations To Try
Looking for a simpler version? Try this felt holder. It has a lot less sewing and whips up even quicker!

Check out this new closure for the fabric roll

More fun crayon crafts
I think that you like these additional crafts. Your kids will love using up their broken crayons to make fun new shapes, and the felt turkey holder and egg holder is perfect for your holiday kid’s table!
I would love to keep you fully stocked with creative ideas, yummy recipes, fun crafts, and loads of free printables. Subscribe to Skip to my Lou to get new ideas delivered to your inbox. Follow me on Facebook, Pinterest, Twitter, and Instagram for all my latest updates.
How to Make a Crayon Roll Crayon Holder
Equipment
- Pair of Scissors
- Iron
Ingredients
- Two pieces of fabric 5 X 16 1/2 inches for the outside and inside
- One 6 X 16 1/2 inch piece of fabric folded in half lengthwise and pressed for the pocket
- One piece of lightweight fusible interfacing 5 X 16 1/2 inches
- One package of ric rac trim
- 30 inches of ribbon
- One package of 16 count crayons
Instructions
- Iron the interfacing to the wrong side of the 5 X 16 1/2 piece of fabric that you want to be on the inside.

- Line up the bottom edges of the folded piece and the piece with interfacing and then pin together. Starting over from the edge 1 1/4 inches sew lines parallel with the edge starting from the top of the crayon pocket, back-stitching at the top to reinforce. Sew the lines one inch apart across the pocket. You will have 1 1/4 inches on each side.

- If you want to use ric rac, pin it around the edge as shown. Fold the ribbon in half and pin it on the edge. Note: On the one, I didn't use ric rac I did a blanket stitch around the edge when finished.

- Pin the remaining piece of 5 X 16 1/2 inch fabric right sides together with the pocket piece. Sew around edges with 1/4 inch seam. Leave about 3 inches across the bottom for turning.

- Trim corners, turn, press and topstitch being careful to catch all layers of the opening to close

- TIP: A rotary cutter, ruler and mat make it really easy to cut out these pieces. I love this folding cutting mat that also serves as an ironing board. (affiliate links)


do you k now how to make a crayon holder out of wood?
hello there and thank you for your info _ I have definitely picked up
something new from right here. I did however expertise a few technical issues using this web site, since I experienced to reload
the website a lot of times previous to I could get
it to load correctly. I had been wondering if your web host is OK?
Not that I am complaining, but slow loading instances times
will often affect your placement in google and could damage your high-quality score if advertising and marketing with Adwords.
Anyway I am adding this RSS to my e-mail and could look
out for a lot more of your respective interesting content.
Make sure you update this again very soon.
It’s amazing to pay a visit this site and reading the views of all mates regarding this piece of writing, while I am also eager of getting familiarity.
Definitely believe that which you stated. Your favorite reason appeared to be on the internet the simplest thing
to be aware of. I say to you, I certainly get annoyed while people
consider worries that they just do not know about.
You managed to hit the nail upon the top and also defined out the whole
thing without having side effect , people can take a signal.
Will probably be back to get more. Thanks
What a cute idea! This would be great for makeup brushes, too! 🙂 Thanks for sharing!
Achei maravilhosa essa ideia.O exemplo que damos para as crianças é exemplar. Elas acostumam logo cedo a se organizarem e de uma forma e visual maravilhoso. Vou fazer para a minha netinha. Parabéns, adoreeeeiiiii!!!!!!!!
Thank you so very much for this fantastic idea. I just finished sewing one for my daughter and am in love with it already.
Love this cute crayon holder! I made a similar one (but much more rushed and much less attractive) on my blog and linked up to your post. http://ellaandharry.blogspot.ca/2012/07/time-for-craft-crayon-holder.html#
Thank you so much for your easy to follow tutorial. We will be visiting our son and his family soon. Our youngest granddaughter will be starting school next month so I was thrilled to find this. I was terrified to do the ric-rac, but it is such a nice touch. I basted it instead of pinning. Worked like a snap!
This project was super easy. I made mine just a bit bigger for my daughter who is a hair stylist, so she could carry her scissors and combs, and shavers. Now all the girls in her salon want one. Makes for great birthday gifts or Christmas presents for the girls!
I am no where near the kind of person that would sew unless my life depended on it…would this work with a glue gun? lol.. no seriously would it?
These are so cute and would be great for my daughter in her school supply kit.
I just got my first sewing machine and was looking for something not too intimidating to start with. This was perfect! Mine may not be as perfectly executed as yours, but it looks cute and works. Thanks!
This was cool!!!!!!!!!!!!!!!!!!!!!!!!!!!!
This is a great post ! it was very informative. I look forward in reading more of your work. Also, I made sure to bookmark your website so I can come back later. I enjoyed every moment of reading it.
This are great! All my little nieces and nephews will love this! What a great idea. Saw this on pinterest.