Learning how to draw braids is easy with a step-by-step tutorial. Drawing braids is fun-filled, and you can make a portrait look more natural. Before your next drawing lesson, read this step tutorial for a realistic plait.
Welcome to this tutorial and learn how to draw braids in eight simple steps. Follow this easy step-by-step guide, and you will be amazed at how simple and fun it is to get different plaits on your paper in no time.
How to Draw Braids in 8 Basic Steps
Drawing plaited hair may look simple, but making the braids look real requires drawing skills and the right tools. Besides, you need to know how to make the patterns, blend the hair, and shade different sections to give your drawing contrast.
The different sections of a braid differ in thickness and darkness. Therefore, you need lighter and darker shades of pencils to create varying light intensities in your drawing. If you want to include roots, ensure they are darker than the end of the braid to make them look natural.
You need the following tools for this tutorial.
- A plain paper or a drawing book
- HB pencils
- 2H pencils
- 2B pencils
- A working surface
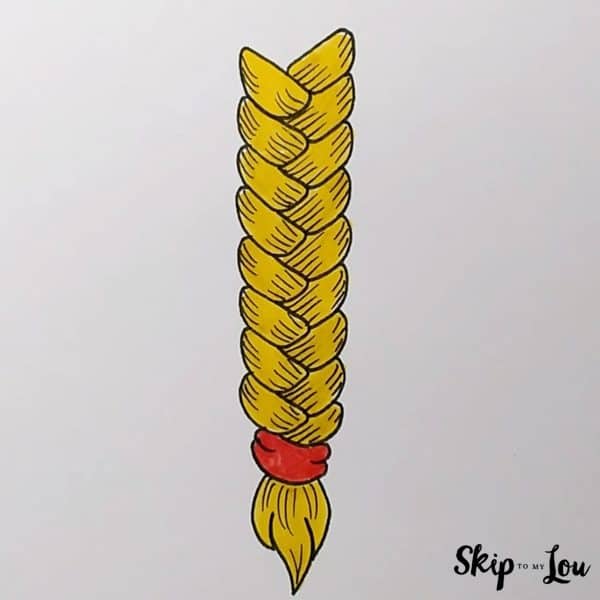
Are you ready? Here are the steps to follow when drawing braids in different basic shapes. For this tutorial, let’s draw a french braid. Below is the reference image.

Step 1: Draw an Outline
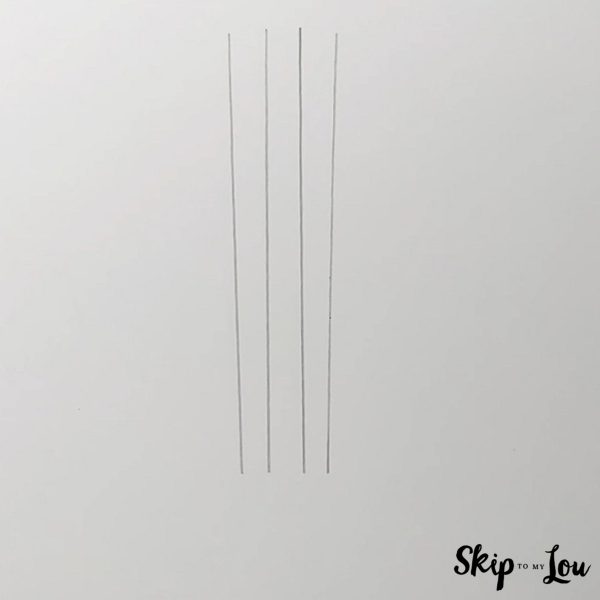
Let’s begin with the easy step of creating an outline. Draw two vertical 2H pencil lines. They serve as a boundary to the structure of a braid. An outline of a french braid comprises two vertical lines at the edges with a straight line between them.
The space between the boundary lines is wider at the top and narrow at the bottom. This will help you create an illusion of a simple braid that gets thinner towards the end. You should use a 2H pencil to draw the outline because it is faint and becomes invisible as you shade your drawing.
Step 2: Draw the Patterns
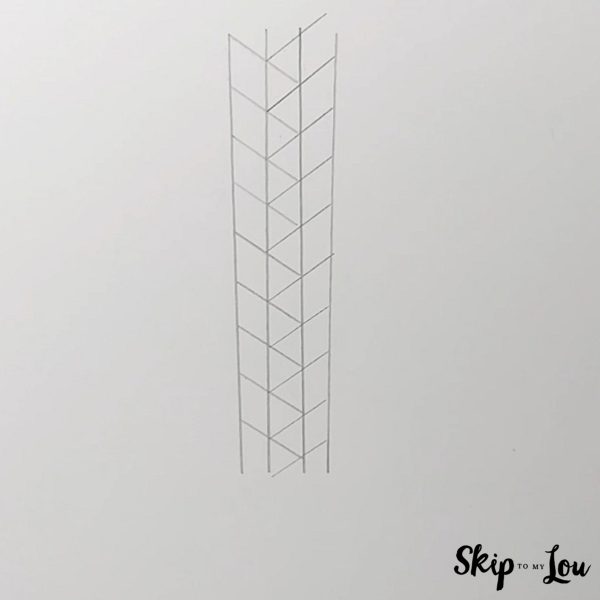
You can start by drawing zigzag lines in the spaces within the outline from the previous step. The lines help you create the two sides of the braid within the spaces. When drawing the pattern, use your HB pencil to make smooth wavy curves touching the corners of the zigzag guideline. You can start with the left side ensuring you follow the flow of the hair.
You can erase the middle line to avoid too many lines on your drawing. They give you a hard time to remove. Make the patterns interlock as the curved ends touch the external guidelines.

After drawing the braid pattern on one side, move the other half and create a similar pattern touching the other borderline. The patterns should alternate at the corners. Touching the zigzag corners in the middle makes them appear like interlocking hair waves.
At this point, you have the braid sketch. You can remove the external guidelines using an eraser before adding detail to your plait.
Step 3: Blend the Hair and Add More Features
You have the sketch of your plait, but it lacks that realistic look. The next step of your braid drawing involves adding small details. Here, you need a darker pencil shade for the edges and a lighter one for the middle part.
Before shading, let’s add some features to your braid. You can use a 2B pencil to draw root hairs at the top. Since they are darker than the older strands of hair, shade them boldly. Avoid using very thick lines by ensuring your pencil is sharp.
While adding detail, pay attention to the hair direction on your braid. However, create some loose hanging strands for a natural touch. Note that real hair strands have different heights and thicknesses and reflect this feature when adding detail to your braid.
Using a 2B and 2H pencil for darker and lighter shades plays the trick.
Step 4: Sharpen the Edges

The Edges of your braid look more real with varying thicknesses at different hair sections. For example, hair strands tend to be thicker at the base and thinner at the tips. You can use a sharp razor to sharpen the edges. Avoid drawing patterns on a continuous stroke throughout the braid. Doing this will give the edges of the braid uniform thickness. This makes them look unrealistic. Instead, lift your pencil after every wavy pattern to achieve varying thicknesses.
Step 5: Add Color Intensity
What color of hair are you drawing? Silver, gray, or dark-colored? You can add color intensity to your braid drawing using different pencil shades. Using an HB pencil is a good idea for silver hair. Ensure you sharpen it well to avoid darker shades and thick strands.
On the other hand, a 2B pencil works well when drawing dark-colored hair. However, consider the light source when adding the color intensity and make one side darker for a more realistic look.
The region where the hair strands interlock receives less light and should have the darkest values. You can make them darker than the contours, which receive more light. Blending 2H and HB pencil shades is a great way to draw gray hair. A mix of the feint 2H and the darker HB creates a perfect shade of gray. Use your 2H pencil for the contours and HB near the interlocks.
Step 6: Add the Shadows Along the Edges
Shadows create a three-dimensional touch to your drawing. You should pay attention to the direction of light when adding shadows to your braid. A light shade along the edges plays the trick as it adds an illusion of depth.
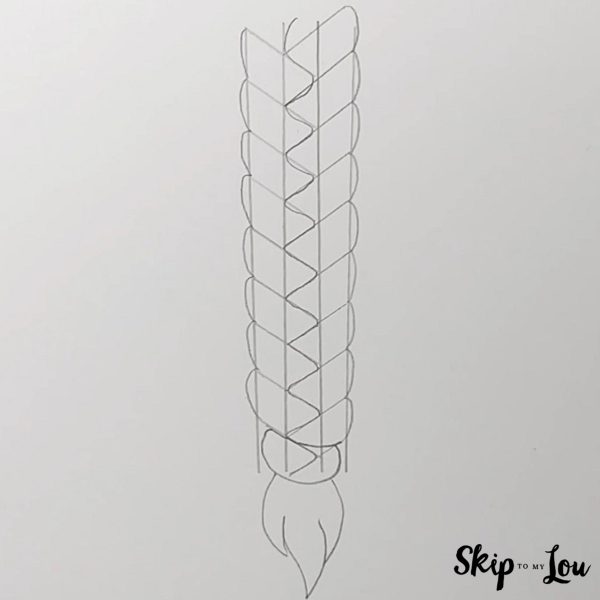
Step 7: Draw the Tail and Make the Highlights
The section of hair at the tip forms the tail of the braid. With a tail on the plait, your drawing looks complete, with an illusion of ‘running back’ and spoiling the braid. You can draw a hair tie at the end of the plait before adding extensions of the tail using an HB pencil.
Start by drawing a single curve in the middle of the braid and add more strands in the same direction. A curved tail with curly hair looks more natural than straight hair.
The tail should have a different shade to make it stand out from the rest of the braid. Light highlights create contrast in your drawing. You can use a sharp blade to create a lighter tone on the curved areas, making them look more faded than the edges and interlocks.
Step 8: Detailing
You are now at the final step. Using a lighter pencil, add some loose hairs throughout your drawing. Increase them near the hair tie for a natural finish.
Time to Draw a Realistic Braid
Congratulations on reading this guide to the end. You now know how to draw braids. Take your pencils and drawing paper and draw a realistic braid. Remember to teach others how to do it in eight simple steps. You can follow the steps for different braids, such as the dutch braid.
This article contains affiliate links.
My favorite drawing supplies for how to draw braids
- Sketching Pencils
- Kneaded Rubber Eraser
- Sketch Pad
- Erasable Colored Pencils
- Fine markers
- Sketch and Drawing Art Pencil Set
- Artist drawing set (This is great for new and experienced artists. It’s also something I give as a gift.)
I would love to keep you fully stocked with creative ideas, yummy recipes, fun crafts, and loads of free printables. Subscribe to Skip to my Lou to get new ideas delivered to your inbox. Follow me on Facebook, Pinterest, Twitter, and Instagram for all my latest updates.