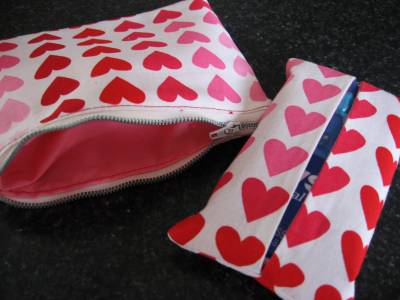
Pocket Tissue Cozy Tutorial
Here is a quick and simple gift to make, a pocket Kleenex holder.

All you need is two pieces of fabric 6 1/2″ X 7″ each.

With right sides together stitch 1/4 inch from the edge all around the outside of the fabric. Leave about 1-2″ opening on the LONG side for turning.

Turn and press. Make sure to press the opening to the inside.

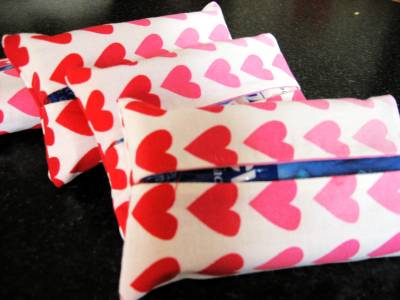
Bring short edges to the middle. Place the fabric you want on the outside in the inside.
You can choose whether to meet the edges exactly in the middle (left picture) or overlap the edges by about 1/4 of an inch (right picture)

Stitch 1/4 inch from the edge along each end.

Turn right side out and fill with your pocket tissues. I put a slit down the center of the plastic packaging on my tissues so they were easy to remove.

You could easily make a ton of these assembly style. They would make great little party favors, teacher gifts, thank you gifts or just to give someone a little something!
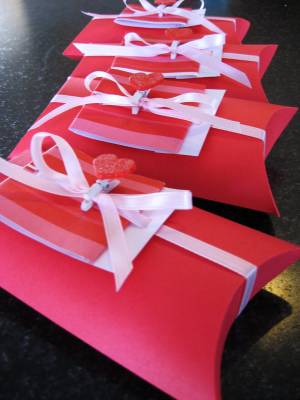
If you would like a cute way to package your handmade gift you can download the Pillow Box Template. Print on colored or printed cardstock, cut on solid lines, lightly score on all dotted lines, bring flap to opposite side and glue flap to inside and then fold in the ends. Add a pretty bow and you’re done!
Related Posts:


Amazing huh? Well it is!
thanks for sharing. a great tutorial for beginners like me. will be making them!
Great pattern! I would recommend overlapping the edges like she suggests – the gap is just too big if you don’t. I was looking for a tissue holder I could put my own tissues in without having to buy one of the little plastic packs and this worked perfectly. Thanks again!
Look forward to making the tissue holder.
Buy different tissues. Cheaper than wasting the fabric.
Omg! I can’t believe how quick and easy these are to make. Love love love!!
Where do I find the PDF file for the kleenex tissue holder ?
Thanks !
Though there are many tissue holders in the market today, it’s better to make our own using our choice of fabric & colours. I think we can even use our used clothes for this.
My bestfriend loves thes.
would you be willing to sell some of your work. How much would it cost? Thank you so much
THANKS FOR THE INSTRUCTIONS. I MADE MINE 8″ x 7″ so there is enough wiggle room for the tissue to slide in easily. happy sewing
Having fun making these great tissues holders thank you for sharing
February 5 2014
Thank you for such an easy tutorial. I know what I will be whipping up for our school’s Mother’s Day stall!
I’m just starting to sew and not very good yet. This project was really fast and easy and came out really well. I’ve been looking for a place to store my cloth wipes and this works great! It’s a bit small for all my cloth wipes though, so I may make another, just a bit larger. My in-laws are coming for xmas and use like a million tissues a day (i think a large box a day between the two of them actually) not sure how. I figure these will be great stocking stuffers for them.
Bethany, send me a picture of the kid’s tissue holders and I will put them on my FB page. How fun!
Just thought you might like to know that I am using your idea in a Family and Consumer Sciences class with 8th graders for their hand-stitching project. They are turning out SO cute!