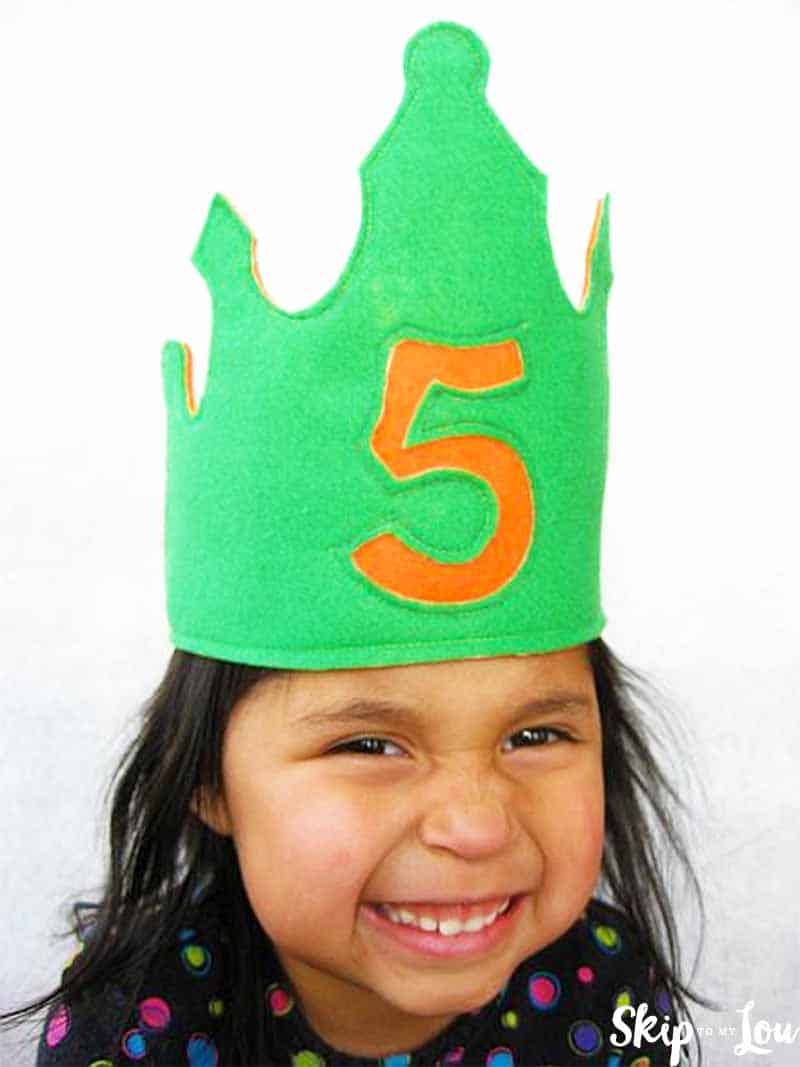
This DIY Birthday crown is sure to make your birthday boy or girl feel like a King or Queen! This crown is very simple and can be embellished any way you like! It will for sure be a hit at birthday parties. It would even make a fun handmade birthday gift.

If you have a little girl that wants something a bit more girly, try this birthday hat fit for a princess.
How to Make DIY Birthday Crown
Download and print out the crown template. Cut out.

Iron interfacing to the back of the piece of felt you want for the outside color. I only had a lightweight interfacing—-it works, but I might try a medium weight next time.

Trace the crown onto the outside piece of felt with a disappearing fabric marker. This is the stitching line —do not cut out. Draw an outline of the birthday year in the center of the crown.
You may use these printable numbers as a guide. If you would prefer a monogram use these letter templates.

Place the two pieces of felt together and stitch all the way around the crown outline——-making sure to slip in a piece of 1″ wide elastic at the back on each edge of the crown. My piece of elastic ended up being 10″ long and I placed 1″ in the seam on each side. Measure a child’s head to get the measurement you need.
You could easily make a casing for the elastic if you want it to have a more finished look.
Stitch around the number.


Cut out the crown close to the stitching line, being careful not to clip the elastic.

The number on the front is reverse applique. Make a small slit in the top layer (be careful to only cut through the top layer) and then trim close to the stitching all the way around the inside of the number.

Ta Da! How easy was that. Not much effort to make a little someone feel very special!
More Birthday and Crown Ideas
- Step-by-step guide for your own Crown Drawing.
- With this Pipe Cleaner Crowns for Kids the kids will enjoy making their own crowns.
- Birthday Jokes also include some birthday puns.
- Many different choices at Happy Birthday Coloring Pages, especially check out It’s My Birthday.
- If you like to crochet here is a crochet crown.
- If you don’t sew here is a printable crown template.
- Birthday Cake Ideas for inspiration.
I would love to keep you fully stocked with creative ideas, yummy recipes, fun crafts, and loads of free printables. Subscribe to Skip to my Lou to get new ideas delivered to your inbox. Follow me on Facebook, Pinterest, Twitter, and Instagram for all my latest updates.


Thanks! Made this for my son’s first birthday and it turned out great! Now the challenge will be to get him to actually wear it.
I love the clever use of reverse applique on the number. I’ve never seen that idea before. I better get off my throne and get sewing.
This is such a GOOD idea! come on over and link up to MMM 🙂
Just made this for my son this morning! It’s Crazy Hat Day at his school. So adorable!!! He didn’t want to wear a hat, but he loeved this so much, he wore it leaving. Thanks for the step by step!!!
Thanks for the great tutorial and template. My birthday guy loved his.
I made this see…http://www.flickr.com/photos/26508289@N06/4400557972/
awesome! – Thanks
Anyone have any ideas if you have 4 kiddos and they all want to wear the crown but are all different ages?? I was just thinking about making one or two and they can share it but I don’t know/can’t think of what to put on the front?
Thanks
You can also use the pattern on Foam, it worked GREAT for my 1yr old’s 1st Birthday
SO cute!!! Thank you for this great idea.
Anja
How darling!!! I don’t know which to do??? 😉
Shannon
wonderful. thanks.
the perfect headdress for my daughter’s birthday.
i set a link to your post at my blog.
i hope, you’ll agree.
if not, please leave a comment.
doro.
AWESOME And Just in Time!!! Thanks so much, this is great, I hope our model looks just as cute!!!
I needed a crown birthday hat last weekend (it the only request from the BDay boy)! This would have been perfect! I will most certainly be making some of these. Possibly even today! Love it!
Rebecca
rootsandwingsco.blogspot.com
That hat is adorable but your model is the cutest! Thanks for the how-to, I’ll be linking.
Super cute! I think it might be easy enough for even me to make!