This DIY Yoga Mat Sling is a quick and simple gift that will get lots of use on the way to class. I bet you have someone on your list who would love a stylish carrying strap for their mat. It’s a practical way to carry your mat in style!
You will want to make a Homemade deodorizer spray Great for cleaning yoga mats!
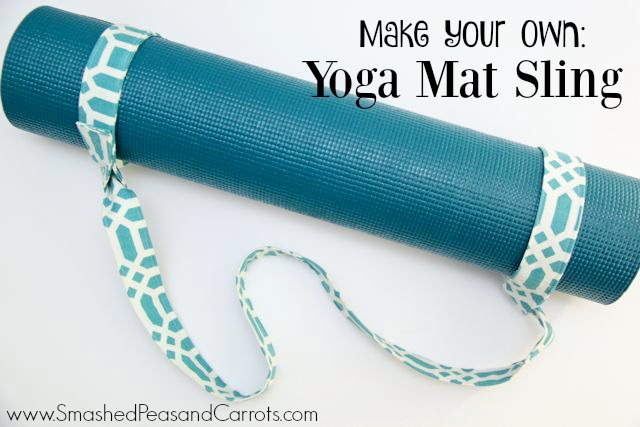
This DIY yoga mat holder is perfect for any size yoga mat, including an extra-thick mat, because the straps are adjustable. It is also machine washable so you can easily clean it before your next yoga class. And as a bonus, it also works as a strap for using during class for those balancing poses! Sometimes you just don’t need a yoga mat bag.
YOGA Mat Carrier Supplies
To make this DIY Yoga Mat Strap or Yoga Mat Sling you will need the following:
- Two 6 x 30 inch pieces of home decor or other heavy weight fabric
- Iron and ironing board
- Coordinating thread and sewing machine
How to Make a Yoga Mat Sling
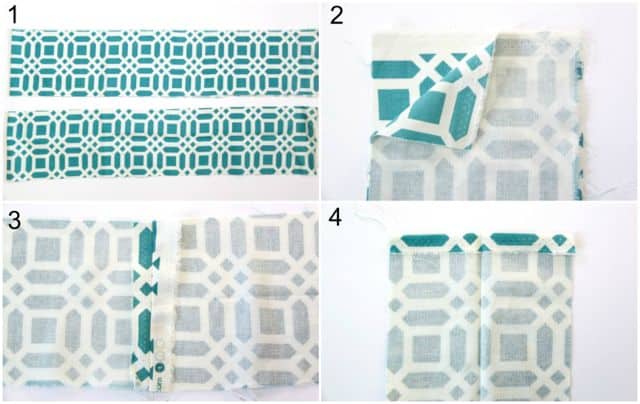
- Cut two 6 x 30 inch pieces of home decor or other heavy weight fabric.
- Place two of the short (6 inch) ends together, right sides facing, and sew with a 1/2 inch seam allowance to make one long strip of fabric.
- Open up the seam you just made and iron it flat.
- Fold down each of the short raw edges of the long fabric strip you just sewed together 1/2 inch towards the wrong side and iron flat. Then fold the entire length of fabric (hot dog style) in half and iron the fold flat too (you can see the crease down the middle in this picture!)

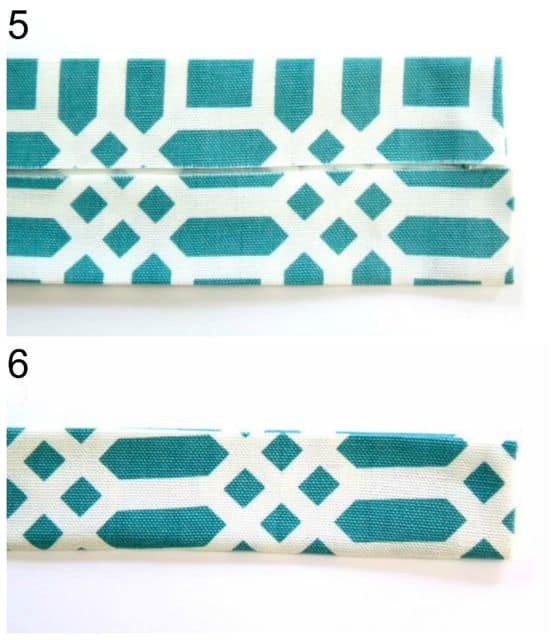
- Next, unfold the strip and, with it right side up on your ironing board, fold each side to the center line and iron flat down the length of the fabric strip.
- Fold the strip of fabric down the middle, making sure the raw edges are inside. Iron down the length of the fabric. Now, sew all the way around the entire strip of fabric using a 1/4-1/8 inch seam allowance depending on what you like the look of best.

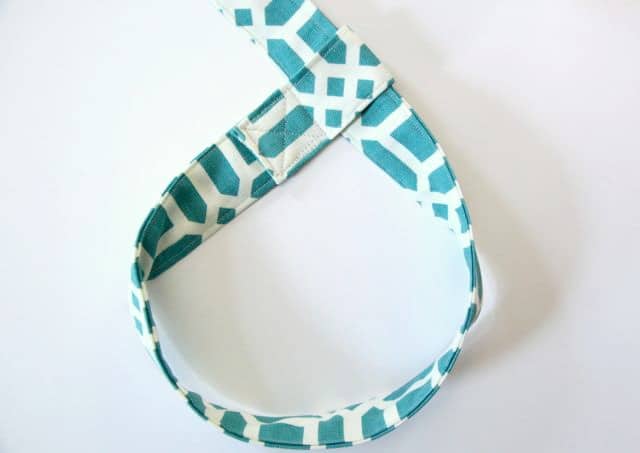
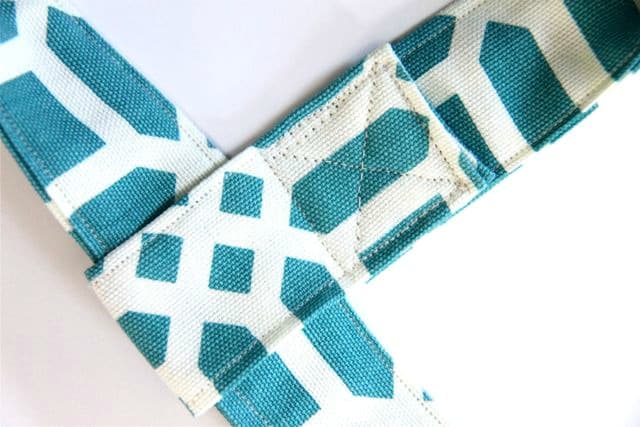
- To make the loops that will go around the yoga mat, take each end of the strap and wrap it around the strap itself anywhere on the length of the strap (I usually do this about a foot or so from the end). Make sure to fold the strap about 2 inches past the length of the strap so that you have room to sew it in place.

- Then sew in place using a box and an “X” to reinforce the stitches.

- Now you can loosen the loops up and place them around each end of a rolled-up yoga mat. Cinch the loops down and throw the middle section around your shoulder…you or your yogi friend are ready to head to class.
There is nothing better than giving a pretty gift and a pretty AND useful gift is even better!

Thanks so much to Maggie from Smashed Peas and Carrots for this great tutorial.
More Things to Sew
Check out these fun sewing and DIY projects:
- Homemade deodorizer spray Great for cleaning yoga mats!
- Zippered Pouch Carries all the small essentials.
- Back to School Sewing Projects
- Looking for another great gift idea? Try making one of these DIY flag banners for friends and family.
- Got some fabric scraps left over? Make a fabric scrap memory game.
I would love to keep you fully stocked with creative ideas, yummy recipes, fun crafts, and loads of free printables. Subscribe to Skip to my Lou to get new ideas delivered to your inbox. Follow me on Facebook, Pinterest, Twitter, and Instagram for all my latest updates.


I made the strap according to the pattern and its just okay on length as a carry handle. I wish I’d read the comments first and added the extra length.
Loved the tutorial – very easy to follow. I agree – it needs to be longer. I will do 40 inches next time, I think. The adjustable loop design is so smart! A ton easier than the velcro contraption I paid too much for at the store.
the 30 inch measure is too short for me! make it 45 inches so youmcan sling it over your shoulder, especially with a coat on.
Great quick pattern, however, it needed to be significantly lengthened. As the pattern stands, you couldn’t get it over a shoulder and there was no where near the amount of slack like the picture. I added an additional 30″ strip and it turned out fine. I had 2 yoga women test it out for me and they liked the extra length. Thank you again!!!
Love this strap but would make 10 inches longer.
Thank you so much for sharing this tutorial. The steps are so clear and thanks to the lack of confusion, I managed to whip up a strap in 45 minutes.