When do you start preparing for the holidays? Now is the time if you want to give a unique handmade gift! Are you following my Holiday Bake Craft & Crochet Series? Yes, we have added crochet tutorials too! By the end of the month Thirty Handmade Days, Your Homebased Mom and I will have shared over 100 fabulous handmade gift tutorials.

Be sure to head over to Your Homebased Mom for loads of edible gift recipes and Thirty Handmade Days will help us craft the perfect handmade holiday. I will be sharing sewn and crocheted gift tutorials. We even have some incredible giveaways. Each day be sure to visit the guest poster’s blog for a chance to win BIG! Up for grabs is a Cricut cutting machine, a Blendtec blender, a Baby Lock sewing machine and a $300 Michaels gift card! Grab a new entry every day! Visit Crafterhours today to enter to win the Baby Lock Sewing Machine.
Fabric gift bags are so useful! I decided I’d like to add a fun feature – a sheer front pocket to hold the gift tag! Looks cool, easy to tuck the tag in, doesn’t get in the way of opening the gift and easy to replace when you’re ready to re-use the bag. These are super simple to make — read on for the sheer pocket drawstring fabric gift bag tutorial!

Here’s what you’ll need:
- Body fabric – two 13.5” x 11” rectangles – could be quilting cotton, poplin, light linen, anything that is light enough to gather nicely when the drawstring is pulled.
- Sheer pocket fabric – one 11” x 9” rectangle – I used a nylon tricot chiffon, but tulle or powermesh will work too! If you’re using a fabric that frays you’ll need to finish the edges before assembling.
- Iron-on interfacing – one 1” x 2” rectangle
- Twine, ribbon or yarn for drawstring
- Large safety pin or bodkin
- Pins, thread
Start by making a sandwich with your fabric rectangles. Right sides together with the sheer fabric in the middle, all aligned at the bottom edge and on the sides.
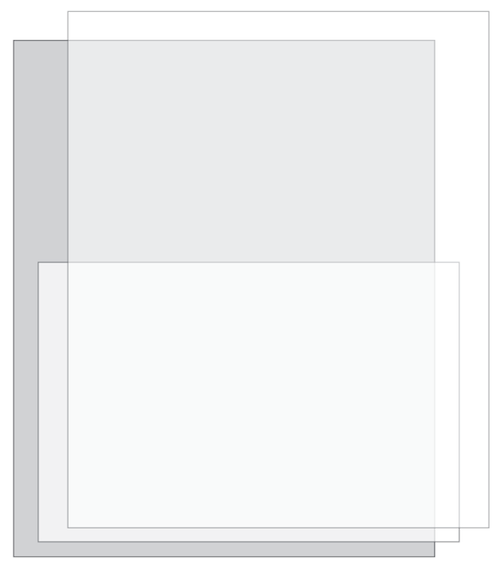
Pin and sew around 3 sides. Use whatever seam allowance you prefer! I usually default to ½”. There are lots of projects where seam allowance is CRITICAL. This ain’t one of those. HURRAY!

Flip the top opening down ½” and press. Iron your 2” x 1” rectangle of interfacing about an inch from the edge of the fabric and press.

Flip the top opening down again about 1.5”. Press.
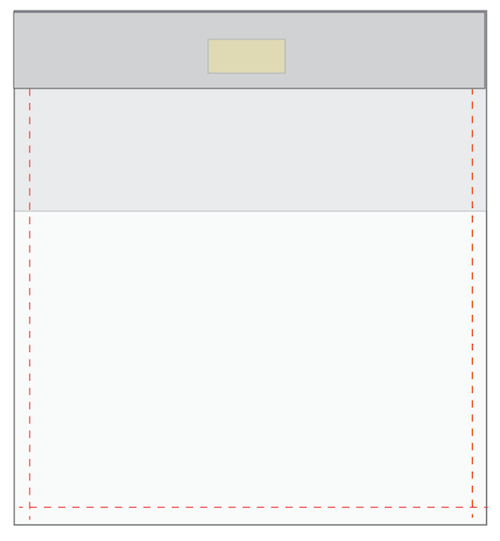
Turn your bag right side out and stitch along the bottom of the casing.
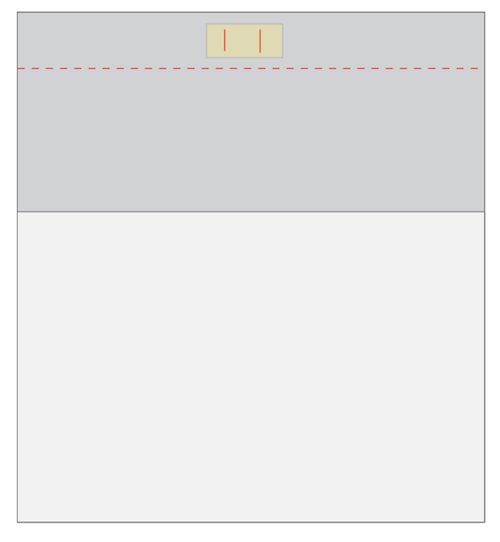
Locate the interfacing that’s now inside and at the front center of your drawstring casing. Snip two small slits and use a safety pin or bodkin to thread your twine or ribbon through!
And you’re done! Tuck your tag inside!

Susan went to school for art, advertising and public relations and spills her craft and sewing thoughts and projects over at crafterhoursblog.com. She and crafterhours blog partner Adrianna share what they make for themselves, their friends, homes and combined six daughters.

Find Susan and crafterhours:
On the blog: https://www.crafterhoursblog.com
On Facebook https://www.facebook.com/crafterhoursblog
On Pinterest https://www.pinterest.com/crafterhours/
On Instagram https://www.instagram.com/crafterhours
On Twitter: https://twitter.com/crafterhours


If you buy the right kind of loft insulation this is
not necessary. Another important part of keeping your electricity prices low is
making sure your boiler is well maintained. Try to only
boil what you need – making sure you cover the heating element of course, and you should start to see
savings.