This pleated pouch tutorial shows you how to make the perfect home made gift. Slip in a gift card and it would make and extra special! Once you know how to put in a zipper think of all the things you can make!
How to make a zippered Pouch
Download pattern pieces and print with no scaling selected on your printer. Cut out two of each piece from your favorite fabric. You will also need 1 – 7 inch zipper.
Pleated Pouch Pattern Download
Mark fabric from pattern where it should be pleated. Bring one mark over to the next. Pin.
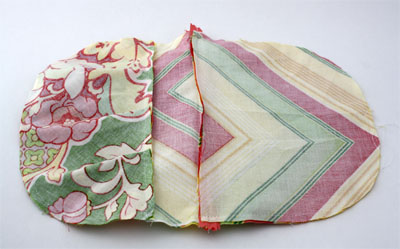
Place outer top piece face down on pleated piece, line up edges and stitch across 1/4 inch from the edge. Open up and press. Repeat with other two pieces to make the other side.
Make a zipper sandwich. Place 1 piece of outer fabric face up, then the zipper and then the lining right side facing down. Line up the three edges.
With a zipper foot sew across the top between the edge of your zipper sandwich and the zipper teeth (closer to the zipper feet).
Bring lining and outer fabric to the same side.
Make another zipper sandwich on the other side of the zipper.
Open up and it will look like this. You can top stitch at the edge of the fabric along the zipper now, if you like (I didn’t).
Bring both pieces of lining to one side and both pieces of the outer fabric to the other side. Un-zip zipper at least halfway so you can turn it once it is stitched. If you forget to un-zip the zipper you won’t be able to turn your pouch right side out.
Pinch zipper towards outer fabric, making sure it is laying nicely as you pin.
Using 1/4 inch seam stitch all the way around the pouch leaving a two inch opening in the bottom of the lining for turning.
Turn right side out. Hand stitch (or machine stitch) opening in lining closed.
Push lining inside the pouch and it is finished!
You might also be interested in this Zippered Pouch tutorial.
It is easy to make a matching tote for your pouch with this super simple tote tutorial!
You might also like these 10 Tote Tutorials.
Want to make your bag more personal? Try these easy applique monograms with free printable letters.


Glad you like it!
Thanks for this nice tutorial. I sewed this pouch several times. You can see my newest one on my blog 🙂 Have a nice day!!!
what is the pattern she is using ? how can you find the measurements?
I’ve looked every where but can’t find one that looks like hers!
🙁
I did it!!!!!!!!! The only part that I found confusing was when you say to do the zipper sandwich again. It seems like the lining piece is opposite of the first time…? I’m a newbie so I was so excited to have made something!!!!!!!!!!! Yay! Next time I will definitely line it with something to make it thicker tho. Thanks a million!!!!!!!!!!
Hi Cindy;
You’re Pleated pouch looks divine! I’m really impressed with how beautifully your zipper sits at the top of the pouch. Did you use any specific technique to make it look so neat & even? I’m a little OC when it comes to little details like that 😉 and I’m not happy with the outcome of my recent effort (hence why I’m online trying to figure out how to rectify it! ) I Would appreciate any tips you could offer. Thanks 🙂
The sewing projects are so cute!!! To be honest I am a YOUNG sewer. The first time i saw these projects I knew it would be easy, fun, and simple.
hi
great sewing project was easy enough for me to do and i did add a wristlet band….super cuteness…thank you for your great instructions and patterns!!!!
would it be possable to enlarge this pattern to make a clutch big enough to fit a few diapers and a travel wipes case?
I’ve been trying to learn how to work a zipper and found your tutorial very simple and easy to understand, while others I’ve tried have not been so easy. Thank you! Turned out super cute.
I do it!!! So Lovely!!! Tank you. http://trapospolibel.blogspot.com/2012/01/um-trabalhinho-de-fim-de-semana.html
Couldn’t wait to try this! I just purchased several valentines fabrics and made some of these pouches to fill with goodies on Valentine’s Day. I added some lightweight fusible fleece to the band and lining pieces and it turned out great! Thanks for all the great tuts!
Thank you, Thank you, Thank you!!!!! I am positively in LOVE with this pattern! Not only are the instructions Super easy to follow, but the final product is adorable!!! I added some iron-on fusible web to give it some extra body, and use mine as a cute change purse/wallet. Keep your wonderful patterns coming!!!! Thanks You!
You just completely saved my butt! I needed some fast last minute gifts for some cousins that I wasn’t planning on having gifts for! Beautiful tutorial and great pouch! Thank you so much for posting!
I just finished making one of these for my sons teacher for Christmas. I’ll put something inside. I hope she likes it. Thanks for the tut.
Liz