Hair bows can make an inexpensive and appreciated gift for the little girls in your life. Can you ever have too many? Around our house they often never come home so it is nice to know for just a few dollars it is easy to make your own boutique style hair bows. Every outfit can have the perfect accessory made by you.

Supplies to make a hair bow
24 inches of 1.5 inch wide grosgrain ribbon to make a 4 1/2 inch wide bow or 18 inches of 1.5 inch grosgrain ribbon to make a 3 1/5 inch bow
6 inches of fine gauge floral wire,
a hair clip
glue gun
scissors

How to make a hair bow
Fold the 24 inch (or 18 inch) piece of ribbon in half and crease with your thumb.

Lay ribbon out flat. Bring one edge of the ribbon to the center of the ribbon and lay on top of the crease to form a loop.

Repeat for the other side, creating a figure eight. Make sure ends of ribbon overlap about an inch.

Bring the outside edge of the loop to the center. From this point on it works best to hold the ribbon in your hands.

Bring the loop on the other side to the center. Be sure to adjust the loops so they are even.

Pinch the center together by bending the outside edge down first and accordion fold the center together, ending by folding the opposite edge down. Keeping the fold tight will create a nicely shaped bow.

Tightly wrap a piece of floral wire around the center.
 Twist securely in the back and trim edges.

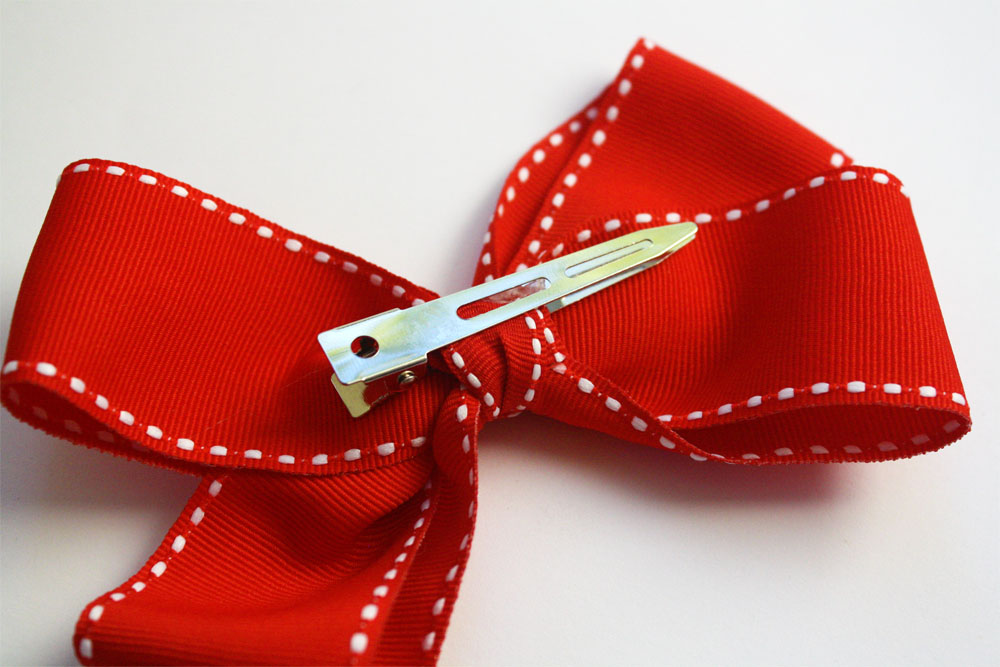
Slip the hair clip through the wire on the back of the bow. Make sure the wire is folded under so it doesn’t poke into the head.

Hot glue or sew a button on the center of the bow. Seasonal buttons, plastic gem and charms can be used. (Remember for young children to be cautious of items that could be a choking hazard)

With all of the beautiful ribbon and buttons that can be found, think of the possibilities for making stylish bows.
If you are looking for more handmade gift ideas for the holidays you might enjoy browsing my Handmade Gift Guide.


I love it simple! Can u give suggestions in using elastic s? Or rubber bands?
hey thanks i am a crafty kind of person and this is a really good thing todo thankyou again its awesome.:)
I am starting out my blog and would love to be able to put your page up along with your step by steps. I would make sure to include you and make sure your website nma eis known. I think this Tutorial is great and would love to use it. Thanks
Thank you for the easy step by step lesson.
Great ideas.thanks for it
from: São Paulo- Brazil
Great tutorial. You Make it look so easy.
cute, I’m going to make some for my niece. i’m stopping by from tatertots and jello and would love for you to stop by my blog and checkout the huge giveaway going on. http://thelovelypoppy.blogspot.com/2011/10/blog-follower-giveaway.html xoxo nicole
That hairbow is so cute! Thanks for sharing the tutorial!
Wonderful tutorial for such a stylish and simple project. they come out perfect every time. Thanks.
THANK YOU!! THANK YOU!! I knew it couldn’t be that hard but just couldn’t get the ribbon to look nice like that. The bows I’ve tried to do just didn’t look that lovely. Thanks for the step-by-step photos!
thank you! i’m glad i didn’t buy the spool of ribbon yesterday at joann b/c i had picked up the wrong type! now i know just what to shop for and what length i need! thanks again!
Aahh…. I never could get that perfect loop, but now I’m ready to go with all those buttons and ribbon spools stored in my To-Do craft box! Thanks!
Love this. Thanks for the step by step! For some reason, I can make all sorts of hair doodads but working with ribbon seems daunting! I will try again with this tutorial.
This is a great simple idea. I think as crafters, we sometimes get too caught up in trying to make something everything New and Shiny. These are fun and simple and perfect.
Thanks for sharing!
Oh my gosh! It looks so easy! I love it!