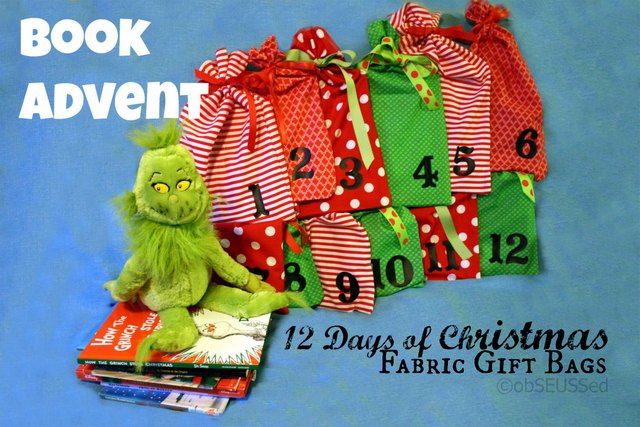
These 12 days of Christmas Fabric Gift Bags are something fun you sew up either as a gift or for your own family! What a fun way to get excited about the holidays! I love advent calendars, in fact I have shared quite a few advent calendars you can make. Handmade gifts are my favorite way to give gifts, the extra time and love are always appreciated!
This month we are sharing over 100 handmade gift tutorials. I have teamed up with Thirty Handmade Days and Your Homebased Mom to share the best homemade gift ideas. We have over 100 tutorials so you will have the best homemade holiday ever! Each day be sure to visit the guest poster’s blog for a chance to win BIG! Up for grabs is a Cricut cutting machine, a Blendtec blender, a Baby Lock sewing machine and a $300 Michaels gift card! Grab a new entry every day! Visit obSEUSSed today to enter to win the Baby Lock Sewing Machine.

Hello! I’m Victoria, a.k.a. obSEUSSed. I’m happy to share my sewing home made gift idea with you today.
12 Days of Christmas Fabric Gift Bags
 I love to use fabric gift bags for birthdays and Christmas to cut down on paper waste and it makes wrapping SOO much quicker! We even leave out Santa/Grinch bags for Santa to fill so our kids know which gifts Santa brought.
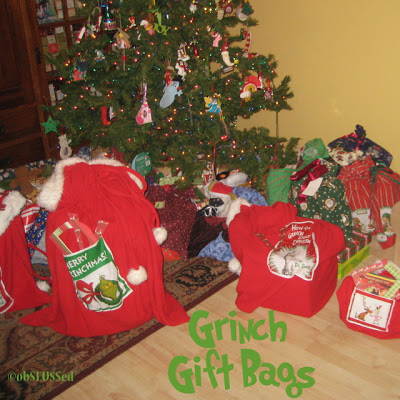
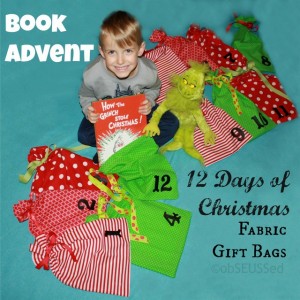
The past years I jumped on the trend of wrapping Christmas books for a little advent count down with my kids. It took forever to wrap them.
![Grinch-Christmas-Book-advent-obSEUSS[1]](https://www.skiptomylou.org/wp-content/uploads/2014/11/Grinch-Christmas-Book-advent-obSEUSS1.jpg)
I thought I may as well make some reusable fabric gift bags to use with our book advent each year. This would be an excellent gift to give to close family or friends or even teachers. Sew the bags, then add a book (or two) in the Day 1 bag to get them started. A beautiful and thoughtful gift that can be used each year. I’m giving these to my children.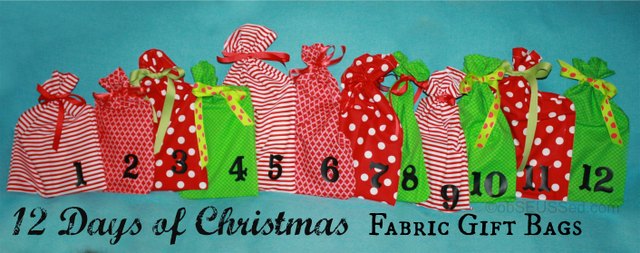
The bags can be used for a book advent (from books you already own, borrowed from the library or new gifts) or any other special gifts to count down to Christmas.
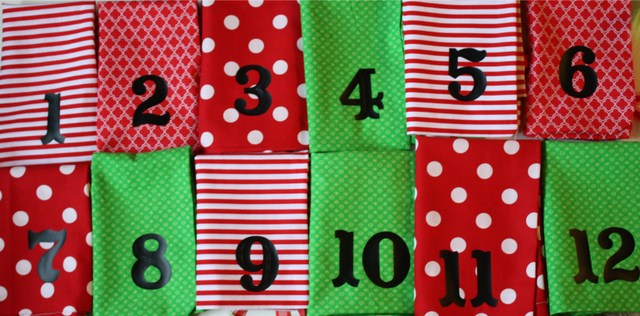
I also chose cute Christmas colored fabric that would work well for birthdays during the year (when mixed with my other colorful bags). For example, you can use the ‘Day 5’ bag for when your child turns 5.
How to make 12 Days of Christmas Fabric Gift Bags
Instructions by Victoria @obSEUSSed
Materials Needed:
- A variety of Christmas patterned fabric. I normally buy 1 to 1.5 yards of each style to get me 2-4 bags.
- Grossgrain or fancy ribbon. About 30 inches per bag, so 360 inches or 10 yards total.
- White thread (or colored if you want it to match your fabric).
- Iron-on numbers, purchased at the store or iron-on heat vinyl to be cut by hand or a cutting machine.
- A sewing machine and your ability to sew straight lines.
I love to sew. November and December are my busiest sewing months as I am making gifts for family and friends. But I have a confession – I only sew straight lines and only if I can do it without a paper pattern or pinning. I’m a lazy sewer. It has to be simple but you can still make some amazing things by sewing straight lines.
How to:
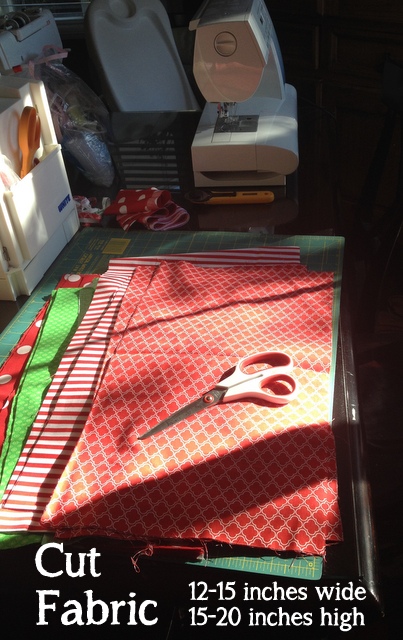
1. Cut fabric to a variety of sizes. I like to keep mine at least 12 inches wide and often 18 inches tall. I’ll make a few larger than that and a couple smaller. Make sure to have a front and back piece while cutting. I use my cutting mat and circular cutter or scissors.
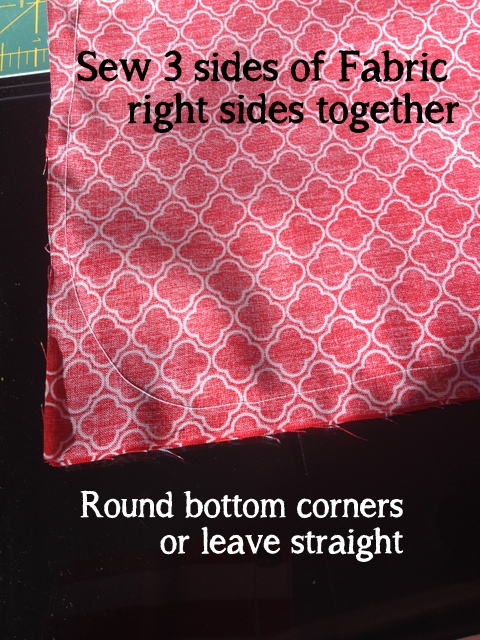
2. Make sure the fabric has wrong sides facing out. Next I sew 3 sides with straight stitching. Sometimes I curve the bottom corners but that is only if I’m feeling risky.
3. Then I turn the bag right sides out. Fold over the top edge about 1 inch. You can double fold to have a nice edge or just fold once to be quick. It won’t matter much to see the inside.
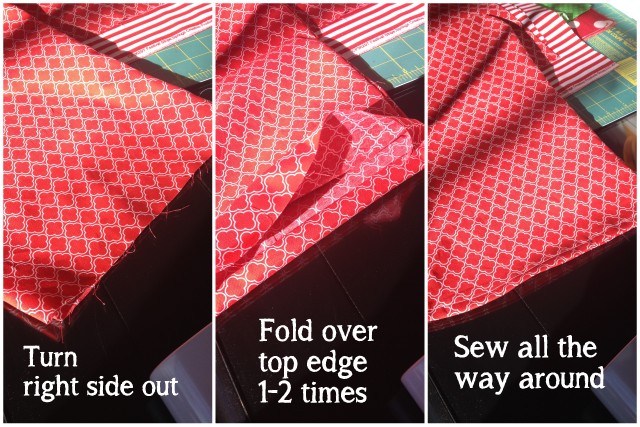
4. Sew along the outside edge as you hold the folded fabric down. Make a nice finished edge ring around the top.
5. Now cut your coordinating ribbon about 30-36 inches. Find the middle and pinch it. Lay it along the seam of one side of the bag about 1-3 inches from the top. Now sew back and forth about 3-4 times to hold the ribbon on. Again, I use white thread for all of this to keep it simple but you can use matching thread if you wish.

6. Now your bag is all ready to hold books or gifts and just tie it up to look pretty.
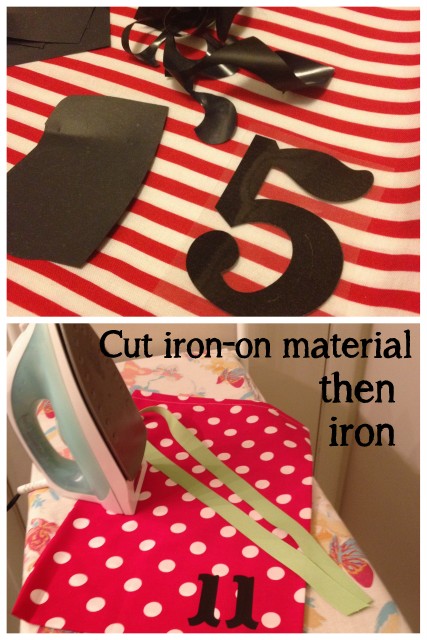
7. Adding Numbers: To create the ‘12 Days of Christmas’ bags you can use iron-on numbers from the craft store, or iron-on vinyl cut by hand or a cutting machine. I used iron-on vinyl I ordered from Pick Your Plum daily deal site. There are a variety of places you can find it. I created numbers in the Silhouette software using the Captain Howdy font. I made the numbers about 3 inches high. Then I mirrored the image and cut it on the matte side of the heat transfer vinyl. (I used this YouTube video for help.) Then you stick the sticky side to your fabric and iron on high setting. Peel off the top clear plastic and you are done.
Now they are all ready for the 12 Days of Christmas advent book count down.
A beautiful gift for your children, family, friends or teachers. Remember to count down to Christmas and open bag #12 first.
Thank you Cindy for inviting me to share this gift idea today.
I’m sharing a DIY elastic sewn bookmark on my blog today. Stop by to get instructions and enter to win the Baby Lock sewing machine.

 Victoria @obSEUSSed blogs about children’s books, kid crafts, DIY and Dr. Seuss inspired crafts at www.obSEUSSed.com. She also contributes to iHeartSaltLake.com sharing her favorite local spots. Follow along on Pinterest, Instagram and facebook for family friendly activities and crafts.


I hope you used it. I am sorry for my delay, I bet his party was cute.
Hi there wondering if I could ask for pemisrsion to use this to make stick finger puppets for my son’s 5th b-day (robot theme) as party favors. We’re only having a few guests but this would be neat for the kiddos. When I post about his birthday I would love to link credit back to you. I’ll understand if not. Love all the fun things on your blog! Jennifer
What a fantastic idea! I came across the book idea this morning looking for a new tradition then happened across this page as I was looking for certain books. I have now gone out and brought materials so I can make pouches.