This DIY Quilted Tablet Case is a practical way to store a tablet and give a homemade gift. Use up all your scraps! I love a quick sewing project! Sew up a bunch for perfect handmade gifts this season! These 20 minute throw pillows are a fun way to update any room in your house.
This month we are sharing over 100 handmade gift tutorials. I have teamed up with Thirty Handmade Days and Your Homebased Mom to share the best homemade gift ideas. We have over 100 tutorials so you will have the best homemade holiday ever! Each day be sure to visit the guest poster’s blog for a chance to win BIG! Up for grabs is a Cricut cutting machine, a Blendtec blender, a Baby Lock sewing machine and a $300 Michaels gift card! Grab a new entry every day! Visit Handmade in Heartland today to enter to win the Baby Lock Sewing Machine.

DIY Tablet Case

I love making handmade gifts for the holidays, this fun tablet case is easy and fun and if you are familiar with a sewing machine shouldn’t take you long at all! I love doing small projects because they take so little fabric that I usually have enough scraps and random fabric purchases in my closet to use, less trips to the fabric store is always a nice thing. So many people will be giving tablets this Christmas, wouldn’t it be fun to give your teen a cute handmade case to go with it?!

I had this fun french flower fabric in my craft closet and thought it would be perfect to quilt it around the print. You could easily just quilt strait lines an inch apart or in a random design, go with what will compliment your fabric.
How to make DIY Tablet Case
For this project you’ll need an outside fabric, inside fabric & batting, some bias tape, a button & 2 inches of elastic.
The first step is to measure your tablet and cut your fabric, I cut my font pieces 1″ bigger all around than your tablet, this gives you 1/2″ seam allowances. Next you will cut cut the back the same measurement except make it 2″ longer so that it can fold over. You will cut 2 of each, one for the outside and one for the lining of the case. You’ll also want 1 piece of batting for the front and one for the back.
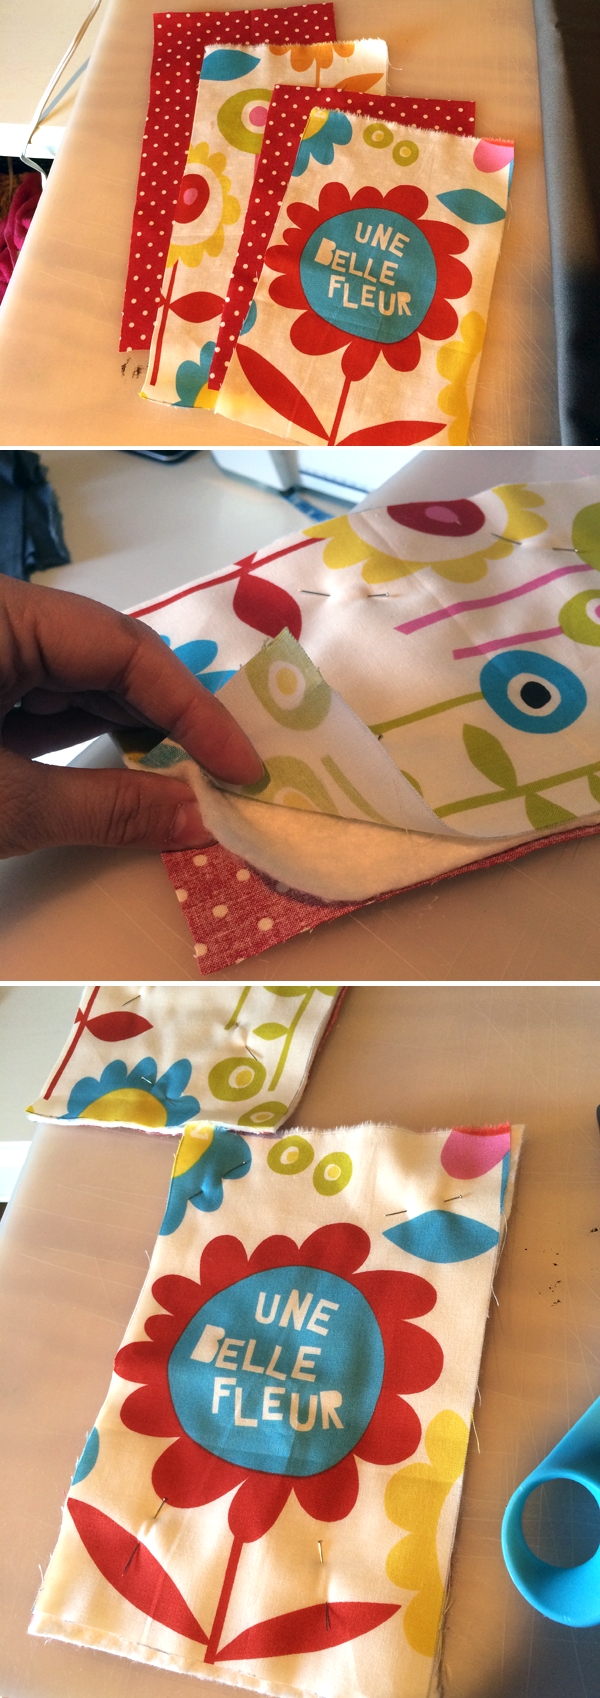
Layer the fabrics so that the fabrics sandwich the batting in the middle, make sure the right side of each fabric faces the outside and not the batting. Pin it together and then take to your machine to quilt. I used the design of the fabric, but if you want to do stripes its a good idea to use a light pencil or vanishing marker to draw your lines with a ruler and then sew over them.
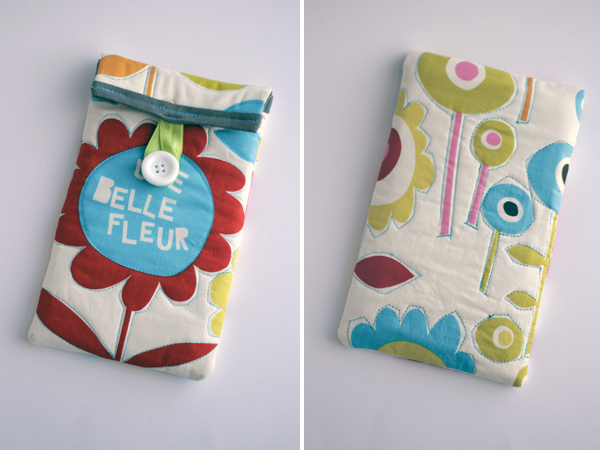
After both the front and back are quilted add binding to the top 2″ of the longer piece on the sides and then a longer piece across the top, also sew binding across the top of the shorter piece. This finishes the edges of the top of the case, I used 1/2″ bias tape and sewed it at 1/4″. Next, sew together on the side seams, using a 1/2″ seam allowance all the way up to the end of the short side.Turn your case rightside out! Fold your elastic in half and stitch the ends to the center of the back piece on the inside, see the photos to understand where to place the elastic. Sew your button on the front at the bottom of where the elastic reaches without stretching. Voila! you’re done!
Do you make your holiday gifts, or at least some of them? One of these years I’m going to give only handmade gifts! Cheers to making fun personal gifts for giving!

I hope you enjoyed this post! A big thanks to Skip to My Lou for having me over! Here a few other posts you might enjoy. 🙂
Peanut Butter Reindeer Cookies
The Best Traditional Chicken Pot Pie

 Hi! I’m Angela from Handmade in the Heartland, I believe that everyone can create a handmade life easier than they think, and with my blog I hope to inspire others to pull out their sewing machine, glue gun, or measuring cups and make things from scratch.


I am a newbie in sewing world and always wanting to learn to sew 🙂 I am so glad that I found your blog on Pinterest! Thanks for sharing this tutorial!