Join Us for my Bake Craft Sew Along! If you love to sew then you won’t want to miss a day of sewn handmade gift ideas. According to Kelly is featuring gifts that can be crafted and A Southern Fairytale is sharing recipes perfect for making edible gifts! Don’t forget to enter our SEW Amazing Giveaway. Just visit The Crafty Cupboard today.

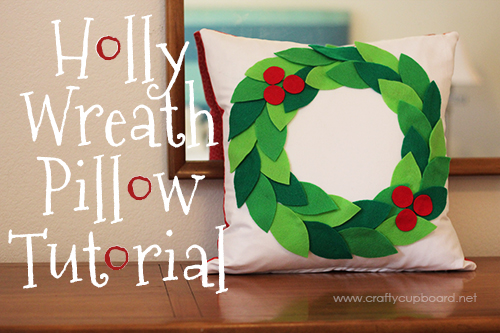
Hi there, it’s Melanie from The Crafty Cupboard! I’m so happy to be sharing a favorite holiday project with you today. One of my go-to ways to decorate for the Holidays is with a festive pillow cover! Especially when that pillow cover is EASY to make, and FUN to look at! This one required a glue gun- talk about fast and effective! Let me show you how to make this pillow for yourself, or for a friend!
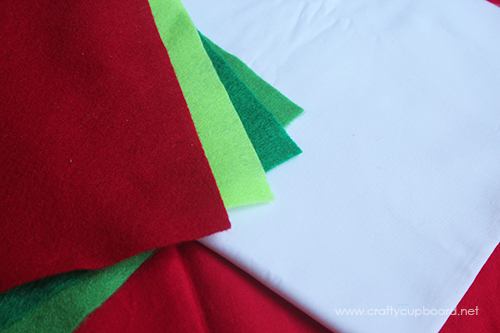
The materials are:
- 3 (or more) sheets of green felt in different shades. Wool felt is beautiful, but the eco-fi felt I used is more economical.
- 1 sheet red felt
- 1/2 yard White Cotton fabric, cut into 18″ square
- 1/2 yard coordinating flannel fabric for backing, cut into 18″ square
- 14″ zipper
- 18″ pillow form (TIP: I scour thrift stores and garage sales for good quality pillows with down or down alternative pillow forms, toss the covers, and wash the forms before using. A great way to save money on a quality product!)
- Hot Glue Gun and Glue sticks
On to the construction!
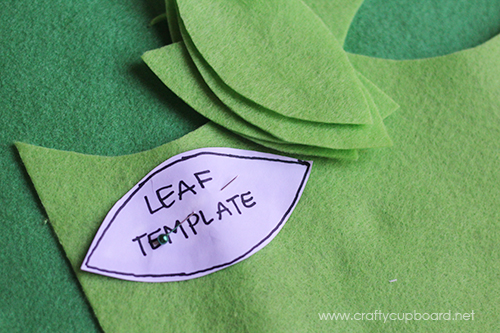
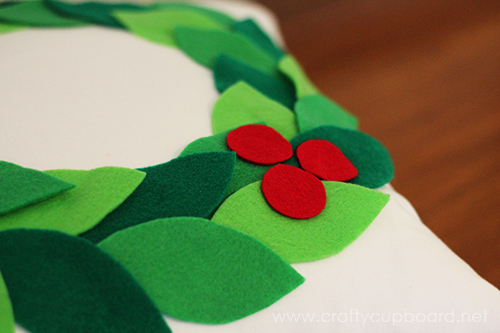
1. Draw a leaf template 4″ long and 2″ at its widest point. Use the template to cut leaves out of all three sheets of green felt.
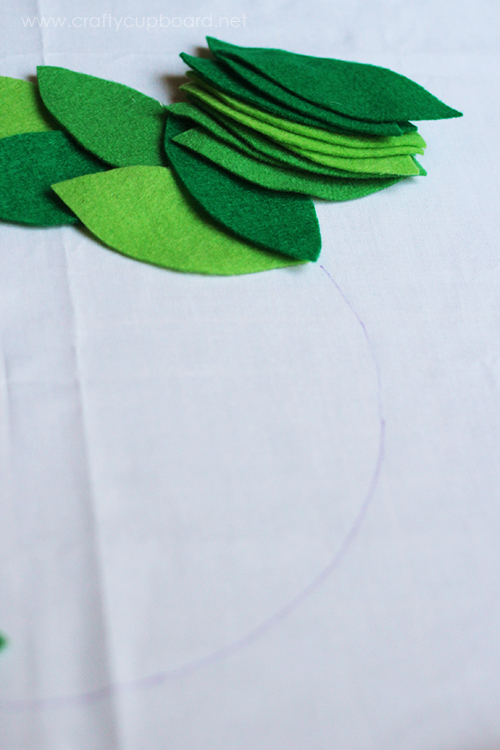
2. Cut your white fabric into an 18″ square, and then draw a 10″ circle centered on the square. Start “Dry placing” the felt leaves around the circle, meaning arrange them without gluing.
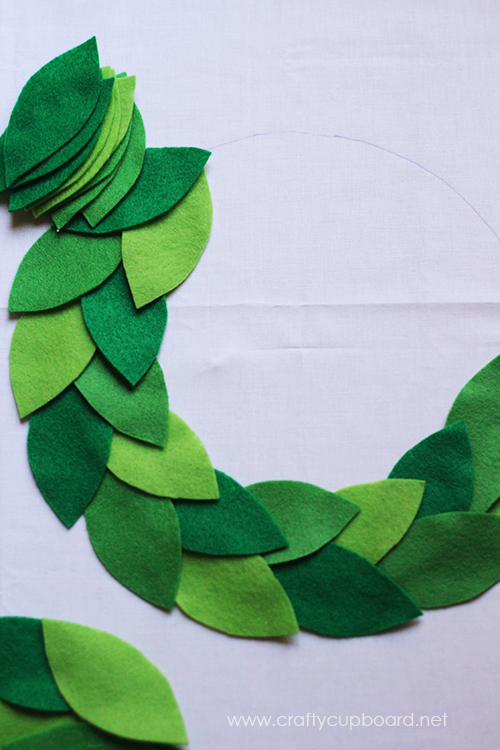
3. Continue arranging the leaves around your circle, distributing the colors well.
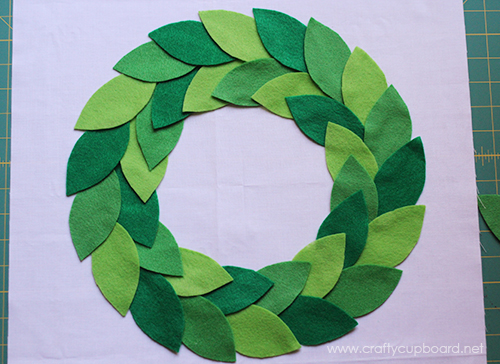
4. Once the leaves are pretty and arranged nicely, lift the leaves gently one by one and glue them to the white background piece.

5. Cut 1″ circles from the red felt and arrange them in berry bunches on your leaves. Glue them to the leaves. Now: onto the pillow construction!
I wanted to make a graphic you could print out and keep by your sewing machine, so just save the following image to your computer and print it out. All sewing uses a 1/2″ seam allowance unless otherwise indicated. I’ll go through the steps here:
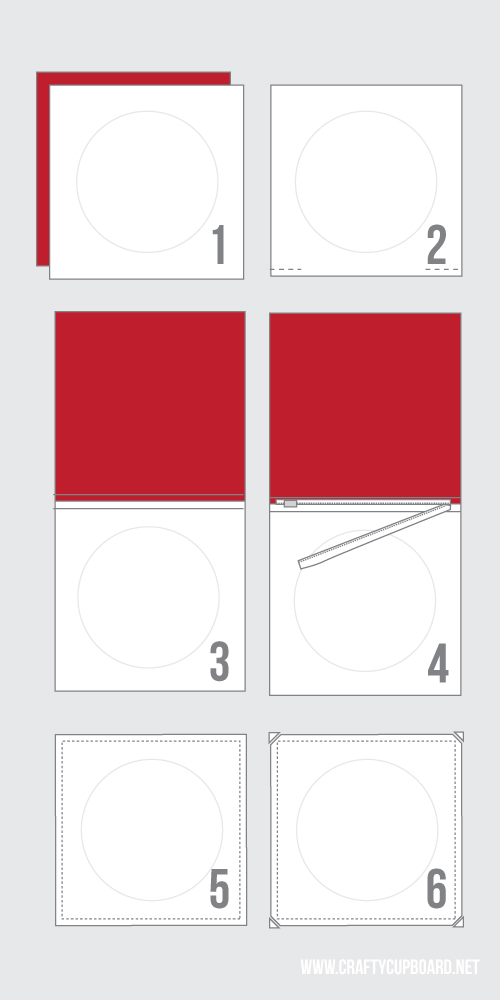
Step 1: Place your backing fabric and front fabric right sides together.
Step 2: Sew the bottom together only 3″ in from each side, leaving a large space between.
Step 3: Open pillow pieces and iron the bottom seams open. Leave the pillow pieces Right Sides down.
Step 4: Lay an open zipper face down on the ironed seam, centered on the seam. Pin or tape one side of the zipper to the pillow and attach with a zipper foot. Sew through both the seam allowance and the outside of the pillow. Repeat with the other side of the zipper.
Step 5: With the zipper only halfway closed, sew around the remaining three sides.
Step 6: Snip the corners to make turning easier, and turn inside out through zipper opening.
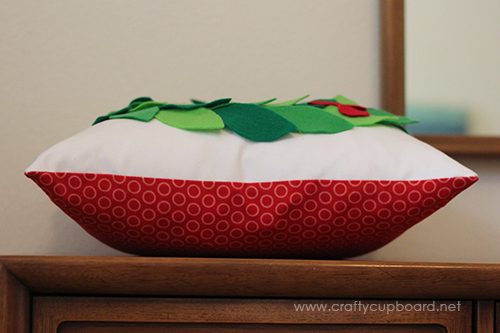
All that is left is to insert that pillow form and to fluff it up nice and pretty!
The hot-glued holly leaves and berries make quick work of the front, and the zipper closure makes for a sturdy finish! Make one, make two, make many!
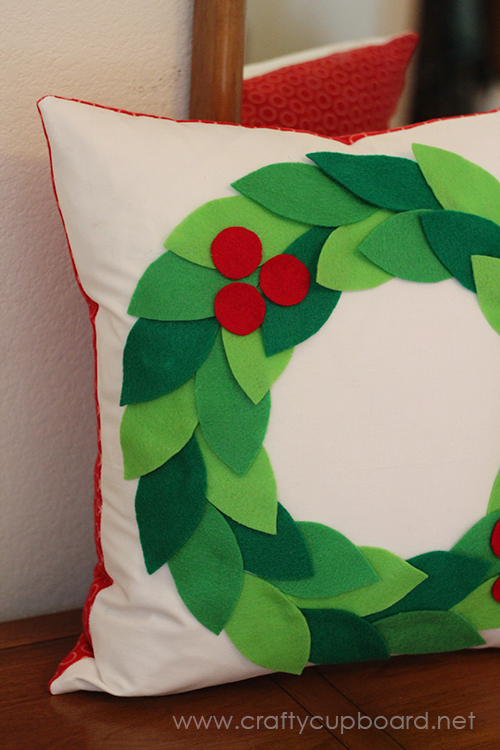
Pillows are such a comfy way to incorporate holiday decor, don’t you think? My girls have been fighting over who gets to sit with the pillow while they are watching their favorite show (and the pillow has held up REALLY well), which means I need to get making a few more!
For more holiday and basic sewing fun, stop by and visit my blog, The Crafty Cupboard! I hope to see you there!
SEW Amazing Giveaway worth over $1000.00
Stop by The Crafty Cupboard for more sewing inspiration and to enter the SEW Amazing Giveaway today (you only have today to enter)! I am giving away more than $1o00.00 worth of sewing goodies! You won’t want to miss this!


Can the felt leaves be glued onto fabric with Mod Podge Glue?
This is such a wonderful holiday pillow! Thank you for the inspiration!
Super cute! Love it!
This is AMAZING! Melanie… YOU are one talented seamstress!
Carrie
This is definitely a Christmas decoration that I will be doing with my family. Thanks for the easy to follow tutorial.
Cute!! I’ve linked to your tutorial over at Craft Gossip:
http://sewing.craftgossip.com/tutorial-felt-holly-wreath-pillow/2013/11/04/
–Anne
What a beautiful pillow!