Welcome to the Bake Craft Sew Along! If you love to sew then you won’t want to miss a day of sewn handmade gift ideas. According to Kelly is featuring gifts that can be crafted and A Southern Fairytale is sharing recipes perfect for making edible gifts!

Hi there! I’m Delia and I blog over at Delia Creates.
Today, I thought I would revamp an old tutorial of mine:
This is a super simple project but my original tutorial pictures were just somewhat confusing. I’m hoping today’s tutorial will help clear things up!
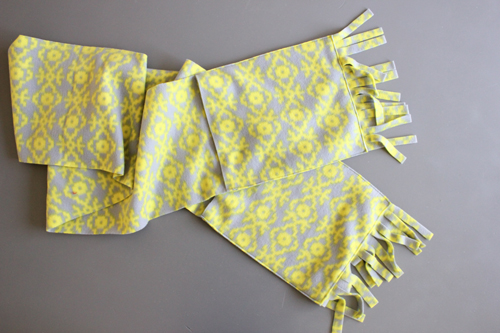
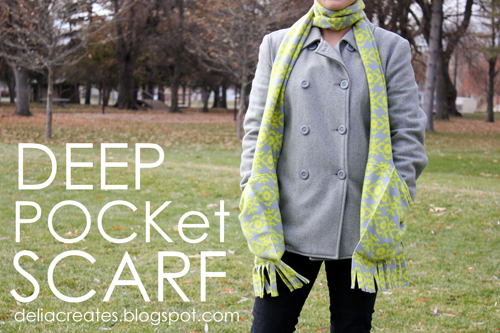
This is a great project that is fast and inexpensive to whip up, and great for gift giving. Make one for yourself or a half dozen for friends. It’s nice and warm and super handy to be able to slip your hands into when you don’t have gloves.
So, let’s get started.
Materials:
– 1/2 yard of high quality fleece
– matching or contrasting thread
– optional but very helpful: rotary cutter, mat and ruler
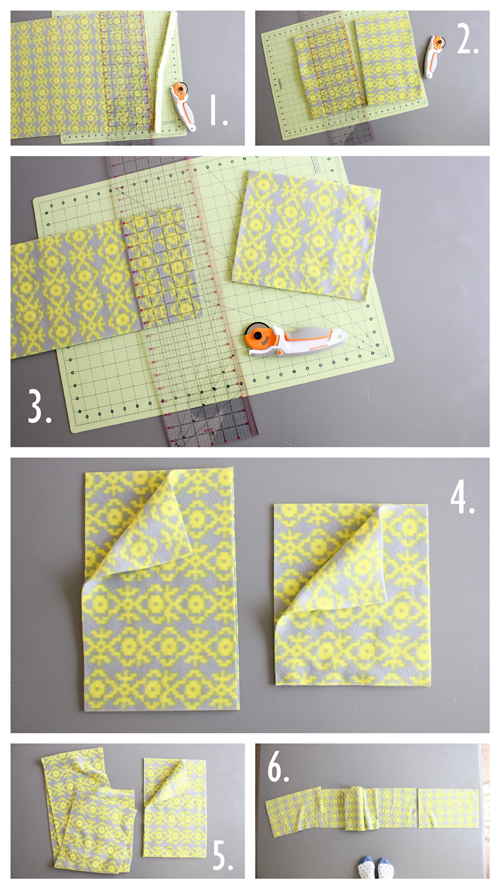
1. Trim the selvage off of your fleece and make sure it is all square and even.
2. Cut your 1/2 yard of fleece exactly in half. You should end up with TWO strips of fleece 9×58 inches (or roughly 58-60 inches depending on the width of your fleece).
3. Keep one of the two strips as is and set it aside. Take the second strip and cut it into four smaller rectangles.
4. You’ll need 2 – 9×13 inch pieces and 2 – 9×11 inch pieces. The longer rectangles will extend the length of the piece you set aside and the smaller rectangles will be your pockets. *These are measurements for making a scarf for a medium height female adult.
5. Grab the 9×58 inch scarf piece and the two longer 9×13 inch rectangles.
6. See how these extra pieces will extend the length of the scarf?
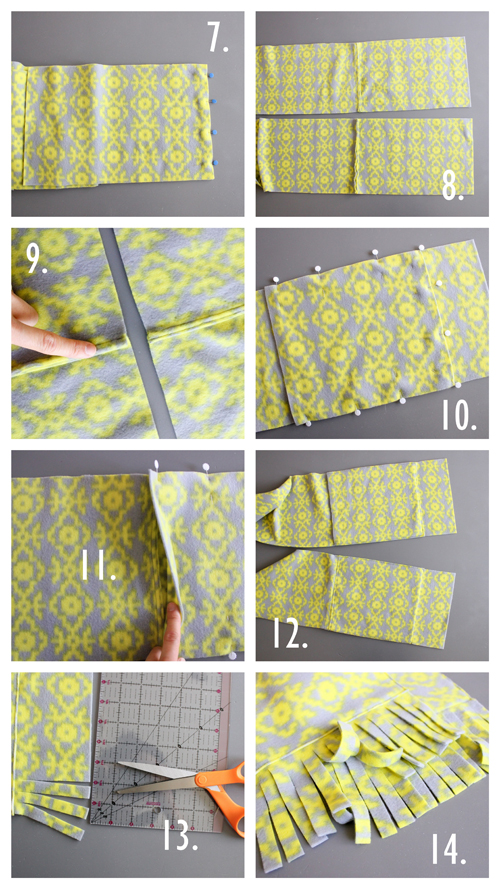
7. Lay the extra pieces on the ends of the main scarf piece right sides facing. Pin and sew with 1/4 inch seam allowance.
8. Repeat this process for the other end.
9. Push the seam allowance down toward the end of the scarf and sew down it down so it lays flat. Repeat for the other side.
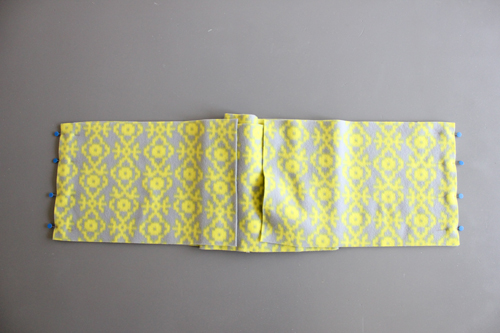
10. Now take the smaller rectangles you cut earlier. These are your pockets. Lay them on the ends of your scarf.
11. Be sure to lay the pocket pieces over the seams at the ends. You’ll also want to leave room at the ends for fringe.
12. Pin and sew with an 1/8 inch seam allowance. Be very careful to catch both layers and to back stitch several times at the tops of each side of each pocket. Run your finger along the inside of the pocket to double check. You can do two very close lines of stitching to strengthen the seam if you like.
13. Now for the fringe! Using a ruler as a guide, snip lines across the bottom about 1/2 inch apart. Don’t worry if it’s not exact.
14. And that’s it! You’re done!

Told you it was a cinch.
You can even wear this scarf sans coat on a sunny winter day (I have), it adds the perfect amount of warmth to a long sleeve shirt so you don’t have to wear a jacket. It also comes in handy when I’m scraping the ice off the car windows and I left my gloves in the house…again. 🙂
Thanks for having me over Cindy! It’s been a pleasure!
Delia


I love this with pockets thank you very much
what a simple and cute idea! Love the extra length, but even if not extended, the pockets are so valuable.
Only wish I’d seen this when I made approximately 30 scarves for our local coat drive earlier this month!
Original idea,para regalar en estas Navidades.
felicidades¡¡+
Love this! Wish I had a need for one =)
This will be perfect for the bolts of Black Friday fleece I bought!
Nice gift idea. I can’t wait to make a dozen of these! Thanks so much!! I think I need to find this exact pattern fleece, it is fab!!
What a great idea!! My hands are always cold and this is the perfect solution. Your tutorial makes sense to me 🙂