We are baking, sewing & crafting up a storm, preparing handmade gifts for this holiday season. I am sharing 30 wonderful sewn gifts from 30 amazing bloggers! Head on over to According to Kelly for 30 fabulous crafty gifts. A Southern Fairytale is spotlighting 30 edible yummies & holiday-inspired recipes.You definitely don’t want to miss a day! Check out ALL of our creative projects HERE.
")

Hi, I’m Anna from noodlehead. I’m excited to join in again for Skip to My Lou’s Holiday Bake, Craft and Sew Along! This year’s project is really fun because you can make it as simple or complex as you’d like and there’s really no rules, love that. So for making a really fun customizable fabric tray read on…


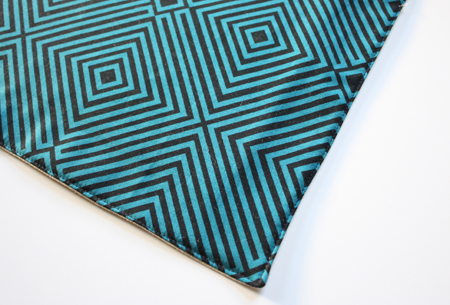
I had made a tray earlier this year for my dad and I figured this would be a simple project to share!
This is a great project to make to combine with a few other goodies for a hostess gift, a gift for your not-so-organized husband as a place for him to set his glasses and wallet and spare change, or for a special friend. Fill it with treats, magazines, recipes, anything works! I’ve included dimensions to make three different sized fabric trays: pencil size (small), spare change size (medium), and magazine size (large). This is also a great scrap busting project, so dig into your scrap bin and pull out your favs. Enjoy!

Materials:
For small fabric pencil tray:
- 2 pieces of fabric 10″Wx6″T (this is where you can get as fancy or simple as you’d like, think of patchwork, quilt blocks, anything goes – just trim it down to this size)
- one piece cotton batting or fusible fleece 10″Wx6″T
- one piece peltex 7″Wx3″T stiff double side fusible interfacing (I used Peltex 72F, found at Walmart/joanns, etc.)
For medium fabric spare change tray:
- 2 pieces of fabric 12″Wx10″T
- one piece cotton batting or fusible fleece 12″Wx10″T
- one piece peltex 9″Wx7″T stiff double side fusible interfacing (I used Peltex 72F, found at Walmart/joanns, etc.)
For large fabric magazine tray:

- 2 pieces of fabric 16×15
- one piece cotton batting or fusible fleece 16×15
- one piece peltex 11×12 stiff double side fusible interfacing (I used Peltex 72F,e found at Walmart/joanns, etc.)
Directions:
Fuse fleece to one of the main fabric piece (if using fusible fleece), fuse peltex centered onto the fabric you’ve selected for the bottom of your tray.

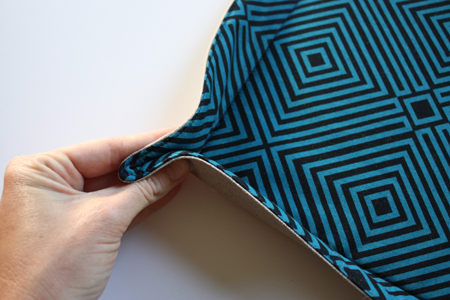
Layer batting (no need if you’ve already used fusible fleece), fabric for inside of tray RIGHT side up, fabric for bottom of tray RIGHT side down (see picture, the peltex is fused center, leaving the plastic layer on for now).

Pin. Sew along all four edges using a 1/4″ seam allowance, but leaving a 3-4″ opening for turning (5″ opening for the large tray). Clip corners. Remove plastic film from peltex. Turn right side out, push out corners with a chopstick or other dull instrument. Press, tucking the raw edges of the opening inside. Also press the peltex rectangle to fuse it to the tray interior.
Topstitch along all edges, thus closing the opening you left for turning.

Sew a rectangle along the edges of the peltex rectangle. You’ll be able to feel the edge of it through the fabric, if not, sewing through it isn’t a big deal. A water soluble pen might come in handy to keep your rectangle looking like a rectangle! You can even do more quilting at this point if you wish.
Pinch each corner at the edge of the peltex, bending the fabric up to meet at the edges.
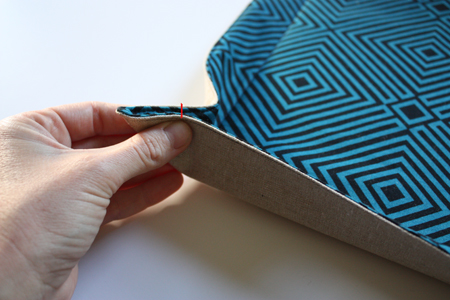
Here you can either use floss (or even thread) and sew a few stitches through the two edges to hold them together.


Or you can pin them together and stitch straight up the corner you pinched (remembering to backstitch). Repeat for the remaining 3 corners and you’re set!

Fill with whatever your heart desires and give that gift!!

I’d also like to note that there are a lot of similar projects out there, so if this isn’t your cup of tea, try one of these fab tutorials:
- fabric tray by chic chic sewing
- trinket tray by heather bailey
- fabric basket tutorial by Make, Do & Send
- fabric scrap basket by The Sometimes Crafter
- happy hostess gift box by Jennifer Casa for Sew Mama Sew
Or better yet, stop by my blog and check out all my tutorials and patterns, maybe you’ll find something else you just HAVE to make! Thanks for having me Cindy!
[fabrics: linen, lizzy house 1001 peeps (blue), tula pink parisville (yellow), greenfield hill denyse schmidt (green)]


Thanks for the tray pattern. I want to use mine for travel & class, I added velcro instead of sewing it.
I have made these for years for gifts. I call them “Travel Valets”. I put snaps on each corner (you can also use Velcro), so that you can unsnap them and fold them flat to put in your suitcase. When you reach the hotel, snap the sides together and use on your hotel desk or dresser for your room key, wallet, glasses, jewelry, change, etc. Everyone loves receiving them. I’ve made them in college themed fabrics, hobby themed fabrics, and have also monogrammed them with my embroidery machine. I usually cut mine 10×13″ and have a one inch lip all around.
I am ready to make this tray. I would like to make mine a custom size but want to make sure the proportions are correct. Are the measurements for the large tray correct? The difference between the fabric and the peltex is 3″each side on the small and medium trays but on the large tray the differences are 5″ on one side and then 3″ on the other side. Please let us know.
What a great gift idea, be it for office workers, or as a hostes gift with oil cloth for holding muffins or cookies…
LOVE this tutorial! Many thanks for sharing.
Valerie
http://valsplay.blogspot.com/
LOVE this tutorial! Many thanks for sharing…
I made something similar to this out of felt. I really enjoyed getting to see a “dressier” version. Thank you for the many great ideas that you share and for the nudge to start working on Christmas. Gulp.
I’ve just listed you as a recipient of the Versatile Blogger Award. You can find the details about this award on this post on my blog: http://suebe.wordpress.com/2011/09/14/im-a-versatile-blogger/
love these! thanks for sharing 🙂
x
I love that you’re thinking ahead to Christmas (EEeeeeeeeee!!!) partly because it’s my favorite holiday and partly because I’m glad that someone is making me think about handmade gifts at a time when I could actually start them and get them done in time insead of NOVEMBER, which happens to me every year. I’m making a list and these are definitely on the list. Keep those tutorials comin’, I love it!
I am discovering your blog via noodlehead and it is just a treasures place !! I can’t believe all those great stuufs you are proposing ! I’ll be back !!!! Have a llovely day !
these are fantastic! so simple and would make a great gift for neighbors at Christmastime! thanks for sharing Noodlehead!
Small snaps at the corners would work too.
Adding small snaps can be another alternative, so that it can lay flat.
So glad to see this project. Anna is one of my favorite creators, and I’ve wanted to make something similar for quite a while.