We are baking, sewing & crafting up a storm, preparing handmade gifts for this holiday season. I am sharing 30 wonderful sewn gifts from 30 amazing bloggers! Head on over to According to Kelly for 30 fabulous crafty gifts. A Southern Fairytale is spotlighting 30 edible yummies & holiday-inspired recipes.You definitely don’t want to miss a day! Check out ALL of our creative projects HERE.
")
Hello friends! I am so excited to be sharing this sewing project with you today. My name is Mar and I am visiting today from SevenSisters. Thank you for having me Cindy!

I am so blessed to be married to an amazing man, mom to two beautiful little girls and part time nurse at a remarkable hospital. Whenever I can find the time I am crafting along with my “Seven Sisters”. I don’t know where I would be without them. They are truly the best friends and blessings a girl could have (Not to mention two of them are my real life sisters!!). In total we are 3 biological sisters, a mom and daughter team, and two friends. But in our heart of hearts we are truly sisters.
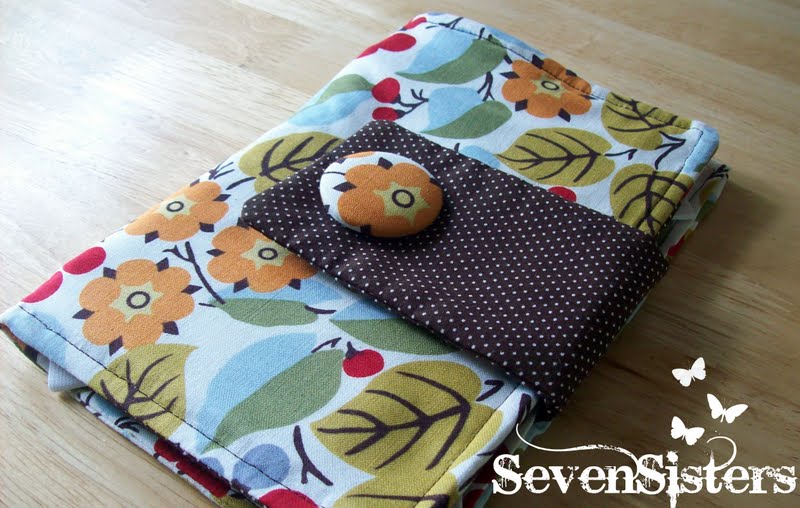
I am so excited to be a part of this Holiday Bake, Craft and Sew Along and to be bringing you a full tutorial on how to make your own Kindle Cover. Which is the perfect gift for that special someone in your life that loves to read and owns a kindle (Like my mother in law who keeps dropping hers. This is the perfect gift for her.) If you don’t happen to own a kindle this project could easily be adjusted for whatever electronic device you own and I will explain below.

Materials:
*Fabric (preferably two different patterns that go together)
*Matting (like the kind used in quilting)
*Elastic
*Iron on velcro
*Fabric button
*Basic sewing supplies
*Sewing machine
Getting Started
My cover is made for the Amazon Kindle with dimensions as follows:
Length x Width x Height
7.5 in x 4.8 in x 0.335 in
I used this formula for measuring and cutting all my material
(L + H +1) x (W + H + 1)
This formula will help you make your measurements
whether you have this exact kindle or not. For example, you could use this formula
and make a cover for the nook or even an ipad.
I found this formula to be extremely helpful.
After calculating and using my handy dandy formula
(and rounding to the nearest whole number) I cut all my material as follows.
I have numbered all the pieces to make my instructions easier.
The numbers will be used throughout the tutorial.
*Piece 1: 9 x 12.5 inches (main fabric)
*Piece 2: 9 x 12.5 inches (main fabric)
*Piece 3: 10 x 13.5 inches (matting)
hint: you want the matting piece to be slightly larger
than your two main pieces 1 and 2
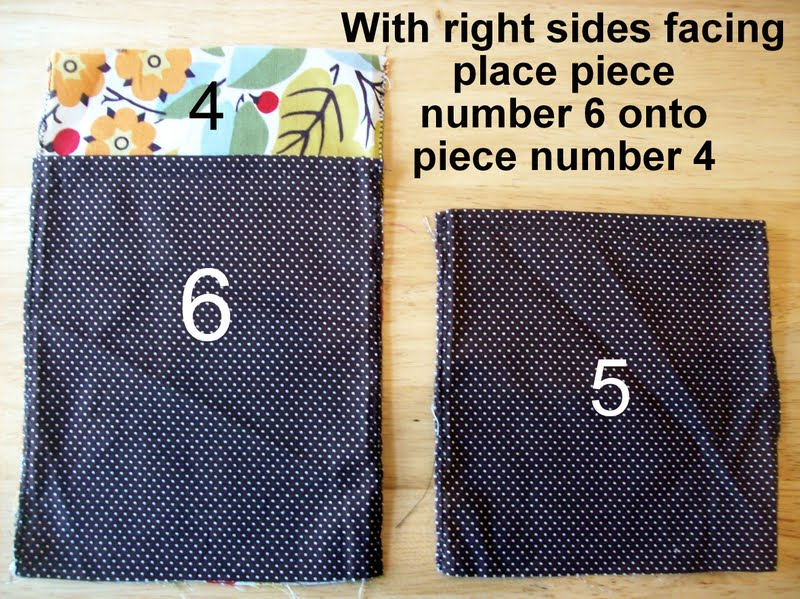
*Piece 4: 9 x 6 inches (main fabric)
*Piece 5: 7 x 6 inches (contrasting fabric)
*Piece 6: 8 x 6 inches (contrasting fabric)
*Piece 7: 3 x 6 inches (contrasting fabric)
* Piece 8: 3 x 6 inches (contrasting fabric)
Piece 9: 3.5 x 6 inches (matting)

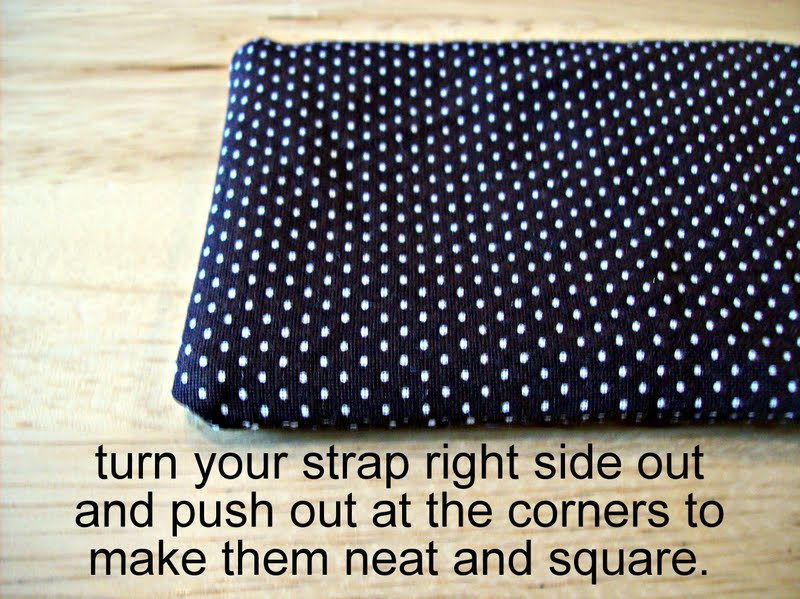
To make the strap:


You only want to sew up the three edges so you can turn in right side out
with the matting in the middle. Cutting the extra fabric off the corners allows
for your corners to look neat and square instead of bulky.

Viola!
A beautiful strap!
To make the inside pocket piece:

Only hem the tops of pieces 5 and 6. Leave the bottom edge untouched.

Sewing the zigzag stitch will help prevent fraying along the edges.
Again leave the bottom edges untouched on each piece.

When you are done only the top pieces of 5 and 6 should be hemmed and
pieces 4, 5, and 6 should have the zigzag stitch along each side edge of fabric.
Leave the top of piece 4 untouched as well as the
bottom edge of each piece.

Turn your pieces over so you are looking at the front of them.
You are now going to pin the three pieces together and then sew into place.
This will form two pockets for the inside of the kindle cover.

Turn the pocket piece over again so you are looking at it from the back and
fold in the edges with the zigzag stitch only and pin into place.
You are only going to hem along the two side edges with the zigzag stitches.

This is what it should look like when all the pocket pieces are sewn together.
Hemming along the zigzag stitch sews all three pieces together.

Putting it all together:

You want the matting piece to be larger than your two main pieces because it
makes sewing it all together easier. You can trim away excess later.
Right now we are going to lay all the pieces on top of each other as
follows and then sew them all together as one piece.

Once you have placed the pocket piece on top of piece number 2
take your number 1 piece (with wrong side facing you) and lay it on top.
Piece number 1 should look inside out right now. Not to worry once you sew
it all up you will turn it right side out again. Pin along the edges described below.
Leaving the right side edge unpinned.

Starting from the right side bottom edge start to sew a straight stitch
around the pinned edges. Do not lift your needle out of the fabric
during this step, until all the way around.


Finally once you have sewn around the three pinned edges. Turn your work
right side out. This is what it should look like. With the right side edge still open.

For this final step we are going to sew the right edge of the cover while sewing the strap into place and continue around the entire edge of the cover to make for a neat, stylish finish. Fold in the bottom piece of fabric and the matting and pin into place. Place your strap where you want it and pin that into place. Finally fold in the top piece of fabric and pin it all together to seal it all shut. See below.
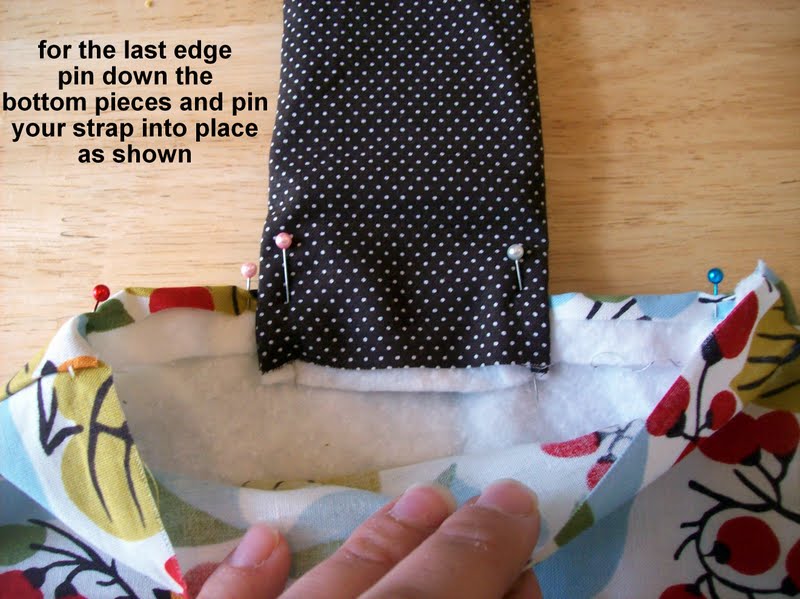

For this last part. Just be sure to catch every piece of fabric in the “last pinned edge” so
that it all comes together neatly .
Starting at the top right corner (where you have pinned it shut). Sew a straight stitch through all the fabric all the way around the kindle cover. This will make for a neat finish and close up the last edge.

Phew: hang in there it’s almost done.. and looking beautiful!

Sewing the Elastic:

I wanted this not only to be a cover to protect the kindle but also something that could hold the kindle in place while reading it. I might as well be stylish while I’m reading right?
First I cut a piece of cardstock to the measurments of my kindle to use it as a reference. Using elastic that I measured and cut to fit around the corners. I folded in the edges of the elastic and pinned and sewed into place. They ended up working really well, and didn’t even interfere with the screen.
Finishing Touches:

Iron out any wrinkles and iron on your velcro.

TADA!!!
I can’t wait to give it to my mother in law for Christmas!

Come by sometime and visit us! We are hoping to have all our Christmas projects done before Thanksgiving so we can sit back and sip hot chocolate all holiday season long. (haha ..here’s to hoping!)
Lastly, here are a few of my other tutorials. Enjoy!
Birthday Box Tutorial: with the cutest magnets and bows ever!


There is definately a great deal to learn about this topic.
I like all of the points you have made.
Terrific work! This is the kind of information that should
be shared around the net. Disgrace oon the seek engines for now not positioning thiks publish
higher! Come on over and talk over with my web site .
Thanks =)