If you are looking for wonderful ideas on how to have a handmade holiday, you have come to the right place! Welcome to our Bake, Craft & Sew Along! Please skip on over to According to Kelly to see a crafty inspired gift and A Southern Fairytale for edible yumminess that will be perfect this holiday season.
Still need more ideas? Be sure to check out all the Made By You Monday links below. Please share your tutorials and ideas for the perfect holiday gift!

 Yesterday was Brian’s sister- Melody’s- birthday. She’s currently in college. I remember as a college student I was always in need of pretty things. Pretty pillows, pretty sheets, pretty shower curtains, pretty plates, pretty glasses. SO, that’s what I decided to get for her.
Seeing as it was too late to order something online, I thought the local Target might have something to that effect. To my delight they had some totally kitchy Orla Keily fruit tumblers online….online….being the keyword. Their in-store selection was quite another story all together.
Sure, they had kitch. They had kitch in every plastic form imaginable. But ask for a sea foam ceramic bowl or a flower patterned high ball glass, you’d be plum outta luck.
So disappointed, I found myself back at square one. Ugh. I had a couple hours to go until the party and didn’t have a hallmark card to my name. Desperate, I went through my fabric stash and happily found my plan B.
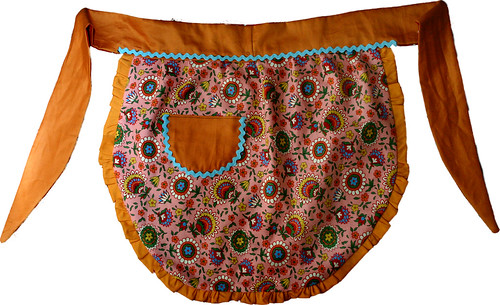
 Still, kitchen related….I whipped up a reversible cottage chic cooking apron. I had never made an apron before but they seemed easy enough. I didn’t have time to go out an buy a pattern so I simply measured and cut and came up with this.
Now, I know there are some AMAZING apron patterns out there! If time were on my side, I would have went out and purchased one because I lLOVE the way some of them look! But, I just wanted to show everyone that if you don’t want to spend money on a pattern or don’t have time, you can make one yourself
I think it’s the perfect last minute project for any young girl, whether mother or college student….or both….especially if both!
Melody, now one year older and one apron richer, was kind enough to pose avec apron.
If you ever find yourself in a gift giving pickel here’s how I did it (in only 2 hours!)….
First I cut two pieces of fabric 18″ x 24″. One of the front blue flower pattern the other of the pink and orange pattern. I folded them in half and rounded the bottom left corner creating a wide U shape when open.
Second, I cut two 1.5″ strips. One was the contrasting polka dot pattern, the other was the solid orange trim. Both were twice the length of apron from the top left side of the U shape, around the bottom and to the other top right side.
Third, I cut two 3″ by 48″ strips. One was the contrasting polka dot pattern, the other was the solid orange trim. You can cut the ends to a point if you’d like.
 Fourth, I sewed the 1.5″ strips, right sides together, around the two short ends and one long side, leaving one long side unsewn. I turned it right side out and then ironed it flat. Then gathered it. Here’s an online tutorial on how to gather if you don’t know how.
Fifth, I cut out four 4″ x 4″ squares (one polka dot patten, one blue flowered pattern AND one orange solid color and one pink and orange pattern) and rounded the bottom corners.
Sixth, I took two and sewed the right side together on three sides. Turned right side out, folded the unsewn side inward so that no raw edges were showing then stitched across the top. I repeated this with the other two pieces. Thus making two pockets. I then sewed one pocket on three sides onto one of the 18″ x 24″ rectangle and did the same with the other pocket and rectangle.
Seventh, I sewed the two 18″x24″ pieces together right sides together with the ruffle trim wedged between the two, leaving the top of the apron unsewn. Turn right side out.
 Eighth, I then slightly gathered the top of the apron.
Ninth, I sewed the two 3″ by 48″ strips together around the two short ends and top long side, leaving the bottom long side unsewn. I turned it right side out and then ironed it flat. I then folded the the the unsewn side inward so that no raw edges were showing, slipped the gathered apron in between and centered, then stitched across the top.
Now it is your turn to share your handmade gift ideas!


Chewing through this considered argument against AGW will take me some time…
OH I LOVE those aprons!!! Thanks for hosting another awesome party!! 🙂
DARLING apron! Thanks for hosting another great party 🙂
I have an extreme weakness for aprons! You must have read my mind–because I’ve been itching to sew one up. This is perfect! Now, if I could just do it. 🙂
That apron is super cute! I really need to make some. Sorry to link a recipe today, I need to get my “craft on”! 🙂
Thanks so much for hosting!
~Liz