Learn how to make stickers in a few easy steps. Yes, you can make homemade lick and stick stickers. These stickers really work and the possibilities are endless. So get ready to make your own stickers!

Make Your Own Stickers!
It is easy to make your own stickers. Once you have your stickers they can decorate note cards, lunch sacks, favor bags or make adorable stickers for gift wrapping with matching gift tags. Around here one special four year old has requested an alphabet book. Finding all of the letters and items that begin with the letters in our magazines will keep us busy!
DIY Stickers Supplies
- gelatin
- light corn syrup
- flavoring extract (We used LorAnn’s flavoring
 (in apple) but you can also use the extract from the spice aisle at the grocery store.)
 - wrapping paper, pictures cut from magazines etc.

How to make your own stickers
If you have ever wondered how to make stickers just follow the recipe below. You will have fun creating with your kids!
How to make stickers
Ingredients
- 1 envelope 1/4 oz unflavored gelatin
- 4 tablespoons boiling water
- 1 teaspoon light corn syrup
- 1/2 tsp flavoring extract less if using professional strength flavoring
Instructions
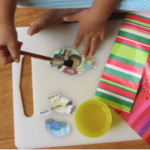
- Add gelatin to the boiling water and stir until dissolved. Stir in corn syrup and flavoring. Paint sticker gum on backs of pictures cut from magazines or pieces of wrapping paper. After the backs of papers are coated allow to dry completely.
How to make stickers
Add gelatin to the boiling water and stir until dissolved. Stir in corn syrup and flavoring.
 Paint sticker gum on backs of pictures cut from magazines or pieces of wrapping paper.
 After the backs of papers are coated allow to dry completely.

Once the paper is dry use punches to cut out fun shapes from the wrapping paper. Once you have all of the shapes cut out —- lick lick away!
 Then stick! Bella was thrilled to learn how to make stickers! What fun!

Note: If you have leftover sticker gum it will harden into a gel. To re-use, heat until it becomes liquid again then you can make your own stickers again.
Now that you know how to make stickers you might like more fun ways to keep little hands busy!


I have only tried with corn syrup. It is thicker than regular table syrup. If you try please let us know.
Wow.. very simple… can be tried easily…
BTW we can use any kind of syrup, right… if the light corn syrup isn’t available ..??
Gosh Becky I just don’t know the answer to that question. Maybe someone could help?
How about boiling a little sugar and water to make a thick sugar syrup?
i live in india and we dont have corn syrup here, Any subsitutes ?
This is a great safe way to show little kids how to make anything into stickers. I will have to share this with my wife so she can share this with her young students.
Thanks you
Ha! This is such a cool idea! (Gotta love Stumbleupon 😉 My twins are going to love this.
Awesome it was so much fun although i don’t like the taste:):):):):):)