A homemade rice heating pad is super-simple to make and works great on achy muscles.
Spa gifts are extra useful and appreciated homemade gifts. This sugar scrub makes skin feel silky smooth. What a great way to take care of friends and make them feel special
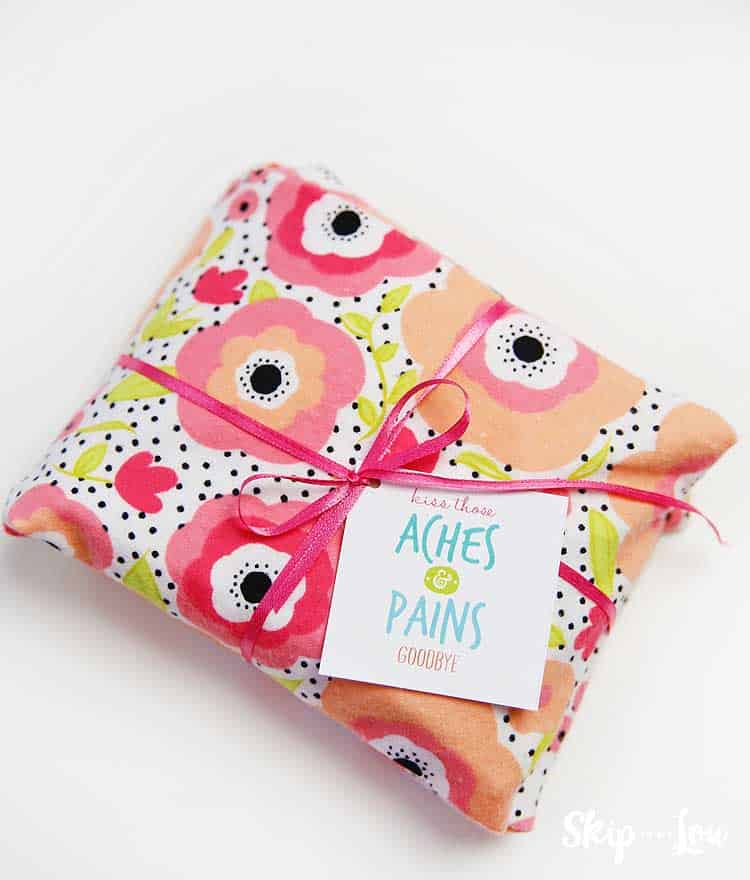
I made this rice heating pad for a friend recovering from surgery. It was part of a special post surgery care package I sent her. They also make a great addition to a spa basket. You might also like to make one of these DIY beauty products.
Rice Heating Pad Supplies
- 1/3 yard flannel (this will make two, a 1/4 yard will make one but wastes a bit of fabric)
- 1/3 yard muslin
- about 3 cups of white rice per
- thread
- sewing machine
- essential oils
- gift tags (these are black and white and you can print on colored cardstock if you would like colored gift tag see below)

How do you make a rice heating pad?
This is a really simple rice heating pad to make. Make them any size you need. Smaller ones make great hand warmers. If you don’t sew you can always fill a sock with rice.
- Cut muslin 6 inches wide by 17 inches long (when folded) When you open the fabric it will be 6″ X 34″
- Cut fabric 6 inches wide by 18 inches long (when folded) When you open the fabric it will be 6″ X 36″

- Turn under each end of the fabric about 1/4 of an inch and top stitch.

- With right sides together overlap ends of fabric about 1 1/2 inches.

- Sew along each side with 1/4 inch seam.

- Sew around muslin leaving a 2 inch opening for turning and adding the uncooked rice.

- Turn muslin right side out.
- Turn flannel fabric right side out.

- Add about 10-20 drops of essential oil to the rice. The addition of essential oils gives the rice heating bag aromatherapy benefits.
- Fill muslin bag with 2-3 cups white rice.

- Stitch the opening in muslin bag shut.

- Place the rice bag into the flannel cover and you have made a rice heating pack! Easy at that. What a great idea!

How do you use hot and cold packs?
To use as a hot pack heat in the microwave at 1 min intervals. Two minutes should do the trick. To use as an ice pack, keep in the freezer and pull out as needed.
Here is the little poem included with the gift tags:
This little pillow filled with rice,
Is such a comfort that’s extra nice.
Microwave for 1 to 2 minutes on high
And kiss those aches and pains goodbye.
Apply it to the troubled spot,
The heat will ease the pain a lot.
Or warm those little toes, so cold
You’ll find this nice to have and to hold.
Or freeze it for a little while,
And fix that pain up in style.
Instead of a compress made of ice,
Use this pillow filled with rice!
How long does a rice heating pad stay hot?
The heated rice heating pad will stay warm for about 30 minutes.
Can you wash a rice heating pad?
This pad has a slipcover that can be washed. Remove the cover, wash, dry and replace. I would not wash the inner bag with the rice.
How to give
These rice therapy bags make useful Christmas gifts too! This one I made from my mother’s flannel nightgown.

Wrap them up with these cute gift tags. For $3.95 you will receive an immediate download of four pages of gift tags in different holiday colors along with one page of black and white gift tags (these can be printed on colored cardstock of your choice). Each page has circles tags, instruction tags, and poem tags. BUY NOW.
If you love making handmade gifts you will love my Wrap Up a Handmade Holiday Bundle (3 pages of rice heating bag tags are included in this special offer. LEARN MORE.


Kim, I haven’t had any trouble. They aren’t in the microwave very long, but cotton fibers are safest. Here is what I found on the internet.
To avoid fire in the microwave, use 100% natural fiber threads like 100% cotton or 100% rayon, as synthetic threads (polyester, nylon) melt and burn; ensure the thread label clearly states “100% cotton” and avoid anything with metal, tinsel, or plastic components for microwaveable projects like bowl cozies or hand warmers.
Do you need to use a certain type of thread? I have heard of you don’t, the microwave can start it on fire?
The rice heating pad tags say “kiss those aches and pains goodbye”
What do the christmas gift tags say at the top? The style is very cute, good job!
can yu add the print option? I do not care to email from work . I do not use my personal as all my printers are at school.
Thanks, Julie, I will try to remember next time or try to edit the photo. For all my projects I make I am actually gifting so sometimes it is hard to use a contrasting thread, but I should figure something out to make it easier to understand. Thanks for the feedback and the tip about burns.
It would be helpful for your tutorial to sew in a contrasting color thread so that we can actually see where you sewed.
Also, be careful when using these, especially with elderly folks, they can get hot and cause burns. Great if used with care!
how do I print these without all the ads. I would be willing to buy these patterns rather than to have all these ads. Thank you. Marcia
Have you published a printable version?