Welcome to the Bake Craft Sew Along! If you love to sew then you won’t want to miss a day of sewn handmade gift ideas. According to Kelly is featuring gifts that can be crafted and A Southern Fairytale is sharing recipes perfect for making edible gifts! Don’t forget to enter our SEW Amazing Giveaway. Just visit Family Ever After today.

I am so excited about the gifts I’ll be sewing to give to all my sisters this year for Christmas. It’s a mini chalkboard bunting. (And I’m giving one away on my blog, so stop by Family Ever After to enter)!

I’ve already made about ten of these, and given them all away. They make the perfect house warming gift, going away present, baby shower gift, thank you gift, or just a simple gift for a dear friend, with just the right amount of handmade effort. Chalkboard fabric (or chalk cloth), is what makes this bunting unique. There are all sorts of fun, happy, welcoming phrases that can be written (more on that later). These take less than an hour to make. Let’s get started!

Supplies:
Template- You can download my free template here. It’s 4.5 inches from top to bottom.
Chalk Cloth- I got mine from Sisters and Quilters. You need a fat quarter.
Bias Tape- I either make my own, or find unique tapes on etsy. It needs to be double folded, and you need about 3 yards.
Felt- This is a great way to stabilize your triangles. 2 sheets of felt is exactly enough.
Oil cloth (optional)- If you want to make your bunting 2 sided, you can cut triangles to be sewn to the back of the chalk cloth instead of the felt.
Thread- matching or contrasting (your choice)
Rotary cutter, ruler, cutting mat, sewing machine
Directions:
1. Cure your chalk cloth, by rubbing a piece of chalk all over it, or embedding chalk dust in a piece of scrap fabric, and rubbing that into your chalk cloth. Delia explains this really well in a tutorial she did for a similar, larger scale bunting. (You’ll love her pictures).
2. Determine how many triangles you want to cut. I like the idea of making 14, which gives a set of 5 and a set of 9.
3. Cut strips of chalk cloth to be 4.5 inches tall x the width of your cloth.

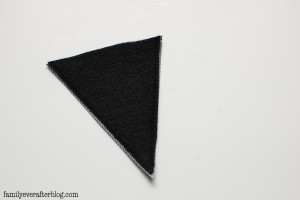
4. Cut your chalk cloth into triangles using the template as a guide. You can cut through 2 layers at a time if you have a sharp rotary blade. Flip the template over so you cut like so.

5. Cut your felt or oil cloth into triangles using the template as a guide. Make these just ever so slightly smaller than the front triangles of the buting. I can get 10 triangles out of one sheet of felt (as pictured).

6. Sew chalk cloth triangles to felt. I don’t sew across the top, or backstitch, since the top edge of the pennants will be enclosed in the bias tape. When sewing, I start on the right edge of the triangle, following the inside of my presser foot as a guide. Once I get to the tip, I pivot and sew the other side. It’s helpful to keep your machine in the “needle down” position. Be sure that the felt was sewn securely to the front. Trim excess felt if necessary. Also, at this point, if you want to make your triangles more quirky, you can use pinking shears or other fun scissors to cut the edges.
Front:

Back:
7. Get out your bias tape. I use about 1 yard for the set of five triangles, and 2 yards for the set of nine triangles.

Open the bias tape to insert the pennants.

Line up the triangles how you’d like. You can pin them in place, but I love to use wonder clips. I space the triangles about 1/4″ apart. I also like to leave about 7 inches of bias tape hanging off the ends before adding in the triangles.

8. To begin sewing, I fold the raw edge of the bias tape over twice, sew that down and backstitch, then pivot my needle and start sewing the bias tape shut. I follow the inside edge of my presser foot.

I like my stitches to be right at the edge of the bias tape. Again, I like to sew with my needle in the down position, so if the bias tape starts to bunch up, I pause from sewing and lift my presser foot and adjust everything.

That’s it!
I like making two buntings, one with five pennants and one with nine. This is perfect for many cute, useful phrases like…. “Merry Christmas, Happy Halloween, Lemonade Stand, Favorites Party, Happy Birthday!, Thank you _____, etc.”

I found this Bistro chalk pen online, which I love because it doesn’t smudge, but it wipes right off. You can also use regular chalk.

Don’t forget, I am giving one away over on my blog, so don’t forget to stop by and enter to win!


SEW Amazing Giveaway worth over $1000
Stop by Family Ever After for more sewing inspiration and to enter the SEW Amazing Giveaway today (you get a new entry everyday)! I am giving away more than $1000.00 worth of sewing goodies! You won’t want to miss this!


So cute! I went to print out the template and it says that page no longer exists. Could I get it emailed to me?