I LOVE all the fabulous projects at the Holiday Sew Along at Skip to My Lou!
Watch out friends – everyone is getting a homemade goodie for the holidays!

Anyway, I am Holly, and 504 Main is my home away from home where I entertain, cook, create. I love making a mess and sometimes that turns into a brilliant craft…and sometimes not. That about sums it up!
Today, I am sharing an idea that I came up with as a solution to one of my own “little” problems, but after a few people saw it and loved it, I thought this just might be a great gift!

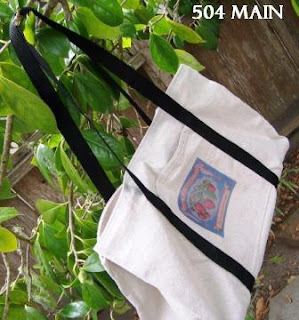
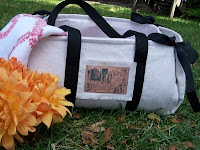
I LOVE going to the Farmers Market…(and I also bring my own bags when I shop anywhere). But you know what I cannot stand – the fresh produce (especially the strawberries) getting smushed in a bag as I walk around the market. I wanted a sturdy flat-bottomed tote bag to keep my strawberries firm, my lettuce crisp, and whatever else I come up with safe and fresh. And I added a pocket – you can always use an extra pocket!

- About 1 1/2 yards (this gives you extra) Canvas, Denim, Duck Cloth (6-” wide) – I used a Drop Cloth. If you cut/place carefully, this pattern can probably be cut in one yard of fabric.
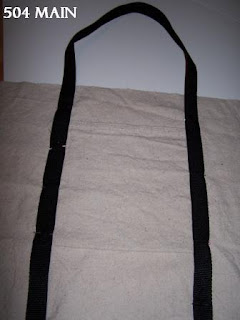
- 104″ (approx. 3 yards) of 1″ Webbing in coordinating color (OR you can make strapping with the fabric)
- Luan or 1/4″ plywood (you cold easily use foam board or a heavy plastic but I really wanted a hard-bottomed bag, so I chose a lightweight (inexpensive) wood.
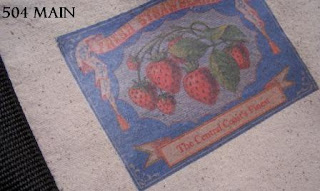
- Optional: T-Shirt Transfer Paper and vintage graphic from The Graphics Fairy. Strawberry Label.
- Scissors
- Sewing Machine
- Heavyweight needle (denim)
- Matching or contrasting thread (and bobbin with thread)
- Pencil/Fabric Marker
- Large sheet of paper for making pattern
- Iron/Ironing Board
- Yardstick/Ruler/L-Square
- Pins
How to make a Farmer’s Market Tote
***All seam allowance is 1/2″ unless otherwise noted***
***I prefer to WASH fabric prior to cutting sewing for these bags.”
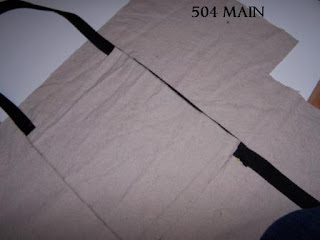
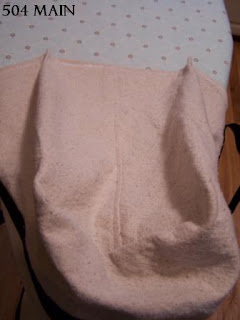
- Bag piece: CUT 1 on the FOLD. Make a rectangle 25 inches wide and 15″ long. At the bottom of each corner, measure in (from side) 3 1/2″ and measure up (from fold) 3″. Make a “notch”/cutout on each side using these measurements.
- Facing: CUT 2. Each is 25″ long and 4″ wide
- Pocket: CUT 1. I used the edge of my drop cloth as the hem. (If you are adding a hem) Use a 1.5″ hem. Cut pocket 9 1/2″ x 8 1/2″ (this measurement is with a top hem). Cut 8″ x 8 1/2″ if using (already sewn) drop cloth hem
- Bottom Pocket: CUT 2. 19″ long x 8″ wide. Use a 1/2″ seam allowance on the bottom of the pocket and a 1 1/2″ hem at the opening.


7. Place the pocket; press pocket over 1 1/2″ and top stitch a hem (if you are not using the finished drop cloth hem), then fold up 1/2″ on the bottom and top stitch that too. With bag laying flat, measure down (from raw edge) 3″ place pocket straight across at that 3″ point (pin if you need to to secure) – YOU NEED TO TUCK RAW SIDE EDGES under the strapping and pin to secure while sewing. The pocket gets sewn to the bag as you sew the strap.

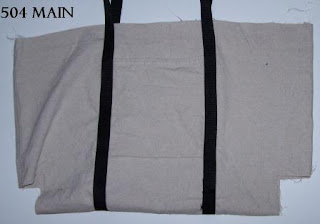
9. Fold bag with right sides together and stitch sides together. Now you can serge them (if you have a serger) or press and top stitch the seam, facing toward the back.
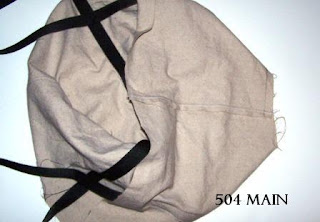
10. Lay bag flat, right sides together and then at the corner “notches” fold to match up to sew them together.
11. Sewing facing side seams (short, 4″ sides) together. Either overlock/serger the bottom edge of the facing of flip it up 1/2″ and top stitch a hem. With right sides together, match up facing to bag and stitch at 1/2″ (typically 1/4″ is fine for a seam like this, but I like 1/2″ for these bags).

12. Flip bags, press and top stitch at the top of the bag. I actually used a zig zag for the top stitch – just for a “style-thing.” Contrasting stitching would look great too.
13. I decided to define my corners, so I folded the (imaginary) side line and tacked for about 1″ at the top of the bag.
14. Trim thread/strings and press bag to prepare for decoration. Print out graphic from the computer onto Transfer paper – be sure to use mirror image if there is writing/text. Apply the graphic to the pocket using instruction from the transfer paper.
I made up a fold-away picnic basket a couple of months ago, that I think is also a great gift. In fact, this bag looks very similar (but simpler to sew) and is inspired by the picnic basket.
************************
Thanks for letting me share my Market Bag!
Come on by and say “Hi!” at Main Street – 504 Main that is…


great tutorial…this solves my problem too! i usually carry a second bag for strawberries and tomatoes…with this i won’t have to! fabulous as always!
Thanks for having me…I realized I never gave the dimension of the cut luan in my tutorial (these things keep me up at night!) I cut mine 16.5″ x 6.5″ that gives a bit of room when you insert it in the pocket so that it is not too tight. Thanks again! Sorry about that!
I am obsessed with market totes! What a good gift idea too!
Jenna
callherhappy.com
This is sooo cute Holly!! I love the drop cloth – and I love how big it is!! Perfect and roomy!
Wonderful tutorial Holly!
I would never had thought of using a drop cloth, great idea!