
Have you tried creating 3D papercraft? The finished project is so cool and with this step-by-step tutorial, I think that you will love the whle process! It is one of my favorite paper crafts.
You’ll also enjoy learning how to Make an Origami Crane and this 3D Paper Craft Lizard.
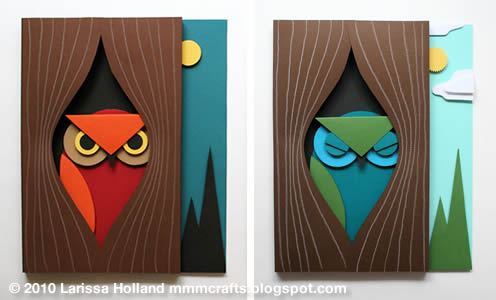
Left: art made with this tutorial, Right: art made with alternate colors
(see note at the end of the tutorial)
This 3D paper owl craft project is for you and your crafty older kids, say around 11-ish years and up, who can wield a pair of scissors, handle smallish pieces and follow placement instructions carefully. Finished size of the art project is 8 x 10 inches.
Moms: You can definitely make this a paper craft for kids by cutting out the shapes for younger kids, and skipping the pop dots and folding. Just cut off the folded flaps. You could also make just the owl and skip the whole background, and it will still be plenty o’ fun!

Paper owl craft Supplies
Alrighty young crafters, here’s what you will need to make the nighttime owl pictured above:
- my PDF download with all the pattern pieces (get it here)
- printer
- ruler
- clear tape
- butter knife for scoring
- 8.5 x 11 piece of poster board (you can cut one from a larger piece)
- 8.5 x 11 inch heavy scrapbooking paper (heavier than construction paper) in the following colors: orange, brown, dark teal, black, light brown, red, and yellow. (if you want to make a daytime owl, see note at the end)
- scissors
- glue stick
- gel paper glue for the small pieces
- 1 inch circle punch and 5/8 inch circle punch (see templates on the first page of the PDF file if you don’t have a punch)
- 1/2 inch diameter (1/8 in. thick) round pop dots
- white or gray colored pencil
- bold sense of crafting adventure
Got all that together? Let’s make some mad papercraft 3D art.
Print the paper owl template
Step 1: Print out the pattern pieces!
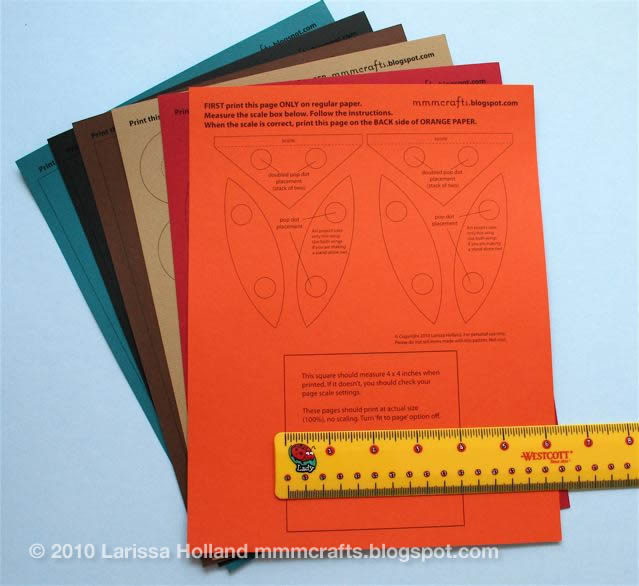
Make a test print of the first page on regular paper and measure the guide box with a ruler to be sure you are printing at the correct size.
Once you are sure the scaling is good, follow the instructions on each page to print them on different colors of paper. You won’t be printing on your yellow paper.
NOTE: some will be printed on the front and some on the back of the page! If your paper is not textured and looks the same on both sides, don’t bother with this.
Step 2: Score all your folds.
 (the hand that would be holding the ruler was taking the picture, but you get the idea.)
There are three folds to score, two on the brown paper and one on the orange paper. Line up your ruler against the dotted line, and firmly score along the line using your butter knife. Do this a couple of times. This is making a nice dent in the paper so that when you bend the paper your fold will be easy and clean.
Cut out paper owl pattern
Step 3: Cut out one each of your pattern pieces with scissors.

Some of the pages will have duplicate pattern pieces, but these are extras just in case you mess up. When it comes to cutting, slow and steady wins the race. Here are some cutting tips for you:
- Rough cut shapes away from the rest of the page first. Then cut them out on the lines.
- Don’t try to cut the whole shape in one continuous direction. Cut it in stages and from different directions to make it easier.
- Cut inward-facing angles first from one side to the point, then from the other side to the point, and let the pointed piece fall out.
- Turn your paper in your hand as you cut curves.
- Remember it doesn’t have to be perfect to look awesome!
Step 4: Punch out some circles.

Using a 1 inch punch, make three yellow circles. Using a 5/8 inch (or 1/2 inch) punch, make two black circles. Set them aside with the rest of the pieces.
If you don’t have circle punches, use a compass or you can print the templates provided on the first page of the PDF file.
Step 5: Put the background together.

Use the glue stick on the back (the side with the lines) of the 8 x 10 inch dark teal piece. Get glue on all the edges and then zig zag it down the middle.
Now place it on the letter sized piece of posterboard – it will probably stick better on the non-shiny side of the posterboard. Don’t worry about lining it up with the edges, you’ll be trimming the extra off. After you smooth it down, trim the extra poster board off the edges.

Use the glue stick on the back of the large black piece (the side without the oval on it). Carefully line it up with the left, top and bottom edges. Smooth it down.
Assembling your paper owl
Step 6: Put the owl together.
 Hard to see here, but the guidelines will be showing on the red.
Use the glue stick on the back of the red oval (the side with no lines). Line it up with the oval guideline on the black piece and smooth it down. (Hopefully even though this is black paper you will still be able to see the guideline on the black like I can.)


Put two single pop dots on the back of the orange wing where shown. Line up the wing with the guideline on the red oval and stick it down. Ooh. It’s 3D.


Cut a pop dot into quarters with scissors. Yep, that is small, but you don’t want the pop dot to show from behind the beak. Put one tiny pop dot piece on the back of the black beak and place the beak on the light brown ruff using the guideline.

Use gel glue (less is more) on the black circles and place them in the center of two of the yellow circles. Now you have two owl eyes! Wait a minute or two for the gel to dry.

Place one pop dot in the middle of the back of both eyes. Glue the eyes down over the guidelines on the light brown ruff piece.

Flip over the light brown ruff and put two single pop dots on the back. Place it on the red oval on the guidelines.

Now for the triangular orange…ears. Or whatever they actually are. Anyway, they look like ears. Fold the scored flap toward the pop dot side, and place two double pop dots where shown by the guide (double means two that are stacked together).

Flip it over and place it on the owl’s head, centered with the beak, and lined up with the remaining guideline. Man! Your paper owl looks wicked fierce. Make some hooing noises – you know you want to.
Creating the tree for your paper owl
Step 7: Put the tree trunk together.

Flip your tree trunk pieces over to the blank side. Now, summon up your artistic muse and use a white or gray colored pencil to create bark lines all down the tree trunk. Curve them around the knot hole. Groovy… very tree-like.
Fold the scored flaps toward the back and crease them. Unfold them.

Lay the left tree trunk bark side down, lined up to the left edge of the background. Tape it where the edges meet.
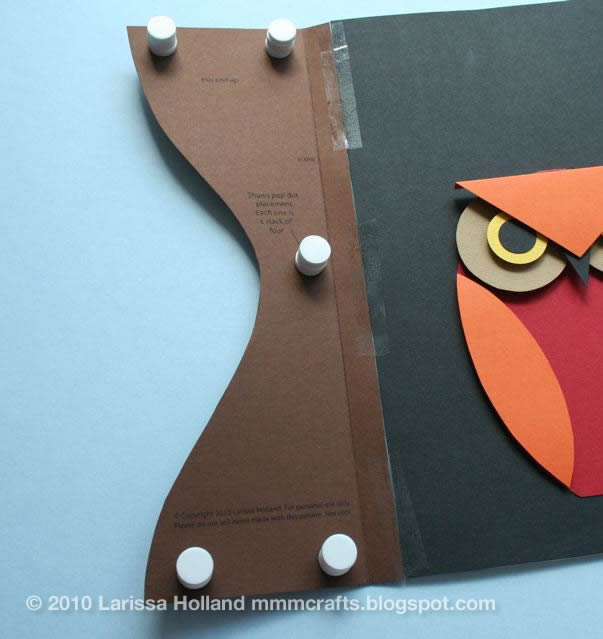
Place a stack of four pop dots on each place indicated.

Crease your flap again, then fold the whole piece carefully over and stick it down over the owl, making sure your fold is at right angles. Don’t push it firmly down until you are sure the side is straight up and down.

Now repeat those steps for the other side, except this time line the right tree trunk up to the edge of the black paper on the right (NOT the edge of the art). Tape it where the edges meet. Place a stack of four pop dots on each place indicated.


Fold it over and stick it down over the owl, making sure your fold is at right angles before you press it down. The tree pieces should overlap slightly and hide the bottom of the owl. Voila! You are almost done!
Step 8: Put the moon and trees on.


Trim off 1/4 inch of the side of the remaining yellow circle. Put a pop dot on the back. Place it about an inch down from the top on the teal background, with the cut side against the tree trunk.

Put pop dots on the back of the black trees piece, three or four singles should do it. Place it lined up against the bottom edge and against the tree trunk.
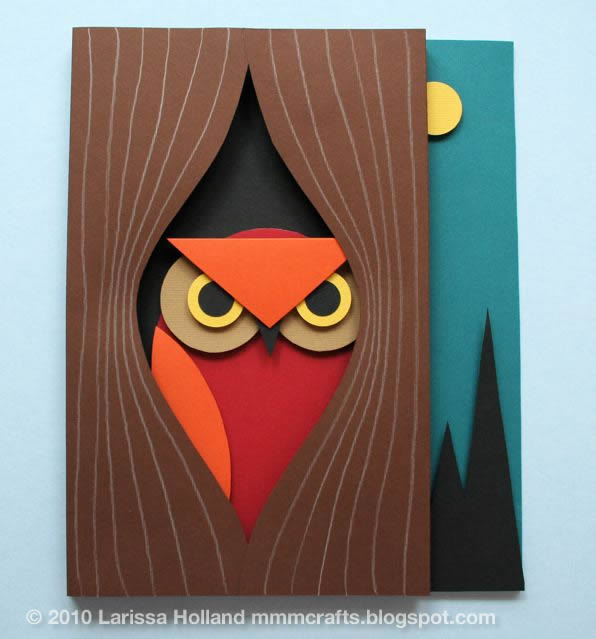
Your awesome piece of 3D paper art is done! Step back and admire it. Whoooo’s a paper artist? You are, that’s who!
More paper owl craft ideas
Want to do it again? Here are more options:

- Try it again using light blue paper for the sky and green for the small trees to make it seem like day-time! Add rays to the moon to make it a sun… maybe add a cloud or two.
- You could make the owl’s eyes closed by layering a semi-circle on top of a circle. Owls like to sleep during the day! (Hmm. Kind of like kids who are out of school.)
- Try making just the owl in different colors as decorations for your room.
- Use your leftover paper pieces to create more paper art of your own design or recycle them.
- Your finished owl art can be displayed in an 8 x 10 shadowbox frame or by itself.
Many thanks to the gifted Larissa from mmmcrafts for this unbelievable 3D paper owl template. These easy owls make an amazing craft for kids – or a craft for teachers appreciation gifts.
Need Crafts? We have you covered:
I would love to keep you fully stocked with creative ideas, yummy recipes, fun crafts, and loads of free printables. Subscribe to Skip to my Lou to get new ideas delivered to your inbox. Follow me on Facebook, Pinterest, Twitter, and Instagram for all my latest updates.


Loved your owls! Thank you!
Hi there! I am an elementary teacher and I would love to do this project for our art show, but I wanted your permission. Would it be okay for me to use this template for my class?
I would love to add this to my Pappercuts pinup @ Pinterest, but, I’m not sure how to. Can you add a Pinterest button to your saddress?
I love this! So well done!
I can’t download the pattern PDF 🙁 Is there another way to obtain it?
Don’t rein yourself in at all! It’s so insightful. Summarizing the story in a sentence is a great idea. Very hard to do.
AWEOME! I am CASE-ING it in 4.125 X 5.5 greeting card size! TFS
What a cute project I am going to do thia onewith my grand kids. Thank you keep up the great stuff.
I made two of these today, a daytime and a nighttime owl, and they came out great! I love them and can’t wait to mount them in shadow boxes. Thanks for the detailed instructions and pattern! So cute.
This is really cute! Lovely! I’m trying to do…
This is ridiculous! I can’t believe how cute these little owls are 🙂
I love this so much! Thank you for sharing!
This is so amazing. And with the detailed instructions and pattern pieces it even looks doable. Thanks for sharing! I’m featuring the owl in my today’s blogpost: http://tinyurl.com/36ffecx
We teach a children’s craft class in Manila, Philippines and made your 3D owl last month. Thank-you so much for posting this pattern. Unfortunately good craft supplies are few and far between here, so we couldn’t use pop dots or paper. As an alternative we used craft foam and we think they came out pretty cute. You can check out the photos on our blog http://www.ilovecrafts-manila.blogspot.com. Thank-you again!
We made them! My girls, 6 and 8 years, each made one for their room, and I made one for their teacher. Thank you very much for the idea and sharing the pdf with us, and all these thought-through instructions.