Welcome to the Bake Craft Sew Along! If you love to sew then you won’t want to miss a day of sewn handmade gift ideas. According to Kelly is featuring gifts that can be crafted and A Southern Fairytale is sharing recipes perfect for making edible gifts! Don’t forget to enter our SEW Amazing Giveaway. Just visit The Boy Trifecta today.
")
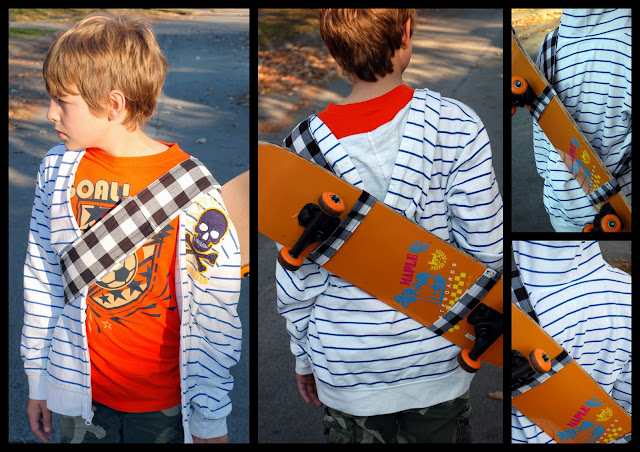
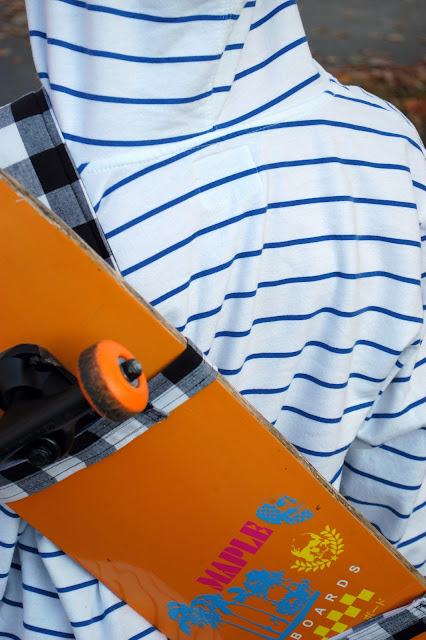
Guys are hard to craft for. And they don’t get nearly as excited about handmade goodness as women do. For these reasons, I like to include a handmade accessory that goes along with store-bought gifts, rather than trying to make their entire gift. This Snowboard or Skateboard Sling a great handmade accessory for any extreme sports lover!

I originally designed this sling to be used with a skateboard, but have since learned that it also works with a snowboard – a perfect handmade accessory whether you live in a warm climate or a snowy one. You could make this out of scraps, and pick up a skateboard or snowboard and some safety equipment and you’ve got the perfect gift for any active guy in your life.
This project is super easy and suitable for a beginner. You do need a couple of measurements from your skateboard before you get started. You need to know the distance between your wheels, and the circumference around your board. If your board is a different size than mine, adjust the length of the fabric strips accordingly. If you’re sewing this for use with a snowboard, you’ll be using the distance between the bindings as your reference, rather than the wheels.
In case you don’t know these measurements, the measurements I provide here work for your average skateboard.
Supplies: Long strips of scrap fabrics, or you could piece fabric together
Fusible fleece
Sewing machine
Velcro (about 30 inches of half-inch wide Velcro)
Coordinating thread
Before you start cutting, it’s helpful to have the following measurements handy:

Cut two pieces of fabric that are 5 inches by 55 inches (for the main strap), and two pieces of fusible fleece that are about 4 inches wide by 54 inches long. Apply the fusible fleece to the wrong side of the straps.
Then, cut two strips of fabric that are 5 inches by 22.5 inches (to wrap around the board). You can adjust these measurements as necessary to fit your board measurements.
Cut your velcro into 5-inch segments.
First thing we’re going to do is make the straps that wrap around the board. To do this, we’re basically turing our shorter fabric strips into bias tape and stitching them closed.
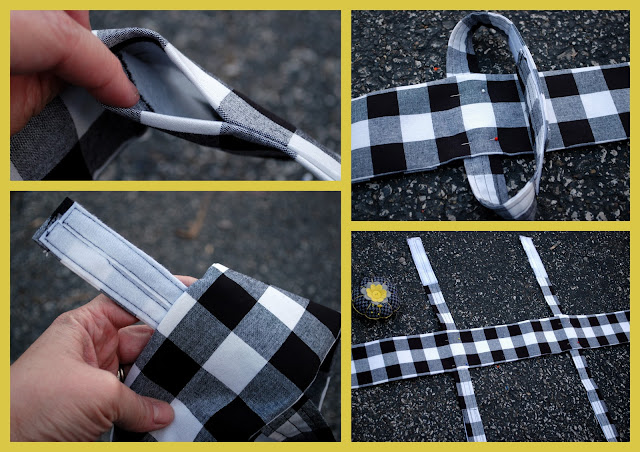
Press your shorter strips in half along the long side, then open your strips and press the edges in towards the center crease. In the first picture on the left, you can see both of the long edges press in towards the center. Make sure to fold the short edge in about half an inch to enclose the raw edge of the fabric.
In the middle picture, you can see that I stitched a few rows along the short edge of the strip to keep those ends folded in, and then sewed parallel lines about half an inch apart all the way down the length of the strip.
Finally, on the right, you can see that I attached two 5-inch velcro segments to each strap end. Make sure that you attach the soft Velcro piece and the rough Velcro piece to OPPOSITE SIDES (and ends) of the strap. So, apply the soft part of the Velcro to one end, and then FLIP and ROTATE the strap to apply the rough part of the velcro to the other end.
Repeat for the second strap.

Next, take the measurement for the distance between your wheels, divide by two, and mark that distance on either side of the center point on your 55-inch-strap. We’re marking where our short strap will attach to our long strap.
Or, if you have the board available, do what I did. Wrap your straps around the board, and then lay the board on the ground. The center point on your long strip (so 27.5 inches) should be in the center of your board. Use pins to mark where your board strap will attach to the long strap.

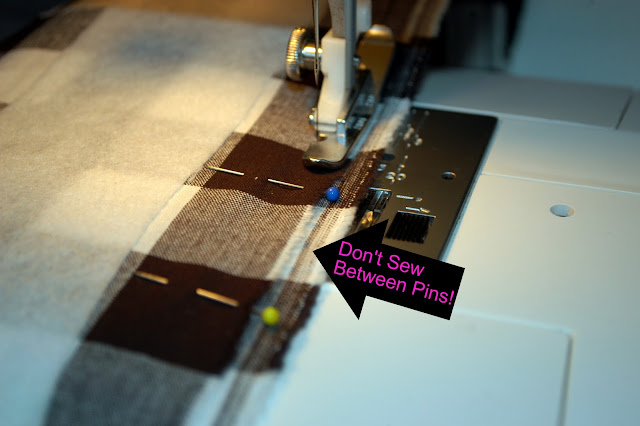
Place your long straps right sides together, and stitch together, making sure to SKIP the places where your pins are (for you to insert the straps later). I recommend starting your seam on a long side, wrapping around one short end, and the back up the other long side.
Turn your strap right side out and press. Make sure to fold your open edge inwards and press that in place too.
Nest, grab your short straps. Find the openings you left in the side seam, and slide your short straps through the openings. Pin in place.
Topstitch all the way around your strap. This will secure your board straps in place.

I went ahead and made a box stitch across the place where the board straps attach, just for added durability.

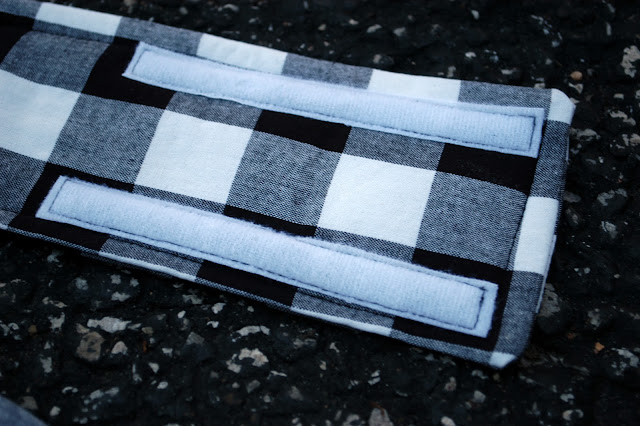
Grab your remaining Velcro strips and apply them to opposite ends of the main strap. Remember to apply the Velcro to opposite ends AND opposite sides (so that when the strap wraps around the body, the Velcro pieces are facing one another).
And you’re done! You’ve got a great, handmade gift for any skateboarding or snowboarding guy in your life.
Looking for some other handmade gift ideas for guys? Stop by the tutorials section of my blog for lots of free sewing and crochet patterns for the boys and men in your life (and maybe a few for mom to0)!
Thanks for having me, Cindy!
SEW Amazing Giveaway worth over $700
Stop by The Boy Trifecta for more sewing inspiration and to enter the SEW Amazing Giveaway today (you only have today to enter)! I am giving away more than $700.00 worth of sewing goodies! You won’t want to miss this!


What an awesome boy project!